mirror of
https://github.com/casey/just
synced 2024-07-20 17:56:56 +00:00
2354 lines
66 KiB
Markdown
2354 lines
66 KiB
Markdown
↖️ 目录
|
||
|
||
<h1 align="center"><code>just</code></h1>
|
||
|
||
<div align="center">
|
||
<a href="https://crates.io/crates/just">
|
||
<img src="https://img.shields.io/crates/v/just.svg" alt="crates.io version">
|
||
</a>
|
||
<a href="https://github.com/casey/just/actions">
|
||
<img src="https://github.com/casey/just/workflows/Build/badge.svg" alt="build status">
|
||
</a>
|
||
<a href="https://github.com/casey/just/releases">
|
||
<img src="https://img.shields.io/github/downloads/casey/just/total.svg" alt="downloads">
|
||
</a>
|
||
<a href="https://discord.gg/ezYScXR">
|
||
<img src="https://img.shields.io/discord/695580069837406228?logo=discord" alt="chat on discord">
|
||
</a>
|
||
<a href="mailto:casey@rodarmor.com?subject=Thanks%20for%20Just!">
|
||
<img src="https://img.shields.io/badge/Say%20Thanks-!-1EAEDB.svg" alt="say thanks">
|
||
</a>
|
||
</div>
|
||
<br>
|
||
|
||
`just` 为您提供一种保存和运行项目特有命令的便捷方式。
|
||
|
||
本指南同时也可以以 [书](https://just.systems/man/zh/) 的形式提供在线阅读。
|
||
|
||
命令,在此也称为配方,存储在一个名为 `justfile` 的文件中,其语法受 `make` 启发:
|
||
|
||
|
||
|
||
然后你可以用 `just RECIPE` 运行它们:
|
||
|
||
```sh
|
||
$ just test-all
|
||
cc *.c -o main
|
||
./test --all
|
||
Yay, all your tests passed!
|
||
```
|
||
|
||
`just` 有很多很棒的特性,而且相比 `make` 有很多改进:
|
||
|
||
- `just` 是一个命令运行器,而不是一个构建系统,所以它避免了许多 [`make` 的复杂性和特异性](#just-避免了-make-的哪些特异性)。不需要 `.PHONY` 配方!
|
||
|
||
- 支持 Linux、MacOS 和 Windows,而且无需额外的依赖。(尽管如果你的系统没有 `sh`,你需要 [选择一个不同的 Shell](#shell))。
|
||
|
||
- 错误具体且富有参考价值,语法错误将会与产生它们的上下文一起被报告。
|
||
|
||
- 配方可以接受 [命令行参数](#配方参数)。
|
||
|
||
- 错误会尽可能被静态地解决。未知的配方和循环依赖关系会在运行之前被报告。
|
||
|
||
- `just` 可以 [加载`.env`文件](#env-集成),简化环境变量注入。
|
||
|
||
- 配方可以在 [命令行中列出](#列出可用的配方)。
|
||
|
||
- 命令行自动补全脚本 [支持大多数流行的 Shell](#shell-自动补全脚本)。
|
||
|
||
- 配方可以用 [任意语言](#用其他语言书写配方) 编写,如 Python 或 NodeJS。
|
||
|
||
- `just` 可以从任何子目录中调用,而不仅仅是包含 `justfile` 的目录。
|
||
|
||
- 不仅如此,还有 [更多](https://just.systems/man/zh/)!
|
||
|
||
如果你在使用 `just` 方面需要帮助,请随时创建一个 Issue 或在 [Discord](https://discord.gg/ezYScXR) 上与我联系。我们随时欢迎功能请求和错误报告!
|
||
|
||
安装
|
||
------------
|
||
|
||
### 预备知识
|
||
|
||
`just` 应该可以在任何有合适的 `sh` 的系统上运行,包括 Linux、MacOS 和 BSD。
|
||
|
||
在 Windows 上,`just` 可以使用 [Git for Windows](https://git-scm.com)、[GitHub Desktop](https://desktop.github.com) 或 [Cygwin](http://www.cygwin.com) 所提供的 `sh`。
|
||
|
||
如果你不愿意安装 `sh`,也可以使用 `shell` 设置来指定你要使用的 Shell。
|
||
|
||
比如 PowerShell:
|
||
|
||
```make
|
||
# 使用 PowerShell 替代 sh:
|
||
set shell := ["powershell.exe", "-c"]
|
||
|
||
hello:
|
||
Write-Host "Hello, world!"
|
||
```
|
||
|
||
…或者 `cmd.exe`:
|
||
|
||
```make
|
||
# 使用 cmd.exe 替代 sh:
|
||
set shell := ["cmd.exe", "/c"]
|
||
|
||
list:
|
||
dir
|
||
```
|
||
|
||
你也可以使用命令行参数来设置 Shell。例如,若要使用 PowerShell 也可以用 `--shell powershell.exe --shell-arg -c` 启动`just`。
|
||
|
||
(PowerShell 默认安装在 Windows 7 SP1 和 Windows Server 2008 R2 S1 及更高版本上,而 `cmd.exe` 相当麻烦,所以 PowerShell 被推荐给大多数 Windows 用户)
|
||
|
||
### 安装包
|
||
|
||
<table>
|
||
<thead>
|
||
<tr>
|
||
<th>操作系统</th>
|
||
<th>包管理器</th>
|
||
<th>安装包</th>
|
||
<th>命令</th>
|
||
</tr>
|
||
</thead>
|
||
<tbody>
|
||
<tr>
|
||
<td><a href="https://forge.rust-lang.org/release/platform-support.html">Various</a></td>
|
||
<td><a href="https://www.rust-lang.org">Cargo</a></td>
|
||
<td><a href="https://crates.io/crates/just">just</a></td>
|
||
<td><code>cargo install just</code></td>
|
||
</tr>
|
||
<tr>
|
||
<td><a href="https://en.wikipedia.org/wiki/Microsoft_Windows">Microsoft Windows</a></td>
|
||
<td><a href="https://scoop.sh">Scoop</a></td>
|
||
<td><a href="https://github.com/ScoopInstaller/Main/blob/master/bucket/just.json">just</a></td>
|
||
<td><code>scoop install just</code></td>
|
||
</tr>
|
||
<tr>
|
||
<td><a href="https://docs.brew.sh/Installation">Various</a></td>
|
||
<td><a href="https://brew.sh">Homebrew</a></td>
|
||
<td><a href="https://formulae.brew.sh/formula/just">just</a></td>
|
||
<td><code>brew install just</code></td>
|
||
</tr>
|
||
<tr>
|
||
<td><a href="https://en.wikipedia.org/wiki/MacOS">macOS</a></td>
|
||
<td><a href="https://www.macports.org">MacPorts</a></td>
|
||
<td><a href="https://ports.macports.org/port/just/summary">just</a></td>
|
||
<td><code>port install just</code></td>
|
||
</tr>
|
||
<tr>
|
||
<td><a href="https://www.archlinux.org">Arch Linux</a></td>
|
||
<td><a href="https://wiki.archlinux.org/title/Pacman">pacman</a></td>
|
||
<td><a href="https://archlinux.org/packages/community/x86_64/just/">just</a></td>
|
||
<td><code>pacman -S just</code></td>
|
||
</tr>
|
||
<tr>
|
||
<td><a href="https://nixos.org/download.html#download-nix">Various</a></td>
|
||
<td><a href="https://nixos.org/nix/">Nix</a></td>
|
||
<td><a href="https://github.com/NixOS/nixpkgs/blob/master/pkgs/development/tools/just/default.nix">just</a></td>
|
||
<td><code>nix-env -iA nixpkgs.just</code></td>
|
||
</tr>
|
||
<tr>
|
||
<td><a href="https://nixos.org/nixos/">NixOS</a></td>
|
||
<td><a href="https://nixos.org/nix/">Nix</a></td>
|
||
<td><a href="https://github.com/NixOS/nixpkgs/blob/master/pkgs/development/tools/just/default.nix">just</a></td>
|
||
<td><code>nix-env -iA nixos.just</code></td>
|
||
</tr>
|
||
<tr>
|
||
<td><a href="https://getsol.us">Solus</a></td>
|
||
<td><a href="https://getsol.us/articles/package-management/basics/en">eopkg</a></td>
|
||
<td><a href="https://dev.getsol.us/source/just/">just</a></td>
|
||
<td><code>eopkg install just</code></td>
|
||
</tr>
|
||
<tr>
|
||
<td><a href="https://voidlinux.org">Void Linux</a></td>
|
||
<td><a href="https://wiki.voidlinux.org/XBPS">XBPS</a></td>
|
||
<td><a href="https://github.com/void-linux/void-packages/blob/master/srcpkgs/just/template">just</a></td>
|
||
<td><code>xbps-install -S just</code></td>
|
||
</tr>
|
||
<tr>
|
||
<td><a href="https://www.freebsd.org">FreeBSD</a></td>
|
||
<td><a href="https://www.freebsd.org/doc/handbook/pkgng-intro.html">pkg</a></td>
|
||
<td><a href="https://www.freshports.org/deskutils/just/">just</a></td>
|
||
<td><code>pkg install just</code></td>
|
||
</tr>
|
||
<tr>
|
||
<td><a href="https://alpinelinux.org">Alpine Linux</a></td>
|
||
<td><a href="https://wiki.alpinelinux.org/wiki/Alpine_Linux_package_management">apk-tools</a></td>
|
||
<td><a href="https://pkgs.alpinelinux.org/package/edge/community/x86_64/just">just</a></td>
|
||
<td><code>apk add just</code></td>
|
||
</tr>
|
||
<tr>
|
||
<td><a href="https://getfedora.org">Fedora Linux</a></td>
|
||
<td><a href="https://dnf.readthedocs.io/en/latest/">DNF</a></td>
|
||
<td><a href="https://src.fedoraproject.org/rpms/rust-just">just</a></td>
|
||
<td><code>dnf install just</code></td>
|
||
</tr>
|
||
<tr>
|
||
<td><a href="https://www.gentoo.org">Gentoo Linux</a></td>
|
||
<td><a href="https://wiki.gentoo.org/wiki/Portage">Portage</a></td>
|
||
<td><a href="https://github.com/gentoo-mirror/dm9pZCAq/tree/master/sys-devel/just">dm9pZCAq/sys-devel/just</a></td>
|
||
<td>
|
||
<code>eselect repository enable dm9pZCAq</code><br>
|
||
<code>emerge --sync dm9pZCAq</code><br>
|
||
<code>emerge sys-devel/just</code>
|
||
</td>
|
||
</tr>
|
||
<tr>
|
||
<td><a href="https://docs.conda.io/en/latest/miniconda.html#system-requirements">Various</a></td>
|
||
<td><a href="https://docs.conda.io/projects/conda/en/latest/index.html">Conda</a></td>
|
||
<td><a href="https://anaconda.org/conda-forge/just">just</a></td>
|
||
<td><code>conda install -c conda-forge just</code></td>
|
||
</tr>
|
||
<tr>
|
||
<td><a href="https://en.wikipedia.org/wiki/Microsoft_Windows">Microsoft Windows</a></td>
|
||
<td><a href="https://chocolatey.org">Chocolatey</a></td>
|
||
<td><a href="https://github.com/michidk/just-choco">just</a></td>
|
||
<td><code>choco install just</code></td>
|
||
</tr>
|
||
<tr>
|
||
<td><a href="https://snapcraft.io/docs/installing-snapd">Various</a></td>
|
||
<td><a href="https://snapcraft.io">Snap</a></td>
|
||
<td><a href="https://snapcraft.io/just">just</a></td>
|
||
<td><code>snap install --edge --classic just</code></td>
|
||
</tr>
|
||
<tr>
|
||
<td><a href="https://github.com/casey/just/releases">Various</a></td>
|
||
<td><a href="https://asdf-vm.com">asdf</a></td>
|
||
<td><a href="https://github.com/ggilmore/asdf-just">just</a></td>
|
||
<td>
|
||
<code>asdf plugin add just</code><br>
|
||
<code>asdf install just <version></code>
|
||
</td>
|
||
</tr>
|
||
<tr>
|
||
<td><a href="https://debian.org">Debian</a> and <a href="https://ubuntu.com">Ubuntu</a> derivatives</td>
|
||
<td><a href="https://mpr.makedeb.org">MPR</a></td>
|
||
<td><a href="https://mpr.makedeb.org/packages/just">just</a></td>
|
||
<td>
|
||
<code>git clone 'https://mpr.makedeb.org/just'</code><br>
|
||
<code>cd just</code><br>
|
||
<code>makedeb -si</code>
|
||
</td>
|
||
</tr>
|
||
<tr>
|
||
<td><a href="https://debian.org">Debian</a> and <a href="https://ubuntu.com">Ubuntu</a> derivatives</td>
|
||
<td><a href="https://docs.makedeb.org/prebuilt-mpr">Prebuilt-MPR</a></td>
|
||
<td><a href="https://mpr.makedeb.org/packages/just">just</a></td>
|
||
<td>
|
||
<sup><b>You must have the <a href="https://docs.makedeb.org/prebuilt-mpr/getting-started/#setting-up-the-repository">Prebuilt-MPR set up</a> on your system in order to run this command.</b></sup><br>
|
||
<code>sudo apt install just</code>
|
||
</td>
|
||
</tr>
|
||
</tbody>
|
||
</table>
|
||
|
||

|
||
|
||
### 预制二进制文件
|
||
|
||
Linux、MacOS 和 Windows 的预制二进制文件可以在 [发布页](https://github.com/casey/just/releases) 上找到。
|
||
|
||
你也可以在 Linux、MacOS 或 Windows 上使用下面的命令来下载最新的版本,只需将 `DEST` 替换为你想安装 `just` 的目录即可:
|
||
|
||
```sh
|
||
curl --proto '=https' --tlsv1.2 -sSf https://just.systems/install.sh | bash -s -- --to DEST
|
||
```
|
||
|
||
例如,安装 `just` 到 `~/bin` 目录:
|
||
|
||
```sh
|
||
# 创建 ~/bin
|
||
mkdir -p ~/bin
|
||
|
||
# 下载并解压 just 到 ~/bin/just
|
||
curl --proto '=https' --tlsv1.2 -sSf https://just.systems/install.sh | bash -s -- --to ~/bin
|
||
|
||
# 在 Shell 搜索可执行文件的路径中添加`~/bin`
|
||
# 这一行应该被添加到你的 Shell 初始化文件中,e.g. `~/.bashrc` 或者 `~/.zshrc`:
|
||
export PATH="$PATH:$HOME/bin"
|
||
|
||
# 现在 just 应该就可以执行了
|
||
just --help
|
||
```
|
||
|
||
### GitHub Actions
|
||
|
||
[extractions/setup-just](https://github.com/extractions/setup-just) 可以用来在 GitHub Actions 的工作流程中安装 `just`。
|
||
|
||
使用举例:
|
||
|
||
```yaml
|
||
- uses: extractions/setup-just@v1
|
||
with:
|
||
just-version: 0.8 # optional semver specification, otherwise latest
|
||
```
|
||
|
||
### 发布 RSS 订阅
|
||
|
||
`just` 的发布 [RSS 订阅](https://en.wikipedia.org/wiki/RSS) 可以在 [这里](https://github.com/casey/just/releases.atom) 找到。
|
||
|
||
### Node.js 安装
|
||
|
||
[just-install](https://npmjs.com/package/just-install) 可用于在 Node.js 应用程序中自动安装 `just`。
|
||
|
||
`just` 是一个很赞的比 npm 脚本更强大的替代品。如果你想在 Node.js 应用程序的依赖中包含 `just`,可以通过 `just-install`,它将在本机安装一个针对特定平台的二进制文件作为 `npm install` 安装结果的一部分。这样就不需要每个开发者使用上述提到的步骤独立安装 `just`。安装后,`just` 命令将在 npm 脚本或 npx 中工作。这对那些想让项目的设置过程尽可能简单的团队来说是很有用的。
|
||
|
||
想了解更多信息, 请查看 [just-install 说明文件](https://github.com/brombal/just-install#readme)。
|
||
|
||
向后兼容性
|
||
-----------------------
|
||
|
||
随着 1.0 版本的发布,`just` 突出对向后兼容性和稳定性的强烈承诺。
|
||
|
||
未来的版本将不会引入向后不兼容的变化,不会使现有的 `justfile` 停止工作,或破坏命令行界面的正常调用。
|
||
|
||
然而,这并不排除修复全面的错误,即使这样做可能会破坏依赖其行为的 `justfiles`。
|
||
|
||
永远不会有一个 `just` 2.0。任何理想的向后兼容的变化都是在每个 `justfile` 的基础上选择性加入的,所以用户可以在他们的闲暇时间进行迁移。
|
||
|
||
还没有准备好稳定化的功能将在 `--unstable` 标志后被选择性启用。由 `--unstable` 启用的功能可能会在任何时候以不兼容的方式发生变化。
|
||
|
||
编辑器支持
|
||
--------------
|
||
|
||
`justfile` 的语法与 `make` 非常接近,你可以让你的编辑器对 `just` 使用 `make` 语法高亮。
|
||
|
||
### Vim 和 Neovim
|
||
|
||
#### `vim-just`
|
||
|
||
[vim-just](https://github.com/NoahTheDuke/vim-just) 插件可以为 vim 提供 `justfile` 语法高亮显示。
|
||
|
||
你可以用你喜欢的软件包管理器安装它,如 [Plug](https://github.com/junegunn/vim-plug):
|
||
|
||
```vim
|
||
call plug#begin()
|
||
|
||
Plug 'NoahTheDuke/vim-just'
|
||
|
||
call plug#end()
|
||
```
|
||
|
||
或者使用 Vim 的内置包支持:
|
||
|
||
```sh
|
||
mkdir -p ~/.vim/pack/vendor/start
|
||
cd ~/.vim/pack/vendor/start
|
||
git clone https://github.com/NoahTheDuke/vim-just.git
|
||
```
|
||
|
||
`vim-just` 也可以从 [vim-polyglot](https://github.com/sheerun/vim-polyglot) 获得,这是一个多语言的 Vim 插件。
|
||
|
||
#### `tree-sitter-just`
|
||
|
||
[tree-sitter-just](https://github.com/IndianBoy42/tree-sitter-just) 是一个针对 Neovim 的 [Nvim Treesitter](https://github.com/nvim-treesitter/nvim-treesitter) 插件。
|
||
|
||
#### Makefile 语法高亮
|
||
|
||
Vim 内置的 makefile 语法高亮对 `justfile` 来说并不完美,但总比没有好。你可以把以下内容放在 `~/.vim/filetype.vim` 中:
|
||
|
||
```vimscript
|
||
if exists("did_load_filetypes")
|
||
finish
|
||
endif
|
||
|
||
augroup filetypedetect
|
||
au BufNewFile,BufRead justfile setf make
|
||
augroup END
|
||
```
|
||
或者在单个 `justfile` 中添加以下内容,以在每个文件的基础上启用 `make` 模式:
|
||
|
||
```text
|
||
# vim: set ft=make :
|
||
```
|
||
|
||
### Emacs
|
||
|
||
[just-mode](https://github.com/leon-barrett/just-mode.el) 可以为 `justfile` 提供语法高亮和自动缩进。它可以在 [MELPA](https://melpa.org/) 上通过 [just-mode](https://melpa.org/#/just-mode) 获得。
|
||
|
||
[justl](https://github.com/psibi/justl.el) 提供了执行和列出配方的命令。
|
||
|
||
你可以在一个单独的 `justfile` 中添加以下内容,以便对每个文件启用 `make` 模式:
|
||
|
||
```text
|
||
# Local Variables:
|
||
# mode: makefile
|
||
# End:
|
||
```
|
||
|
||
### Visual Studio Code
|
||
|
||
由 [skellock](https://github.com/skellock) 为 VS Code 提供的扩展 [可在此获得](https://marketplace.visualstudio.com/items?itemName=skellock.just)([仓库](https://github.com/skellock/vscode-just))。
|
||
|
||
你可以通过运行以下命令来安装它:
|
||
|
||
```sh
|
||
code --install-extension skellock.just
|
||
```
|
||
|
||
### JetBrains IDEs
|
||
|
||
由 [linux_china](https://github.com/linux-china) 为 JetBrains IDEs 提供的插件可 [由此获得](https://plugins.jetbrains.com/plugin/18658-just)。
|
||
|
||
### Kakoune
|
||
|
||
Kakoune 已经内置支持 `justfile` 语法高亮,这要感谢 TeddyDD。
|
||
|
||
### Sublime Text
|
||
|
||
由 TonioGela 编写的 Sublime Text 的语法高亮文件在 [extras/just.sublim-syntax](https://github.com/casey/just/blob/master/extras/just.sublime-syntax) 中提供。
|
||
|
||
### 其它编辑器
|
||
|
||
欢迎给我发送必要的命令,以便在你选择的编辑器中实现语法高亮,这样我就可以把它们放在这里。
|
||
|
||
快速开始
|
||
-----------
|
||
|
||
参见 [安装部分](#安装) 了解如何在你的电脑上安装 `just`。试着运行 `just --version` 以确保它被正确安装。
|
||
|
||
关于语法的概述,请查看这个 [速查表](https://cheatography.com/linux-china/cheat-sheets/justfile/)。
|
||
|
||
一旦 `just` 安装完毕并开始工作,在你的项目根目录创建一个名为 `justfile` 的文件,内容如下:
|
||
|
||
```make
|
||
recipe-name:
|
||
echo 'This is a recipe!'
|
||
|
||
# 这是一行注释
|
||
another-recipe:
|
||
@echo 'This is another recipe.'
|
||
```
|
||
|
||
当你调用 `just` 时,它会在当前目录和父目录寻找文件 `justfile`,所以你可以从你项目的任何子目录中调用它。
|
||
|
||
搜索 `justfile` 是不分大小写的,所以任何大小写,如 `Justfile`、`JUSTFILE` 或 `JuStFiLe` 都可以工作。`just` 也会寻找名字为 `.justfile` 的文件,以便你打算隐藏一个 `justfile`。
|
||
|
||
运行 `just` 时未传参数,则运行 `justfile` 中的第一个配方:
|
||
|
||
```sh
|
||
$ just
|
||
echo 'This is a recipe!'
|
||
This is a recipe!
|
||
```
|
||
|
||
通过一个或多个参数指定要运行的配方:
|
||
|
||
```sh
|
||
$ just another-recipe
|
||
This is another recipe.
|
||
```
|
||
|
||
`just` 在运行每条命令前都会将其打印到标准错误中,这就是为什么 `echo 'This is a recipe!'` 被打印出来。对于以 `@` 开头的行,这将被抑制,这就是为什么 `echo 'This is another recipe.'` 没有被打印。
|
||
|
||
如果一个命令失败,配方就会停止运行。这里 `cargo publish` 只有在 `cargo test` 成功后才会运行:
|
||
|
||
```make
|
||
publish:
|
||
cargo test
|
||
# 前面的测试通过才会执行 publish!
|
||
cargo publish
|
||
```
|
||
|
||
配方可以依赖其他配方。在这里,`test` 配方依赖于 `build` 配方,所以 `build` 将在 `test` 之前运行:
|
||
|
||
```make
|
||
build:
|
||
cc main.c foo.c bar.c -o main
|
||
|
||
test: build
|
||
./test
|
||
|
||
sloc:
|
||
@echo "`wc -l *.c` lines of code"
|
||
```
|
||
|
||
```sh
|
||
$ just test
|
||
cc main.c foo.c bar.c -o main
|
||
./test
|
||
testing… all tests passed!
|
||
```
|
||
|
||
没有依赖关系的配方将按照命令行上给出的顺序运行:
|
||
|
||
```sh
|
||
$ just build sloc
|
||
cc main.c foo.c bar.c -o main
|
||
1337 lines of code
|
||
```
|
||
|
||
依赖项总是先运行,即使它们被放在依赖它们的配方之后:
|
||
|
||
```sh
|
||
$ just test build
|
||
cc main.c foo.c bar.c -o main
|
||
./test
|
||
testing… all tests passed!
|
||
```
|
||
|
||
示例
|
||
--------
|
||
|
||
在 [Examples 目录](https://github.com/casey/just/tree/master/examples) 中可以找到各种 `justfile` 的例子。
|
||
|
||
特性介绍
|
||
--------
|
||
|
||
### 默认配方
|
||
|
||
当 `just` 被调用而没有传入任何配方时,它会运行 `justfile` 中的第一个配方。这个配方可能是项目中最常运行的命令,比如运行测试:
|
||
|
||
```make
|
||
test:
|
||
cargo test
|
||
```
|
||
|
||
你也可以使用依赖关系来默认运行多个配方:
|
||
|
||
```make
|
||
default: lint build test
|
||
|
||
build:
|
||
echo Building…
|
||
|
||
test:
|
||
echo Testing…
|
||
|
||
lint:
|
||
echo Linting…
|
||
```
|
||
|
||
在没有合适配方作为默认配方的情况下,你也可以在 `justfile` 的开头添加一个配方,用于列出可用的配方:
|
||
|
||
```make
|
||
default:
|
||
just --list
|
||
```
|
||
|
||
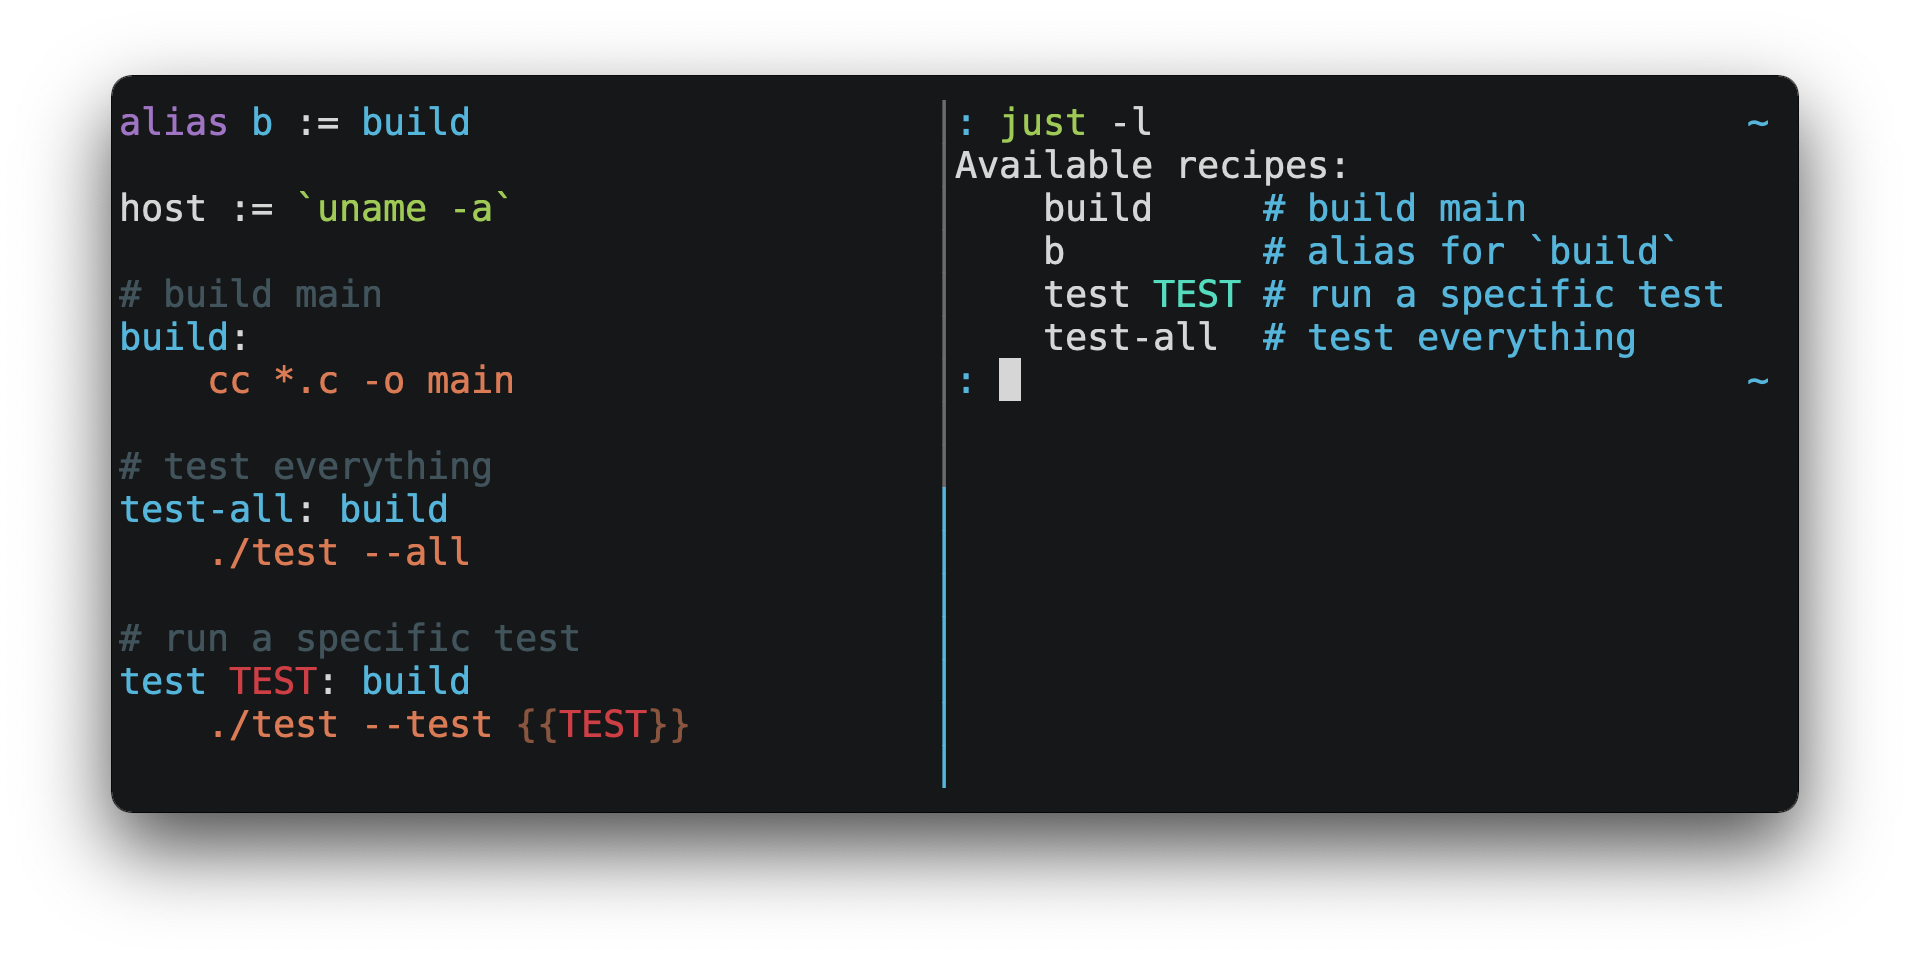
### 列出可用的配方
|
||
|
||
可以用 `just --list` 按字母顺序列出配方:
|
||
|
||
```sh
|
||
$ just --list
|
||
Available recipes:
|
||
build
|
||
test
|
||
deploy
|
||
lint
|
||
```
|
||
|
||
`just --summary` 以更简洁的形式列出配方:
|
||
|
||
```sh
|
||
$ just --summary
|
||
build test deploy lint
|
||
```
|
||
|
||
传入 `--unsorted` 选项可以按照它们在 `justfile` 中出现的顺序打印配方:
|
||
|
||
```make
|
||
test:
|
||
echo 'Testing!'
|
||
|
||
build:
|
||
echo 'Building!'
|
||
```
|
||
|
||
```sh
|
||
$ just --list --unsorted
|
||
Available recipes:
|
||
test
|
||
build
|
||
```
|
||
|
||
```sh
|
||
$ just --summary --unsorted
|
||
test build
|
||
```
|
||
|
||
如果你想让 `just` 默认列出 `justfile` 中的配方,你可以使用这个作为默认配方:
|
||
|
||
```make
|
||
default:
|
||
@just --list
|
||
```
|
||
|
||
请注意,你可能需要在上面这一行中添加 `--justfile {{justfile()}}`。没有它,如果你执行 `just -f /some/distant/justfile -d .` 或 `just -f ./non-standard-justfile` 配方中的普通 `just --list` 就不一定会使用你提供的文件,它将试图在你的当前路径中找到一个 `justfile`,甚至可能导致 `No justfile found` 的错误。
|
||
|
||
标题文本可以用 `--list-heading` 来定制:
|
||
|
||
```sh
|
||
$ just --list --list-heading $'Cool stuff…\n'
|
||
Cool stuff…
|
||
test
|
||
build
|
||
```
|
||
|
||
而缩进可以用 `--list-prefix` 来定制:
|
||
|
||
```sh
|
||
$ just --list --list-prefix ····
|
||
Available recipes:
|
||
····test
|
||
····build
|
||
```
|
||
|
||
`--list-heading` 参数同时替换了标题和后面的换行,所以如果不是空的,应该包含一个换行。这样做是为了允许你通过传递空字符串来完全抑制标题行:
|
||
|
||
```sh
|
||
$ just --list --list-heading ''
|
||
test
|
||
build
|
||
```
|
||
|
||
### 别名
|
||
|
||
别名允许你用其他名称来调用配方:
|
||
|
||
```make
|
||
alias b := build
|
||
|
||
build:
|
||
echo 'Building!'
|
||
```
|
||
|
||
```sh
|
||
$ just b
|
||
build
|
||
echo 'Building!'
|
||
Building!
|
||
```
|
||
|
||
### 设置
|
||
|
||
设置控制解释和执行。每个设置最多可以指定一次,可以出现在 `justfile` 的任何地方。
|
||
|
||
例如:
|
||
|
||
```make
|
||
set shell := ["zsh", "-cu"]
|
||
|
||
foo:
|
||
# this line will be run as `zsh -cu 'ls **/*.txt'`
|
||
ls **/*.txt
|
||
```
|
||
|
||
#### 设置一览表
|
||
|
||
| 名称 | 值 | 描述 |
|
||
| ------------------------- | ------------------ | --------------------------------------------------------------------------- |
|
||
| `allow-duplicate-recipes` | boolean | 允许在 `justfile` 后面出现的配方覆盖之前的同名配方 |
|
||
| `dotenv-load` | boolean | 加载 `.env` 环境变量文件, 如果有的话 |
|
||
| `export` | boolean | 将所有变量导出为环境变量 |
|
||
| `positional-arguments` | boolean | 传递位置参数 |
|
||
| `shell` | `[COMMAND, ARGS…]` | 设置用于调用配方和评估反引号内包裹内容的命令 |
|
||
| `windows-shell` | `[COMMAND, ARGS…]` | 设置用于调用配方和评估反引号内包裹内容的命令。 |
|
||
| `windows-powershell` | boolean | 在 Windows 上使用 PowerShell 作为默认 Shell(废弃,建议使用 `windows-shell`) |
|
||
|
||
Bool 类型设置可以写成:
|
||
|
||
```mf
|
||
set NAME
|
||
```
|
||
|
||
这就相当于:
|
||
|
||
```mf
|
||
set NAME := true
|
||
```
|
||
|
||
#### 允许重复的配方
|
||
|
||
如果 `allow-duplicate-recipes` 被设置为 `true`,那么定义多个同名的配方就不会出错,而会使用最后的定义。默认为 `false`。
|
||
|
||
```make
|
||
set allow-duplicate-recipes
|
||
|
||
@foo:
|
||
echo foo
|
||
|
||
@foo:
|
||
echo bar
|
||
```
|
||
|
||
```sh
|
||
$ just foo
|
||
bar
|
||
```
|
||
|
||
#### 环境变量加载
|
||
|
||
如果将 `dotenv-load` 设置为 `true`,并且存在 `.env` 文件,则该环境配置文件将被加载。默认为 `false`。
|
||
|
||
#### 导出
|
||
|
||
`export` 设置使所有 `just` 变量作为环境变量被导出。默认值为 `false`。
|
||
|
||
```make
|
||
set export
|
||
|
||
a := "hello"
|
||
|
||
@foo b:
|
||
echo $a
|
||
echo $b
|
||
```
|
||
|
||
```sh
|
||
$ just foo goodbye
|
||
hello
|
||
goodbye
|
||
```
|
||
|
||
#### 位置参数
|
||
|
||
如果 `positional-arguments` 为 `true`,配方参数将作为位置参数传递给命令。对于行式配方,参数 `$0` 将是配方的名称。
|
||
|
||
例如,运行这个配方:
|
||
|
||
```make
|
||
set positional-arguments
|
||
|
||
@foo bar:
|
||
echo $0
|
||
echo $1
|
||
```
|
||
|
||
将产生以下输出:
|
||
|
||
```sh
|
||
$ just foo hello
|
||
foo
|
||
hello
|
||
```
|
||
|
||
当使用 `sh` 兼容的 Shell,如 `bash` 或 `zsh` 时,`$@` 会展开为传给配方的位置参数,从1开始。当在双引号内使用 `"$@"` 时,包括空白的参数将被传递,就像它们是双引号一样。也就是说,`"$@"` 相当于 `"$1" "$2"`......当没有位置参数时,`"$@"` 和 `$@` 将展开为空(即,它们被删除)。
|
||
|
||
这个例子的配方将逐行打印参数:
|
||
|
||
```make
|
||
set positional-arguments
|
||
|
||
@test *args='':
|
||
bash -c 'while (( "$#" )); do echo - $1; shift; done' -- "$@"
|
||
```
|
||
|
||
用 _两个_ 参数运行:
|
||
|
||
```sh
|
||
$ just test foo "bar baz"
|
||
- foo
|
||
- bar baz
|
||
```
|
||
|
||
#### Shell
|
||
|
||
`shell` 设置控制用于调用执行配方代码行和反引号内指令的命令。Shebang 配方不受影响。
|
||
|
||
```make
|
||
# use python3 to execute recipe lines and backticks
|
||
set shell := ["python3", "-c"]
|
||
|
||
# use print to capture result of evaluation
|
||
foos := `print("foo" * 4)`
|
||
|
||
foo:
|
||
print("Snake snake snake snake.")
|
||
print("{{foos}}")
|
||
```
|
||
|
||
`just` 把要执行的命令作为一个参数进行传递。许多 Shell 需要一个额外的标志,通常是 `-c`,以使它们评估执行第一个参数。
|
||
|
||
##### Windows Shell
|
||
|
||
`just` 在 Windows 上默认使用 `sh`。要在 Windows 上使用不同的 Shell,请使用`windows-shell`:
|
||
|
||
```make
|
||
set windows-shell := ["pwsh.exe", "-NoLogo", "-Command"]
|
||
|
||
hello:
|
||
Write-Host "Hello, world!"
|
||
```
|
||
|
||
参考 [powershell.just](https://github.com/casey/just/blob/master/examples/powershell.just) ,了解在所有平台上使用 PowerShell 的 justfile。
|
||
|
||
##### Windows PowerShell
|
||
|
||
*`set windows-powershell` 使用遗留的 `powershell.exe` 二进制文件,不再推荐。请参阅上面的 `windows-shell` 设置,以通过更灵活的方式来控制在 Windows 上使用哪个 Shell。*
|
||
|
||
`just` 在 Windows 上默认使用 `sh`。要使用 `powershell.exe` 作为替代,请将 `windows-powershell` 设置为 `true`。
|
||
|
||
```make
|
||
set windows-powershell := true
|
||
|
||
hello:
|
||
Write-Host "Hello, world!"
|
||
```
|
||
|
||
##### Python 3
|
||
|
||
```make
|
||
set shell := ["python3", "-c"]
|
||
```
|
||
|
||
##### Bash
|
||
|
||
```make
|
||
set shell := ["bash", "-uc"]
|
||
```
|
||
|
||
##### Z Shell
|
||
|
||
```make
|
||
set shell := ["zsh", "-uc"]
|
||
```
|
||
|
||
##### Fish
|
||
|
||
```make
|
||
set shell := ["fish", "-c"]
|
||
```
|
||
|
||
##### Nushell
|
||
|
||
```make
|
||
set shell := ["nu", "-c"]
|
||
```
|
||
|
||
如果你想设置默认的表格显示模式为 `light`:
|
||
|
||
```make
|
||
set shell := ['nu', '-m', 'light', '-c']
|
||
```
|
||
|
||
*[Nushell](https://github.com/nushell/nushell) 使用 Rust 开发并且具备良好的跨平台能力,**支持 Windows / macOS 和各种 Linux 发行版***
|
||
|
||
### 文档注释
|
||
|
||
紧接着配方前面的注释将出现在 `just --list` 中:
|
||
|
||
```make
|
||
# build stuff
|
||
build:
|
||
./bin/build
|
||
|
||
# test stuff
|
||
test:
|
||
./bin/test
|
||
```
|
||
|
||
```sh
|
||
$ just --list
|
||
Available recipes:
|
||
build # build stuff
|
||
test # test stuff
|
||
```
|
||
|
||
### `.env` 集成
|
||
|
||
如果 [`dotenv-load`](#环境变量加载) 被设置,`just` 将从一个名为 `.env` 的文件中加载环境变量。这个文件可以和你的 `justfile` 位于同一目录下,或者位于其父目录下。这些变量是环境变量,而不是 `just` 的变量,因此必须使用 `$VARIABLE_NAME` 在配方和反引号中访问。
|
||
|
||
例如,假如你的 `.env` 文件包含:
|
||
|
||
```sh
|
||
# 注释,将被忽略
|
||
DATABASE_ADDRESS=localhost:6379
|
||
SERVER_PORT=1337
|
||
```
|
||
|
||
而你的 `justfile` 包含:
|
||
|
||
```make
|
||
set dotenv-load
|
||
|
||
serve:
|
||
@echo "Starting server with database $DATABASE_ADDRESS on port $SERVER_PORT…"
|
||
./server --database $DATABASE_ADDRESS --port $SERVER_PORT
|
||
```
|
||
|
||
`just serve` 将会输出:
|
||
|
||
```sh
|
||
$ just serve
|
||
Starting server with database localhost:6379 on port 1337…
|
||
./server --database $DATABASE_ADDRESS --port $SERVER_PORT
|
||
```
|
||
|
||
### 变量和替换
|
||
|
||
支持在变量、字符串、拼接、路径连接和替换中使用 `{{…}}` :
|
||
|
||
```make
|
||
tmpdir := `mktemp`
|
||
version := "0.2.7"
|
||
tardir := tmpdir / "awesomesauce-" + version
|
||
tarball := tardir + ".tar.gz"
|
||
|
||
publish:
|
||
rm -f {{tarball}}
|
||
mkdir {{tardir}}
|
||
cp README.md *.c {{tardir}}
|
||
tar zcvf {{tarball}} {{tardir}}
|
||
scp {{tarball}} me@server.com:release/
|
||
rm -rf {{tarball}} {{tardir}}
|
||
```
|
||
|
||
#### 路径拼接
|
||
|
||
`/` 操作符可用于通过斜线连接两个字符串:
|
||
|
||
```make
|
||
foo := "a" / "b"
|
||
```
|
||
|
||
```
|
||
$ just --evaluate foo
|
||
a/b
|
||
```
|
||
|
||
请注意,即使已经有一个 `/`,也会添加一个 `/`:
|
||
|
||
```make
|
||
foo := "a/"
|
||
bar := foo / "b"
|
||
```
|
||
|
||
```
|
||
$ just --evaluate bar
|
||
a//b
|
||
```
|
||
|
||
`/` 操作符使用 `/` 字符,即使在 Windows 上也是如此。因此,在使用通用命名规则(UNC)的路径中应避免使用 `/` 操作符,即那些以 `\?` 开头的路径,因为 UNC 路径不支持正斜线。
|
||
|
||
#### 转义 `{{`
|
||
|
||
想要写一个包含 `{{` 的配方,可以使用 `{{{{`:
|
||
|
||
```make
|
||
braces:
|
||
echo 'I {{{{LOVE}} curly braces!'
|
||
```
|
||
|
||
(未匹配的 `}}` 会被忽略,所以不需要转义)
|
||
|
||
另一个选择是把所有你想转义的文本都放在插值里面:
|
||
|
||
```make
|
||
braces:
|
||
echo '{{'I {{LOVE}} curly braces!'}}'
|
||
```
|
||
|
||
然而,另一个选择是使用 `{{ "{{" }}`:
|
||
|
||
```make
|
||
braces:
|
||
echo 'I {{ "{{" }}LOVE}} curly braces!'
|
||
```
|
||
|
||
### 字符串
|
||
|
||
双引号字符串支持转义序列:
|
||
|
||
```make
|
||
string-with-tab := "\t"
|
||
string-with-newline := "\n"
|
||
string-with-carriage-return := "\r"
|
||
string-with-double-quote := "\""
|
||
string-with-slash := "\\"
|
||
string-with-no-newline := "\
|
||
"
|
||
```
|
||
|
||
```sh
|
||
$ just --evaluate
|
||
"tring-with-carriage-return := "
|
||
string-with-double-quote := """
|
||
string-with-newline := "
|
||
"
|
||
string-with-no-newline := ""
|
||
string-with-slash := "\"
|
||
string-with-tab := " "
|
||
```
|
||
|
||
字符串可以包含换行符:
|
||
|
||
```make
|
||
single := '
|
||
hello
|
||
'
|
||
|
||
double := "
|
||
goodbye
|
||
"
|
||
```
|
||
|
||
单引号字符串不支持转义序列:
|
||
|
||
```make
|
||
escapes := '\t\n\r\"\\'
|
||
```
|
||
|
||
```sh
|
||
$ just --evaluate
|
||
escapes := "\t\n\r\"\\"
|
||
```
|
||
|
||
支持单引号和双引号字符串的缩进版本,以三个单引号或三个双引号为界。缩进的字符串行被删除了所有非空行所共有的前导空白:
|
||
|
||
```make
|
||
# 这个字符串执行结果为 `foo\nbar\n`
|
||
x := '''
|
||
foo
|
||
bar
|
||
'''
|
||
|
||
# 这个字符串执行结果为 `abc\n wuv\nbar\n`
|
||
y := """
|
||
abc
|
||
wuv
|
||
xyz
|
||
"""
|
||
```
|
||
|
||
与未缩进的字符串类似,缩进的双引号字符串处理转义序列,而缩进的单引号字符串则忽略转义序列。转义序列的处理是在取消缩进后进行的。取消缩进的算法不考虑转义序列产生的空白或换行。
|
||
|
||
### 错误忽略
|
||
|
||
通常情况下,如果一个命令返回一个非零的退出状态,将停止执行。要想在一个命令之后继续执行,即使它失败了,需要在命令前加上 `-`:
|
||
|
||
```make
|
||
foo:
|
||
-cat foo
|
||
echo 'Done!'
|
||
```
|
||
|
||
```sh
|
||
$ just foo
|
||
cat foo
|
||
cat: foo: No such file or directory
|
||
echo 'Done!'
|
||
Done!
|
||
```
|
||
|
||
### 函数
|
||
|
||
`just` 提供了一些内置函数,在编写配方时可能很有用。
|
||
|
||
#### 系统信息
|
||
|
||
- `arch()` — 指令集结构。可能的值是:`"aarch64"`, `"arm"`, `"asmjs"`, `"hexagon"`, `"mips"`, `"msp430"`, `"powerpc"`, `"powerpc64"`, `"s390x"`, `"sparc"`, `"wasm32"`, `"x86"`, `"x86_64"`, 和 `"xcore"`。
|
||
|
||
- `os()` — 操作系统,可能的值是: `"android"`, `"bitrig"`, `"dragonfly"`, `"emscripten"`, `"freebsd"`, `"haiku"`, `"ios"`, `"linux"`, `"macos"`, `"netbsd"`, `"openbsd"`, `"solaris"`, 和 `"windows"`。
|
||
|
||
- `os_family()` — 操作系统系列;可能的值是:`"unix"` 和 `"windows"`。
|
||
|
||
例如:
|
||
|
||
```make
|
||
system-info:
|
||
@echo "This is an {{arch()}} machine".
|
||
```
|
||
|
||
```sh
|
||
$ just system-info
|
||
This is an x86_64 machine
|
||
```
|
||
|
||
`os_family()` 函数可以用来创建跨平台的 `justfile`,使其可以在不同的操作系统上工作。一个例子,见 [cross-platform.just](https://github.com/casey/just/blob/master/examples/cross-platform.just) 文件。
|
||
|
||
#### 环境变量
|
||
|
||
- `env_var(key)` — 获取名称为 `key` 的环境变量,如果不存在则终止。
|
||
|
||
```make
|
||
home_dir := env_var('HOME')
|
||
|
||
test:
|
||
echo "{{home_dir}}"
|
||
```
|
||
|
||
```sh
|
||
$ just
|
||
/home/user1
|
||
```
|
||
|
||
- `env_var_or_default(key, default)` — 获取名称为 `key` 的环境变量,如果不存在则返回 `default`。
|
||
|
||
#### 调用目录
|
||
|
||
- `invocation_directory()` - 获取 `just` 被调用时当前目录所对应的绝对路径,在 `just` 改变路径并执行相应命令前。
|
||
|
||
例如,要对 "当前目录" 下的文件调用 `rustfmt`(从用户/调用者的角度看),使用以下规则:
|
||
|
||
```make
|
||
rustfmt:
|
||
find {{invocation_directory()}} -name \*.rs -exec rustfmt {} \;
|
||
```
|
||
|
||
另外,如果你的命令需要从当前目录运行,你可以使用如下方式:
|
||
|
||
```make
|
||
build:
|
||
cd {{invocation_directory()}}; ./some_script_that_needs_to_be_run_from_here
|
||
```
|
||
|
||
#### Justfile 和 Justfile 目录
|
||
|
||
- `justfile()` - 取得当前 `justfile` 的路径。
|
||
|
||
- `justfile_directory()` - 取得当前 `justfile` 文件父目录的路径。
|
||
|
||
例如,运行一个相对于当前 `justfile` 位置的命令:
|
||
|
||
```make
|
||
script:
|
||
./{{justfile_directory()}}/scripts/some_script
|
||
```
|
||
|
||
#### Just 可执行程序
|
||
|
||
- `just_executable()` - `just` 可执行文件的绝对路径。
|
||
|
||
例如:
|
||
|
||
```make
|
||
executable:
|
||
@echo The executable is at: {{just_executable()}}
|
||
```
|
||
|
||
```sh
|
||
$ just
|
||
The executable is at: /bin/just
|
||
```
|
||
|
||
#### 字符串处理
|
||
|
||
- `lowercase(s)` - 将 `s` 转换为小写形式。
|
||
|
||
- `quote(s)` - 用 `'\''` 替换所有的单引号,并在 `s` 的首尾添加单引号。这足以为许多 Shell 转义特殊字符,包括大多数 Bourne Shell 的后代。
|
||
|
||
- `replace(s, from, to)` - 将 `s` 中的所有 `from` 替换为 `to`。
|
||
|
||
- `trim(s)` - 去掉 `s` 的首尾空格。
|
||
|
||
- `trim_end(s)` - 去掉 `s` 的尾部空格。
|
||
|
||
- `trim_end_match(s, pat)` - 删除与 `pat` 匹配的 `s` 的后缀。
|
||
|
||
- `trim_end_matches(s, pat)` - 反复删除与 `pat` 匹配的 `s` 的后缀。
|
||
|
||
- `trim_start(s)` - 去掉 `s` 的首部空格。
|
||
|
||
- `trim_start_match(s, pat)` - 删除与 `pat` 匹配的 `s` 的前缀。
|
||
|
||
- `trim_start_matches(s, pat)` - 反复删除与 `pat` 匹配的 `s` 的前缀。
|
||
|
||
- `uppercase(s)` - 将 `s` 转换为大写形式。
|
||
|
||
#### 路径操作
|
||
|
||
##### 非可靠的
|
||
|
||
- `absolute_path(path)` - 将当前工作目录中到相对路径 `path` 的路径转换为绝对路径。在 `/foo` 目录通过 `absolute_path("./bar.txt")` 可以得到 `/foo/bar.txt`。
|
||
|
||
- `extension(path)` - 获取 `path` 的扩展名。`extension("/foo/bar.txt")` 结果为 `txt`。
|
||
|
||
- `file_name(path)` - 获取 `path` 的文件名,去掉任何前面的目录部分。`file_name("/foo/bar.txt")` 的结果为 `bar.txt`。
|
||
|
||
- `file_stem(path)` - 获取 `path` 的文件名,不含扩展名。`file_stem("/foo/bar.txt")` 的结果为 `bar`。
|
||
|
||
- `parent_directory(path)` - 获取 `path` 的父目录。`parent_directory("/foo/bar.txt")` 的结果为 `/foo`。
|
||
|
||
- `without_extension(path)` - 获取 `path` 不含扩展名部分。`without_extension("/foo/bar.txt")` 的结果为 `/foo/bar`。
|
||
|
||
这些函数可能会失败,例如,如果一个路径没有扩展名,则将停止执行。
|
||
|
||
##### 可靠的
|
||
|
||
- `join(a, b…)` - *这个函数在 Unix 上使用 `/`,在 Windows 上使用 `\`,这可能会导致非预期的行为。`/` 操作符,例如,`a / b`,总是使用 `/`,应该被考虑作为替代,除非在 Windows 上特别指定需要 `\`。* 将路径 `a` 和 路径 `b` 拼接在一起。`join("foo/bar", "baz")` 结果为 `foo/bar/baz`。它接受两个或多个参数。
|
||
|
||
- `clean(path)` - 通过删除多余的路径分隔符、中间的 `.` 和 `..` 来简化 `path`。`clean("foo//bar")` 结果为 `foo/bar`,`clean("foo/..")` 为 `.`,`clean("foo/./bar")` 结果为 `foo/bar`。
|
||
|
||
#### 文件系统访问
|
||
|
||
- `path_exists(path)` - 如果路径指向一个存在的文件或目录,则返回 `true`,否则返回 `false`。也会遍历符号链接,如果路径无法访问或指向一个无效的符号链接,则返回 `false`。
|
||
|
||
##### 错误报告
|
||
|
||
- `error(message)` - 终止执行并向用户报告错误 `message`。
|
||
|
||
#### UUID 和哈希值生成
|
||
|
||
- `sha256(string)` - 以十六进制字符串形式返回 `string` 的 SHA-256 哈希值。
|
||
- `sha256_file(path)` - 以十六进制字符串形式返回 `path` 处的文件的 SHA-256 哈希值。
|
||
- `uuid()` - 返回一个随机生成的 UUID。
|
||
|
||
### 使用反引号的命令求值
|
||
|
||
反引号可以用来存储命令的求值结果:
|
||
|
||
```make
|
||
localhost := `dumpinterfaces | cut -d: -f2 | sed 's/\/.*//' | sed 's/ //g'`
|
||
|
||
serve:
|
||
./serve {{localhost}} 8080
|
||
```
|
||
|
||
缩进的反引号,以三个反引号为界,与字符串缩进的方式一样,会被去掉缩进:
|
||
|
||
````make
|
||
# This backtick evaluates the command `echo foo\necho bar\n`, which produces the value `foo\nbar\n`.
|
||
stuff := ```
|
||
echo foo
|
||
echo bar
|
||
```
|
||
````
|
||
|
||
参见 [字符串](#字符串) 部分,了解去除缩进的细节。
|
||
|
||
反引号内不能以 `#!` 开头。这种语法是为将来的升级而保留的。
|
||
|
||
### 条件表达式
|
||
|
||
`if` / `else` 表达式评估不同的分支,取决于两个表达式是否评估为相同的值:
|
||
|
||
```make
|
||
foo := if "2" == "2" { "Good!" } else { "1984" }
|
||
|
||
bar:
|
||
@echo "{{foo}}"
|
||
```
|
||
|
||
```sh
|
||
$ just bar
|
||
Good!
|
||
```
|
||
|
||
也可以用于测试不相等:
|
||
|
||
```make
|
||
foo := if "hello" != "goodbye" { "xyz" } else { "abc" }
|
||
|
||
bar:
|
||
@echo {{foo}}
|
||
```
|
||
|
||
```sh
|
||
$ just bar
|
||
xyz
|
||
```
|
||
|
||
还支持与正则表达式进行匹配:
|
||
|
||
```make
|
||
foo := if "hello" =~ 'hel+o' { "match" } else { "mismatch" }
|
||
|
||
bar:
|
||
@echo {{foo}}
|
||
```
|
||
|
||
```sh
|
||
$ just bar
|
||
match
|
||
```
|
||
|
||
正则表达式由 [Regex 包](https://github.com/rust-lang/regex) 提供,其语法在 [docs.rs](https://docs.rs/regex/1.5.4/regex/#syntax) 上有对应文档。由于正则表达式通常使用反斜线转义序列,请考虑使用单引号的字符串字面值,这将使斜线不受干扰地传递给正则分析器。
|
||
|
||
条件表达式是短路的,这意味着它们只评估其中的一个分支。这可以用来确保反引号内的表达式在不应该运行的时候不会运行。
|
||
|
||
```make
|
||
foo := if env_var("RELEASE") == "true" { `get-something-from-release-database` } else { "dummy-value" }
|
||
```
|
||
|
||
条件语句也可以在配方中使用:
|
||
|
||
```make
|
||
bar foo:
|
||
echo {{ if foo == "bar" { "hello" } else { "goodbye" } }}
|
||
```
|
||
|
||
注意最后的 `}` 后面的空格! 没有这个空格,插值将被提前结束。
|
||
|
||
多个条件语句可以被连起来:
|
||
|
||
```make
|
||
foo := if "hello" == "goodbye" {
|
||
"xyz"
|
||
} else if "a" == "a" {
|
||
"abc"
|
||
} else {
|
||
"123"
|
||
}
|
||
|
||
bar:
|
||
@echo {{foo}}
|
||
```
|
||
|
||
```sh
|
||
$ just bar
|
||
abc
|
||
```
|
||
|
||
### 出现错误停止执行
|
||
|
||
可以用 `error` 函数停止执行。比如:
|
||
|
||
```
|
||
foo := if "hello" == "goodbye" {
|
||
"xyz"
|
||
} else if "a" == "b" {
|
||
"abc"
|
||
} else {
|
||
error("123")
|
||
}
|
||
```
|
||
|
||
在运行时产生以下错误:
|
||
|
||
```
|
||
error: Call to function `error` failed: 123
|
||
|
|
||
16 | error("123")
|
||
```
|
||
|
||
### 从命令行设置变量
|
||
|
||
变量可以从命令行进行覆盖。
|
||
|
||
```make
|
||
os := "linux"
|
||
|
||
test: build
|
||
./test --test {{os}}
|
||
|
||
build:
|
||
./build {{os}}
|
||
```
|
||
|
||
```sh
|
||
$ just
|
||
./build linux
|
||
./test --test linux
|
||
```
|
||
|
||
任何数量的 `NAME=VALUE` 形式的参数都可以在配方前传递:
|
||
|
||
```sh
|
||
$ just os=plan9
|
||
./build plan9
|
||
./test --test plan9
|
||
```
|
||
|
||
或者你可以使用 `--set` 标志:
|
||
|
||
```sh
|
||
$ just --set os bsd
|
||
./build bsd
|
||
./test --test bsd
|
||
```
|
||
|
||
### 获取和设置环境变量
|
||
|
||
#### 导出 `just` 变量
|
||
|
||
以 `export` 关键字为前缀的赋值将作为环境变量导出到配方中:
|
||
|
||
```make
|
||
export RUST_BACKTRACE := "1"
|
||
|
||
test:
|
||
# 如果它崩溃了,将打印一个堆栈追踪
|
||
cargo test
|
||
```
|
||
|
||
以 `$` 为前缀的参数将被作为环境变量导出:
|
||
|
||
```make
|
||
test $RUST_BACKTRACE="1":
|
||
# 如果它崩溃了,将打印一个堆栈追踪
|
||
cargo test
|
||
```
|
||
|
||
导出的变量和参数不会被导出到同一作用域内反引号包裹的表达式里。
|
||
|
||
```make
|
||
export WORLD := "world"
|
||
# This backtick will fail with "WORLD: unbound variable"
|
||
BAR := `echo hello $WORLD`
|
||
```
|
||
|
||
```make
|
||
# Running `just a foo` will fail with "A: unbound variable"
|
||
a $A $B=`echo $A`:
|
||
echo $A $B
|
||
```
|
||
|
||
当 [export](#导出) 被设置时,所有的 `just` 变量都将作为环境变量被导出。
|
||
|
||
#### 从环境中获取环境变量
|
||
|
||
来自环境的环境变量会自动传递给配方:
|
||
|
||
```make
|
||
print_home_folder:
|
||
echo "HOME is: '${HOME}'"
|
||
```
|
||
|
||
```sh
|
||
$ just
|
||
HOME is '/home/myuser'
|
||
```
|
||
|
||
#### 从 `.env` 文件加载环境变量
|
||
|
||
如果 [dotenv-load](#环境变量加载) 被设置,`just` 将从 `.env` 文件中加载环境变量。该文件中的变量将作为环境变量提供给配方。参见 [环境变量集成](#env-集成) 以获得更多信息。
|
||
|
||
#### 从环境变量中设置 `just` 变量
|
||
|
||
环境变量可以通过函数 `env_var()` 和 `env_var_or_default()` 传入到 `just` 变量。
|
||
参见 [environment-variables](#环境变量)。
|
||
|
||
### 配方参数
|
||
|
||
配方可以有参数。这里的配方 `build` 有一个参数叫 `target`:
|
||
|
||
```make
|
||
build target:
|
||
@echo 'Building {{target}}…'
|
||
cd {{target}} && make
|
||
```
|
||
|
||
要在命令行上传递参数,请把它们放在配方名称后面:
|
||
|
||
```sh
|
||
$ just build my-awesome-project
|
||
Building my-awesome-project…
|
||
cd my-awesome-project && make
|
||
```
|
||
|
||
要向依赖配方传递参数,请将依赖配方和参数一起放在括号里:
|
||
|
||
```make
|
||
default: (build "main")
|
||
|
||
build target:
|
||
@echo 'Building {{target}}…'
|
||
cd {{target}} && make
|
||
```
|
||
|
||
变量也可以作为参数传递给依赖:
|
||
|
||
```make
|
||
target := "main"
|
||
|
||
_build version:
|
||
@echo 'Building {{version}}…'
|
||
cd {{version}} && make
|
||
|
||
build: (_build target)
|
||
```
|
||
|
||
命令的参数可以通过将依赖与参数一起放在括号中的方式传递给依赖:
|
||
|
||
```make
|
||
build target:
|
||
@echo "Building {{target}}…"
|
||
|
||
push target: (build target)
|
||
@echo 'Pushing {{target}}…'
|
||
```
|
||
|
||
参数可以有默认值:
|
||
|
||
```make
|
||
default := 'all'
|
||
|
||
test target tests=default:
|
||
@echo 'Testing {{target}}:{{tests}}…'
|
||
./test --tests {{tests}} {{target}}
|
||
```
|
||
|
||
有默认值的参数可以省略:
|
||
|
||
```sh
|
||
$ just test server
|
||
Testing server:all…
|
||
./test --tests all server
|
||
```
|
||
|
||
或者提供:
|
||
|
||
```sh
|
||
$ just test server unit
|
||
Testing server:unit…
|
||
./test --tests unit server
|
||
```
|
||
|
||
默认值可以是任意的表达式,但字符串或路径拼接必须放在括号内:
|
||
|
||
```make
|
||
arch := "wasm"
|
||
|
||
test triple=(arch + "-unknown-unknown") input=(arch / "input.dat"):
|
||
./test {{triple}}
|
||
```
|
||
|
||
配方的最后一个参数可以是变长的,在参数名称前用 `+` 或 `*` 表示:
|
||
|
||
```make
|
||
backup +FILES:
|
||
scp {{FILES}} me@server.com:
|
||
```
|
||
|
||
以 `+` 为前缀的变长参数接受 _一个或多个_ 参数,并展开为一个包含这些参数的字符串,以空格分隔:
|
||
|
||
```sh
|
||
$ just backup FAQ.md GRAMMAR.md
|
||
scp FAQ.md GRAMMAR.md me@server.com:
|
||
FAQ.md 100% 1831 1.8KB/s 00:00
|
||
GRAMMAR.md 100% 1666 1.6KB/s 00:00
|
||
```
|
||
|
||
以 `*` 为前缀的变长参数接受 _0个或更多_ 参数,并展开为一个包含这些参数的字符串,以空格分隔,如果没有参数,则为空字符串:
|
||
|
||
```make
|
||
commit MESSAGE *FLAGS:
|
||
git commit {{FLAGS}} -m "{{MESSAGE}}"
|
||
```
|
||
|
||
变长参数可以被分配默认值。这些参数被命令行上传递的参数所覆盖:
|
||
|
||
```make
|
||
test +FLAGS='-q':
|
||
cargo test {{FLAGS}}
|
||
```
|
||
|
||
`{{…}}` 的替换可能需要加引号,如果它们包含空格。例如,如果你有以下配方:
|
||
|
||
```make
|
||
search QUERY:
|
||
lynx https://www.google.com/?q={{QUERY}}
|
||
```
|
||
|
||
然后你输入:
|
||
|
||
```sh
|
||
$ just search "cat toupee"
|
||
```
|
||
|
||
`just` 将运行 `lynx https://www.google.com/?q=cat toupee` 命令,这将被 `sh` 解析为`lynx`、`https://www.google.com/?q=cat` 和 `toupee`,而不是原来的 `lynx` 和 `https://www.google.com/?q=cat toupee`。
|
||
|
||
你可以通过添加引号来解决这个问题:
|
||
|
||
```make
|
||
search QUERY:
|
||
lynx 'https://www.google.com/?q={{QUERY}}'
|
||
```
|
||
|
||
以 `$` 为前缀的参数将被作为环境变量导出:
|
||
|
||
```make
|
||
foo $bar:
|
||
echo $bar
|
||
```
|
||
|
||
### 在配方的末尾运行配方
|
||
|
||
一个配方的正常依赖总是在配方开始之前运行。也就是说,被依赖方总是在依赖方之前运行。这些依赖被称为 "前期依赖"。
|
||
|
||
一个配方也可以有后续的依赖,它们在配方之后运行,用 `&&` 表示:
|
||
|
||
```make
|
||
a:
|
||
echo 'A!'
|
||
|
||
b: a && c d
|
||
echo 'B!'
|
||
|
||
c:
|
||
echo 'C!'
|
||
|
||
d:
|
||
echo 'D!'
|
||
```
|
||
|
||
…运行 _b_ 输出:
|
||
|
||
```sh
|
||
$ just b
|
||
echo 'A!'
|
||
A!
|
||
echo 'B!'
|
||
B!
|
||
echo 'C!'
|
||
C!
|
||
echo 'D!'
|
||
D!
|
||
```
|
||
|
||
### 在配方中间运行配方
|
||
|
||
`just` 不支持在配方的中间运行另一个配方,但你可以在一个配方的中间递归调用 `just`。例如以下 `justfile`:
|
||
|
||
```make
|
||
a:
|
||
echo 'A!'
|
||
|
||
b: a
|
||
echo 'B start!'
|
||
just c
|
||
echo 'B end!'
|
||
|
||
c:
|
||
echo 'C!'
|
||
```
|
||
|
||
…运行 _b_ 输出:
|
||
|
||
```sh
|
||
$ just b
|
||
echo 'A!'
|
||
A!
|
||
echo 'B start!'
|
||
B start!
|
||
echo 'C!'
|
||
C!
|
||
echo 'B end!'
|
||
B end!
|
||
```
|
||
|
||
这有局限性,因为配方 `c` 是以一个全新的 `just` 调用来运行的,赋值将被重新计算,依赖可能会运行两次,命令行参数不会被传入到子 `just` 进程。
|
||
|
||
### 用其他语言书写配方
|
||
|
||
以 `#!` 开头的配方将作为脚本执行,因此你可以用其他语言编写配方:
|
||
|
||
```make
|
||
polyglot: python js perl sh ruby
|
||
|
||
python:
|
||
#!/usr/bin/env python3
|
||
print('Hello from python!')
|
||
|
||
js:
|
||
#!/usr/bin/env node
|
||
console.log('Greetings from JavaScript!')
|
||
|
||
perl:
|
||
#!/usr/bin/env perl
|
||
print "Larry Wall says Hi!\n";
|
||
|
||
sh:
|
||
#!/usr/bin/env sh
|
||
hello='Yo'
|
||
echo "$hello from a shell script!"
|
||
|
||
nu:
|
||
#!/usr/bin/env nu
|
||
let hello = 'Yo'
|
||
echo $"($hello) from a shell script!"
|
||
|
||
ruby:
|
||
#!/usr/bin/env ruby
|
||
puts "Hello from ruby!"
|
||
```
|
||
|
||
```sh
|
||
$ just polyglot
|
||
Hello from python!
|
||
Greetings from JavaScript!
|
||
Larry Wall says Hi!
|
||
Yo from a shell script!
|
||
Hello from ruby!
|
||
```
|
||
|
||
### 更加安全的 Bash Shebang 配方
|
||
|
||
如果你正在写一个 `bash` Shebang 配方,考虑加入 `set -euxo pipefail`:
|
||
|
||
```make
|
||
foo:
|
||
#!/usr/bin/env bash
|
||
set -euxo pipefail
|
||
hello='Yo'
|
||
echo "$hello from Bash!"
|
||
```
|
||
|
||
严格意义上说这不是必须的,但是 `set -euxo pipefail` 开启了一些有用的功能,使 `bash` Shebang 配方的行为更像正常的、行式的 `just` 配方:
|
||
|
||
- `set -e` 使 `bash` 在命令失败时退出。
|
||
|
||
- `set -u` 使 `bash` 在变量未定义时退出。
|
||
|
||
- `set -x` 使 `bash` 在运行前打印每一行脚本。
|
||
|
||
- `set -o pipefail` 使 `bash` 在管道中的一个命令失败时退出。这是 `bash` 特有的,所以在普通的行式 `just` 配方中没有开启。
|
||
|
||
这些措施共同避免了很多 Shell 脚本的问题。
|
||
|
||
#### 在 Windows 上执行 Shebang 配方
|
||
|
||
在 Windows 上,包含 `/` 的 Shebang 解释器路径通过 `cygpath` 从 Unix 风格的路径转换为 Windows 风格的路径,该工具随 [Cygwin](http://www.cygwin.com) 一起提供。
|
||
|
||
例如,要在 Windows 上执行这个配方:
|
||
|
||
```make
|
||
echo:
|
||
#!/bin/sh
|
||
echo "Hello!"
|
||
```
|
||
|
||
解释器路径 `/bin/sh` 在执行前将被 `cygpath` 翻译成 Windows 风格的路径。
|
||
|
||
如果解释器路径不包含 `/`,它将被执行而不被翻译。这主要用于 `cygpath` 不可用或者你希望向解释器传递一个 Windows 风格的路径的情况下。
|
||
|
||
### 在配方中设置变量
|
||
|
||
配方代码行是由 Shell 解释的,而不是 `just`,所以不可能在配方中设置 `just` 变量:
|
||
|
||
```mf
|
||
foo:
|
||
x := "hello" # This doesn't work!
|
||
echo {{x}}
|
||
```
|
||
|
||
使用 Shell 变量是可能的,但还有一个问题:每一行配方都由一个新的 Shell 实例运行,所以在一行中设置的变量不会在下一行中生效:
|
||
|
||
```make
|
||
foo:
|
||
x=hello && echo $x # 这个没问题!
|
||
y=bye
|
||
echo $y # 这个是有问题的, `y` 在此处未定义!
|
||
```
|
||
|
||
解决这个问题的最好方法是使用 Shebang 配方。Shebang 配方体被提取出来并作为脚本运行,所以一个 Shell 实例就可以运行整个配方体:
|
||
|
||
```make
|
||
foo:
|
||
#!/usr/bin/env bash
|
||
set -euxo pipefail
|
||
x=hello
|
||
echo $x
|
||
```
|
||
|
||
### 在配方之间共享环境变量
|
||
|
||
每个配方的每一行都由一个新的shell执行,所以不可能在配方之间共享环境变量。
|
||
|
||
#### 使用 Python 虚拟环境
|
||
|
||
一些工具,像 [Python 的 venv](https://docs.python.org/3/library/venv.html),需要加载环境变量才能工作,这使得它们在使用 `just` 时具有挑战性。作为一种变通方法,你可以直接执行虚拟环境二进制文件:
|
||
|
||
```make
|
||
venv:
|
||
[ -d foo ] || python3 -m venv foo
|
||
|
||
run: venv
|
||
./foo/bin/python3 main.py
|
||
```
|
||
|
||
### 改变配方中的工作目录
|
||
|
||
每一行配方都由一个新的 Shell 执行,所以如果你在某一行改变了工作目录,对后面的行不会有影响:
|
||
|
||
```make
|
||
foo:
|
||
pwd # This `pwd` will print the same directory…
|
||
cd bar
|
||
pwd # …as this `pwd`!
|
||
```
|
||
|
||
有几个方法可以解决这个问题。一个是在你想运行的命令的同一行调用 `cd`:
|
||
|
||
```make
|
||
foo:
|
||
cd bar && pwd
|
||
```
|
||
|
||
另一种方法是使用 Shebang 配方。Shebang 配方体被提取并作为脚本运行,因此一个 Shell 实例将运行整个配方体,所以一行的 `pwd` 改变将影响后面的行,就像一个 Shell 脚本:
|
||
|
||
```make
|
||
foo:
|
||
#!/usr/bin/env bash
|
||
set -euxo pipefail
|
||
cd bar
|
||
pwd
|
||
```
|
||
|
||
### 缩进
|
||
|
||
配方代码行可以用空格或制表符缩进,但不能两者混合使用。一个配方的所有行必须有相同的缩进,但同一 `justfile` 中的不同配方可以使用不同的缩进。
|
||
|
||
### 多行结构
|
||
|
||
没有初始 Shebang 的配方会被逐行评估和运行,这意味着多行结构可能不会像你预期的那样工作。
|
||
|
||
例如对于下面的 `justfile`:
|
||
|
||
```mf
|
||
conditional:
|
||
if true; then
|
||
echo 'True!'
|
||
fi
|
||
```
|
||
|
||
在 `conditional` 配方的第二行前有额外的前导空格,会产生一个解析错误:
|
||
|
||
```sh
|
||
$ just conditional
|
||
error: Recipe line has extra leading whitespace
|
||
|
|
||
3 | echo 'True!'
|
||
| ^^^^^^^^^^^^^^^^
|
||
```
|
||
|
||
为了解决这个问题,你可以在一行上写条件,用斜线转义换行,或者在你的配方中添加一个 Shebang。我们提供了一些多行结构的例子可供参考。
|
||
|
||
#### `if` 语句
|
||
|
||
```make
|
||
conditional:
|
||
if true; then echo 'True!'; fi
|
||
```
|
||
|
||
```make
|
||
conditional:
|
||
if true; then \
|
||
echo 'True!'; \
|
||
fi
|
||
```
|
||
|
||
```make
|
||
conditional:
|
||
#!/usr/bin/env sh
|
||
if true; then
|
||
echo 'True!'
|
||
fi
|
||
```
|
||
|
||
#### `for` 循环
|
||
|
||
```make
|
||
for:
|
||
for file in `ls .`; do echo $file; done
|
||
```
|
||
|
||
```make
|
||
for:
|
||
for file in `ls .`; do \
|
||
echo $file; \
|
||
done
|
||
```
|
||
|
||
```make
|
||
for:
|
||
#!/usr/bin/env sh
|
||
for file in `ls .`; do
|
||
echo $file
|
||
done
|
||
```
|
||
|
||
#### `while` 循环
|
||
|
||
```make
|
||
while:
|
||
while `server-is-dead`; do ping -c 1 server; done
|
||
```
|
||
|
||
```make
|
||
while:
|
||
while `server-is-dead`; do \
|
||
ping -c 1 server; \
|
||
done
|
||
```
|
||
|
||
```make
|
||
while:
|
||
#!/usr/bin/env sh
|
||
while `server-is-dead`; do
|
||
ping -c 1 server
|
||
done
|
||
```
|
||
|
||
### 命令行选项
|
||
|
||
`just` 提供了一些有用的命令行选项,用于列出、Dump 和调试配方以及变量:
|
||
|
||
```sh
|
||
$ just --list
|
||
Available recipes:
|
||
js
|
||
perl
|
||
polyglot
|
||
python
|
||
ruby
|
||
$ just --show perl
|
||
perl:
|
||
#!/usr/bin/env perl
|
||
print "Larry Wall says Hi!\n";
|
||
$ just --show polyglot
|
||
polyglot: python js perl sh ruby
|
||
```
|
||
|
||
可以通过 `just --help` 命令查看所有选项。
|
||
|
||
### 私有配方
|
||
|
||
名字以 `_` 开头的配方和别名将在 `just --list` 中被忽略:
|
||
|
||
```make
|
||
test: _test-helper
|
||
./bin/test
|
||
|
||
_test-helper:
|
||
./bin/super-secret-test-helper-stuff
|
||
```
|
||
|
||
```sh
|
||
$ just --list
|
||
Available recipes:
|
||
test
|
||
```
|
||
|
||
`just --summary` 亦然:
|
||
|
||
```sh
|
||
$ just --summary
|
||
test
|
||
```
|
||
|
||
这对那些只作为其他配方的依赖使用的辅助配方很有用。
|
||
|
||
### 安静配方
|
||
|
||
配方名称可在前面加上 `@`,可以在每行反转行首 `@` 的含义:
|
||
|
||
```make
|
||
@quiet:
|
||
echo hello
|
||
echo goodbye
|
||
@# all done!
|
||
```
|
||
|
||
现在只有以 `@` 开头的行才会被回显:
|
||
|
||
```sh
|
||
$ j quiet
|
||
hello
|
||
goodbye
|
||
# all done!
|
||
```
|
||
|
||
Shebang 配方默认是安静的:
|
||
|
||
```make
|
||
foo:
|
||
#!/usr/bin/env bash
|
||
echo 'Foo!'
|
||
```
|
||
|
||
```sh
|
||
$ just foo
|
||
Foo!
|
||
```
|
||
|
||
在 Shebang 配方名称前面添加 `@`,使 `just` 在执行配方前打印该配方:
|
||
|
||
```make
|
||
@bar:
|
||
#!/usr/bin/env bash
|
||
echo 'Bar!'
|
||
```
|
||
|
||
```sh
|
||
$ just bar
|
||
#!/usr/bin/env bash
|
||
echo 'Bar!'
|
||
Bar!
|
||
```
|
||
|
||
### 通过交互式选择器选择要运行的配方
|
||
|
||
`--choose` 子命令可以使 `just` 唤起一个选择器来让您选择要运行的配方。选择器应该从标准输入中读取包含配方名称的行,并将其中一个或多个用空格分隔的名称打印到标准输出。
|
||
|
||
因为目前没有办法通过 `--choose` 运行一个需要传入参数的配方,所以这样的配方将不会在选择器中列出。另外,私有配方和别名也会被忽略。
|
||
|
||
选择器可以用 `--chooser` 标志来覆写。如果 `--chooser` 没有给出,那么 `just` 首先检查 `$JUST_CHOOSER` 是否被设置。如果没有,那么将使用默认选择器 `fzf`,这是一个流行的模糊查找器。
|
||
|
||
参数可以包含在选择器中,例如:`fzf --exact`。
|
||
|
||
选择器的调用方式与配方行的调用方式相同。例如,如果选择器是 `fzf`,它将被通过 `sh -cu 'fzf'` 调用,如果 Shell 或 Shell 参数被覆写,选择器的调用将尊重这些覆写。
|
||
|
||
如果你希望 `just` 默认用选择器来选择配方,你可以用这个作为你的默认配方:
|
||
|
||
```make
|
||
default:
|
||
@just --choose
|
||
```
|
||
|
||
### 在其他目录下调用 `justfile`
|
||
|
||
如果传递给 `just` 的第一个参数包含 `/`,那么就会发生以下情况:
|
||
|
||
1. 参数在最后的 `/` 处被分割;
|
||
|
||
2. 最后一个 `/` 之前的部分将被视为一个目录。`just` 将从这里开始搜索 `justfile`,而不是在当前目录下;
|
||
|
||
3. 最后一个斜线之后的部分被视为正常参数,如果是空的,则被忽略;
|
||
|
||
这可能看起来有点奇怪,但如果你想在一个子目录下的 `justfile` 中运行一个命令,这很有用。
|
||
|
||
例如,如果你在一个目录中,该目录包含一个名为 `foo` 的子目录,该目录包含一个 `justfile`,其配方为 `build`,也是默认的配方,以下都是等同的:
|
||
|
||
```sh
|
||
$ (cd foo && just build)
|
||
$ just foo/build
|
||
$ just foo/
|
||
```
|
||
|
||
### 隐藏 `justfile`
|
||
|
||
`just` 会寻找名为 `justfile` 和 `.justfile` 的 `justfile`,因此你也可以使用隐藏的 `justfile`(即 `.justfile`)。
|
||
|
||
### Just 脚本
|
||
|
||
通过在 `justfile` 的顶部添加 Shebang 行并使其可执行,`just` 可以作为脚本的解释器使用:
|
||
|
||
```sh
|
||
$ cat > script <<EOF
|
||
#!/usr/bin/env just --justfile
|
||
|
||
foo:
|
||
echo foo
|
||
EOF
|
||
$ chmod +x script
|
||
$ ./script foo
|
||
echo foo
|
||
foo
|
||
```
|
||
|
||
当一个带有 Shebang 的脚本被执行时,系统会提供该脚本的路径作为 Shebang 中命令的参数。因此,如果 Shebang 是 `#!/usr/bin/env just --justfile`,对应的命令将是 `/usr/bin/env just --justfile PATH_TO_SCRIPT`。
|
||
|
||
对于上面的命令,`just` 会把它的工作目录改为脚本的位置。如果你想让工作目录保持不变,可以使用 `#!/usr/bin/env just --working-directory . --justfile`。
|
||
|
||
注意:Shebang 的行分隔在不同的操作系统中并不一致。前面的例子只在 macOS 上进行了测试。在 Linux 上,你可能需要向 `env` 传递 `-S` 标志:
|
||
|
||
```make
|
||
#!/usr/bin/env -S just --justfile
|
||
|
||
default:
|
||
echo foo
|
||
```
|
||
|
||
### 将 `justfile` 转为JSON文件
|
||
|
||
`--dump` 命令可以和 `--dump-format json` 一起使用,以打印一个 `justfile` 的JSON表示。JSON格式目前还不稳定,所以需要添加 `--unstable` 标志。
|
||
|
||
### 回退到父 `justfile`
|
||
|
||
如果没有找到配方,`just` 将在父目录和递归地在其上级目录里寻找 `justfile`,直到到达根目录。
|
||
|
||
这个功能目前是不稳定的,所以必须用 `--unstable` 标志启用。
|
||
|
||
举个例子,假设当前目录包含这个 `justfile`:
|
||
|
||
```make
|
||
foo:
|
||
echo foo
|
||
```
|
||
|
||
而父目录包含这个 `justfile`:
|
||
|
||
```make
|
||
bar:
|
||
echo bar
|
||
```
|
||
|
||
```sh
|
||
$ just --unstable bar
|
||
Trying ../justfile
|
||
echo bar
|
||
bar
|
||
```
|
||
|
||
### 避免参数分割
|
||
|
||
考虑这个 `justfile`:
|
||
|
||
```make
|
||
foo argument:
|
||
touch {{argument}}
|
||
```
|
||
|
||
下面的命令将创建两个文件,`some` 和 `argument.txt`:
|
||
|
||
```sh
|
||
$ just foo "some argument.txt"
|
||
```
|
||
|
||
用户 Shell 会把 `"some argument.txt"` 解析为一个参数,但当 `just` 把 `touch {{argument}}` 替换为`touch some argument.txt` 时,引号没有被保留,`touch` 会收到两个参数。
|
||
|
||
有几种方法可以避免这种情况:引号包裹、位置参数和导出参数。
|
||
|
||
#### 引号包裹
|
||
|
||
可以在 `{{argument}}` 的周围加上引号,进行插值:
|
||
|
||
```make
|
||
foo argument:
|
||
touch '{{argument}}'
|
||
```
|
||
|
||
这保留了 `just` 在运行前捕捉变量名称拼写错误的能力,例如,如果你写成了 `{{argument}}`,但如果 `argument` 的值包含单引号,则不会如你的预期那样工作。
|
||
|
||
#### 位置参数
|
||
|
||
设置 `positional-arguments` 使所有参数作为位置参数传递,允许用 `$1`, `$2`, …, 和 `$@` 访问这些参数,然后可以用双引号避免被 Shell 进一步分割:
|
||
|
||
```make
|
||
set positional-arguments
|
||
|
||
foo argument:
|
||
touch "$1"
|
||
```
|
||
|
||
这就破坏了 `just` 捕捉拼写错误的能力,例如你输入了 `$2`,这对 `argument` 的所有可能的值都有效,包括那些带双引号的值。
|
||
|
||
#### 导出参数
|
||
|
||
当设置 `export` 时,所有参数都被导出:
|
||
|
||
```make
|
||
set export
|
||
|
||
foo argument:
|
||
touch "$argument"
|
||
```
|
||
|
||
或者可以通过在参数前加上 `$` 来导出单个参数:
|
||
|
||
```make
|
||
foo $argument:
|
||
touch "$argument"
|
||
```
|
||
|
||
这就破坏了 `just` 捕捉拼写错误的能力,例如你输入 `$argumant`,但对 `argument` 的所有可能的值都有效,包括那些带双引号的。
|
||
|
||
### 配置 Shell
|
||
|
||
有许多方法可以为行式配方配置 Shell,当配方不以 `#!` Shebang 开头时,这些配方的 Shell 为默认的。它们的优先级,从高到低为:
|
||
|
||
1. `--shell` 和 `--shell-arg` 命令行选项。传入这两个选项中的任何一个,都会使 `just` 忽略当前 justfile 中的任何设置
|
||
2. `set windows-shell := [...]`
|
||
3. `set windows-powershell` (废弃)
|
||
4. `set shell := [...]`
|
||
|
||
由于 `set windows-shell` 比 `set shell` 有更高的优先级,你可以用 `set windows-shell` 在 Windows 上选择一个 Shell,而 `set shell` 则为所有其他平台选择一个 Shell。
|
||
|
||
更新日志
|
||
---------
|
||
|
||
最新版本的更新日志可以在 [CHANGELOG.md](https://raw.githubusercontent.com/casey/just/master/CHANGELOG.md) 中找到。以前版本的更新日志可在 [发布页](https://github.com/casey/just/releases) 找到。`just --changelog` 也可以用来使 `just` 二进制文件打印其更新日志。
|
||
|
||
杂项
|
||
-----------
|
||
|
||
### 配套工具
|
||
|
||
与 `just` 搭配得很好的工具包括:
|
||
|
||
- [`watchexec`](https://github.com/mattgreen/watchexec) — 一个简单的工具,它监控一个路径,并在检测到修改时运行一个命令。
|
||
|
||
### Shell 别名
|
||
|
||
为了快速运行命令, 可以把 `alias j=just` 放在你的 Shell 配置文件中。
|
||
|
||
在 `bash` 中,别名的命令可能不会保留下一节中描述的 Shell 自动补全功能。可以在你的 `.bashrc` 中添加以下一行,以便在你的别名命令中使用与 `just` 相同的自动补全功能:
|
||
|
||
```sh
|
||
complete -F _just -o bashdefault -o default j
|
||
```
|
||
|
||
### Shell 自动补全脚本
|
||
|
||
Bash、Zsh、Fish、PowerShell 和 Elvish 的 Shell 自动补全脚本可以在 [自动补全](https://github.com/casey/just/tree/master/completions) 目录下找到。关于如何安装它们,请参考你的 Shell 文档。
|
||
|
||
`just` 二进制文件也可以在运行时生成相同的自动补全脚本,使用 `--completions` 命令即可,如下:
|
||
|
||
```sh
|
||
$ just --completions zsh > just.zsh
|
||
```
|
||
|
||
*macOS 注意:* 最近版本的 macOS 使用 zsh 作为默认的 Shell。如果你使用 Homebrew 安装 `just`,它会自动安装 zsh 补全脚本的最新副本到 Homebrew zsh 目录下,而内置默认版本的 zsh 是不知道的。如果可能的话,最好使用这个脚本副本,因为当你通过 Homebrew 更新 `just` 时,它也会被更新。另外,许多其他的 Homebrew 软件包也使用相同位置的补全脚本,而内置的 zsh 也不知道这些。为了在这种情况下在 zsh 中使用 `just` 的补全,你可以在调用 `compinit` 之前将 `fpath` 设置为 Homebrew 的位置。还要注意,Oh My Zsh 默认会运行 `compinit`,所以你的 `.zshrc` 文件看起来像这样:
|
||
|
||
```zsh
|
||
# 启动Homebrew,添加环境变量
|
||
eval "$(brew shellenv)"
|
||
|
||
fpath=($HOMEBREW_PREFIX/share/zsh/site-functions $fpath)
|
||
|
||
# 然后从这些选项中选择一个:
|
||
# 1. 如果你使用的是 Oh My Zsh,你可以在这里初始化它
|
||
# source $ZSH/oh-my-zsh.sh
|
||
|
||
# 2. 否则就自己运行 compinit
|
||
# autoload -U compinit
|
||
# compinit
|
||
```
|
||
|
||
### 语法
|
||
|
||
在 [GRAMMAR.md](https://github.com/casey/just/blob/master/GRAMMAR.md) 中可以找到一个非正式的 `justfile` 语法说明。
|
||
|
||
### just.sh
|
||
|
||
在 `just` 成为一个精致的 Rust 程序之前,它是一个很小的 Shell 脚本,叫 `make`。你可以在 [extras/just.sh](https://github.com/casey/just/blob/master/extras/just.sh) 中找到旧版本。
|
||
|
||
### 用户 `justfile`
|
||
|
||
如果你想让一些配方在任何地方都能使用,你有几个选择。
|
||
|
||
首先,在 `~/.user.justfile` 中创建一个带有一些配方的 `justfile`。
|
||
|
||
#### 配方别名
|
||
|
||
如果你想通过名称来调用 `~/.user.justfile` 中的配方,并且不介意为每个配方创建一个别名,可以在你的 Shell 初始化脚本中加入以下内容:
|
||
|
||
```sh
|
||
for recipe in `just --justfile ~/.user.justfile --summary`; do
|
||
alias $recipe="just --justfile ~/.user.justfile --working-directory . $recipe"
|
||
done
|
||
```
|
||
|
||
现在,如果你在 `~/.user.justfile` 里有一个叫 `foo` 的配方,你可以在命令行输入 `foo` 来运行它。
|
||
|
||
我花了很长时间才意识到你可以像这样创建配方别名。尽管有点迟,但我很高兴给你带来这个 `justfile` 技术的重大进步。
|
||
|
||
#### 别名转发
|
||
|
||
如果你不想为每个配方创建别名,你可以创建一个别名:
|
||
|
||
```sh
|
||
alias .j='just --justfile ~/.user.justfile --working-directory .'
|
||
```
|
||
|
||
现在,如果你在 `~/.user.justfile` 里有一个叫 `foo` 的配方,你可以在命令行输入 `.j foo` 来运行它。
|
||
|
||
我很确定没有人真正使用这个功能,但它确实存在。
|
||
|
||
¯\\\_(ツ)\_/¯
|
||
|
||
#### 定制化
|
||
|
||
你可以用额外的选项来定制上述别名。例如,如果你想让你的 `justfile` 中的配方在你的主目录中运行,而不是在当前目录中运行:
|
||
|
||
```sh
|
||
alias .j='just --justfile ~/.user.justfile --working-directory ~'
|
||
```
|
||
|
||
### Node.js `package.json` 脚本兼容性
|
||
|
||
下面的导出语句使 `just` 配方能够访问本地 Node 模块二进制文件,并使 `just` 配方命令的行为更像 Node.js `package.json` 文件中的 `script` 条目:
|
||
|
||
```make
|
||
export PATH := "./node_modules/.bin:" + env_var('PATH')
|
||
```
|
||
|
||
### 替代方案
|
||
|
||
现在并不缺少命令运行器!在这里,有一些或多或少比较类似于 `just` 的替代方案,包括:
|
||
|
||
- [make](https://en.wikipedia.org/wiki/Make_(software)): 启发了 `just` 的 Unix 构建工具。
|
||
- [makesure](https://github.com/xonixx/makesure): 一个用 AWK 和 Shell 编写的简单而便携的命令运行器。
|
||
- [mmake](https://github.com/tj/mmake): 一个围绕 `make` 的包装器,有很多改进,包括远程引入。
|
||
- [robo](https://github.com/tj/robo): 一个用 Go 编写的基于 YAML 的命令运行器。
|
||
|
||
贡献
|
||
------------
|
||
|
||
`just` 欢迎你的贡献! `just` 是在最大许可的 [CC0](https://creativecommons.org/publicdomain/zero/1.0/legalcode.txt) 公共领域奉献和后备许可下发布的,所以你的修改也必须在这个许可下发布。
|
||
|
||
### Janus
|
||
|
||
[Janus](https://github.com/casey/janus) 是一个收集和分析 `justfile` 的工具,可以确定新版本的 `just` 是否会破坏或改变现有 `justfile` 的解析。
|
||
|
||
在合并一个特别大的或可怕的变化之前,应该运行 `Janus` 以确保没有任何破坏。不要担心自己运行 `Janus`,Casey 会很乐意在需要时为你运行它。
|
||
|
||
### 最小支持的 Rust 版本
|
||
|
||
最低支持的 Rust 版本,即 MSRV,是 Rust 1.47.0。
|
||
|
||
常见问题
|
||
--------------------------
|
||
|
||
### Just 避免了 Make 的哪些特异性?
|
||
|
||
`make` 有一些行为令人感到困惑、复杂,或者使它不适合作为通用的命令运行器。
|
||
|
||
一个例子是,在某些情况下,`make` 不会实际运行配方中的命令。例如,如果你有一个名为 `test` 的文件和以下 makefile:
|
||
|
||
```make
|
||
test:
|
||
./test
|
||
```
|
||
|
||
`make` 将会拒绝运行你的测试:
|
||
|
||
```sh
|
||
$ make test
|
||
make: `test' is up to date.
|
||
```
|
||
|
||
`make` 假定 `test` 配方产生一个名为 `test` 的文件。由于这个文件已经存在,而且由于配方没有其他依赖,`make` 认为它没有任何事情可做并退出。
|
||
|
||
公平地说,当把 `make` 作为一个构建系统时,这种行为是可取的,但当把它作为一个命令运行器时就不可取了。你可以使用 `make` 内置的 [`.PHONY` 目标名称](https://www.gnu.org/software/make/manual/html_node/Phony-Targets.html) 为特定的目标禁用这种行为,但其语法很冗长,而且很难记住。明确的虚假目标列表与配方定义分开写,也带来了意外定义新的非虚假目标的风险。在 `just` 中,所有的配方都被当作是虚假的。
|
||
|
||
其他 `make` 特异行为的例子包括赋值中 `=` 和 `:=` 的区别;如果你弄乱了你的 makefile,将会产生混乱的错误信息;需要 `$$` 在配方中使用环境变量;以及不同口味的 `make` 之间的不相容性。
|
||
|
||
### Just 和 Cargo 构建脚本之间有什么关系?
|
||
|
||
[`cargo` 构建脚本](http://doc.crates.io/build-script.html) 有一个相当特定的用途,就是控制 `cargo` 如何构建你的 Rust 项目。这可能包括给 `rustc` 调用添加标志,构建外部依赖,或运行某种 codegen 步骤。
|
||
|
||
另一方面,`just` 是用于你可能在开发中会运行的所有其他的杂项命令。比如在不同的配置下运行测试,对代码进行检查,将构建的产出推送到服务器,删除临时文件,等等。
|
||
|
||
另外,尽管 `just` 是用 Rust 编写的,但它可以被用于任何语言或项目使用的构建系统。
|
||
|
||
进一步漫谈
|
||
-----------------
|
||
|
||
我个人认为为几乎每个项目写一个 `justfile` 非常有用,无论大小。
|
||
|
||
在一个有多个贡献者的大项目中,有一个包含项目工作所需的所有命令的文件是非常有用的,这样所有命令唾手可得。
|
||
|
||
可能有不同的命令来测试、构建、检查、部署等等,把它们都放在一个地方是很方便的,可以减少你花在告诉人们要运行哪些命令和如何输入这些命令的时间。
|
||
|
||
而且,有了一个容易放置命令的地方,你很可能会想出其他有用的东西,这些东西是项目集体智慧的一部分,但没有写在任何地方,比如修订控制工作流程的某些部分需要的神秘命令,安装你项目的所有依赖,或者所有你可能需要传递给构建系统的任意标志等。
|
||
|
||
一些关于配方的想法:
|
||
|
||
- 部署/发布项目
|
||
|
||
- 在发布模式与调试模式下进行构建
|
||
|
||
- 在调试模式下运行或启用日志记录功能
|
||
|
||
- 复杂的 git 工作流程
|
||
|
||
- 更新依赖
|
||
|
||
- 运行不同的测试集,例如快速测试与慢速测试,或以更多输出模式运行它们
|
||
|
||
- 任何复杂的命令集,你真的应该写下来,如果只是为了能够记住它们的话
|
||
|
||
即使是小型的个人项目,能够通过名字记住命令,而不是通过 ^Reverse 搜索你的 Shell 历史,这也是一个巨大的福音,能够进入一个用任意语言编写的旧项目,并知道你需要用到的所有命令都在 `justfile` 中,如果你输入 `just`,就可能会输出一些有用的(或至少是有趣的!)信息。
|
||
|
||
关于配方的想法,请查看 [这个项目的 `justfile`](https://github.com/casey/just/blob/master/justfile),或一些 [在其他项目里](https://github.com/search?o=desc&q=filename%3Ajustfile&s=indexed&type=Code) 的 `justfile`。
|
||
|
||
总之,我想这个令人难以置信地啰嗦的 README 就到此为止了。
|
||
|
||
我希望你喜欢使用 `just`,并在你所有的计算工作中找到巨大的成功和满足!
|
||
|
||
😸
|