4.4 KiB
Serenity installation guide for VirtualBox
NOTICE
There are currently issues with running Serenity in VirtualBox. Please refer to the open issue for a list of currently known issues. Anything that doesn't currently work will be noted in this document.
Creating the disk image
Before creating a disk image that will work in VirtualBox, you will need to create a GRUB image as described in the Serenity installation guide. Please skip the final step of that section, as that is only relevant for putting the image onto a real drive. You cannot use the same disk image created for QEMU. Using that image will halt immediately with the message FATAL: No bootable medium found! System halted.
There are a couple of ways to convert the disk image:
If you have QEMU installed:
qemu-img convert -O vdi /path/to/grub_disk_image /path/to/output/serenityos.vdi
If you only have VirtualBox installed:
VBoxManage convertfromraw --format VDI /path/to/grub_disk_image /path/to/output/serenityos.vdi
Set an identifier to the disk image, otherwise updating the disk image makes the identifiers no longer match up.
VBoxManage internalcommands sethduuid serenityos.vdi 19850209-0000-0000-0000-000000000000
Note that if you are on Windows and you do not have QEMU or VirtualBox in your PATH environment variable, you must be in the installation folder for the tool you're using. You will also need to put ./ in front of the command.
Creating the virtual machine
Please note that these instructions were written with VirtualBox v6.1.12 in mind. Therefore, these instructions may not match exactly for past and future versions.
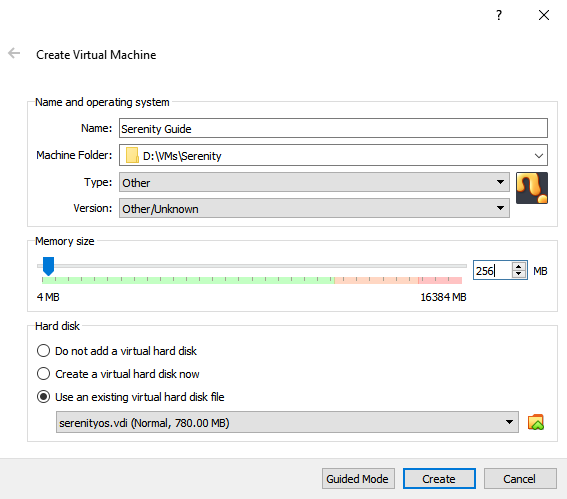
- Open the Create Virtual Machine dialog. Switch to Expert Mode.
- Feel free to give it any name and store it anywhere.
- Switch the Type to Other and the Version to Other/Unknown (64-bit).
- Serenity requires at minimum 512 MiB of memory. Set Memory size equal to or above 512 MiB. The currently recommended size is 1 GiB.
- For Hard disk, select Use an existing virtual hard disk file. Click the folder icon next to the dropdown to open the Hard Disk Selector.
- Click Add. Browse to where you stored the converted disk image from the previous stage and add it. Click Choose.
- Finally click Create.
Reference image:
Configuring the virtual machine to boot Serenity
Serenity will not be able to boot with the default configuration. There are a couple settings to adjust. Open Settings and:
- Go to System, open the Processor tab and tick Enable PAE/NX.
- Go to Audio and set Audio Controller to SoundBlaster 16.
There are a couple of settings to check:
- In Storage, click on the Controller. Make sure the controller type is PIIX4. PIIX3 and ICH6 are untested. Anything else is guaranteed not to work, as Serenity does not currently support them.
- In Network and in the Advanced drop down, make sure the Adapter Type is anything but Intel PRO/1000 MT Desktop (82540EM). While it is the only adapter type Serenity currently supports, it does not currently work in VirtualBox.
Please note that at the time of writing, audio and networking do not work in VirtualBox.
That is all you need to boot Serenity in VirtualBox! Read on for additional configuration you may want to use.
Blinking cursor after GRUB menu
If you only see a blinking cursor after selecting an option in the GRUB menu, it is very likely you have encountered one of the errors listed in the troubleshooting document.
- Check that you have enabled PAE/NX in the Settings > System > Processor tab.
- If you are using a 64-bit disk image, check that Version is set to Other/Unknown (64-bit) instead of Other/Unknown in Settings > General.
Additional configuration (optional)
For serial debugging, go to Serial Ports and enable port 1. Feel free to set the Port Mode to anything if you know what you're doing. The recommended mode is Raw File. Set Path/Address to where you want to store the file. This must also include the file name.
While the default 16 MB of video memory is more than enough to use the default resolution, it is not enough to use all the supported resolutions. If you want to use 2560x1080, you will need to supply at minimum 22 MB of video memory.