17 KiB
Running Teleport on AWS
We've created this guide to give customers a high level overview of how to use Teleport on Amazon Web Services (AWS). This guide provides a high level introduction leading to a deep dive into how to setup and run Teleport in production.
We have split this guide into:
Teleport on AWS FAQ
Why would you want to use Teleport with AWS?
At some point you'll want to log into the system using SSH to help test, debug and troubleshoot a problem box. For EC2, AWS recommends creating 'Key Pairs' and has a range of other tips for securing EC2 instances.
This approach has a number of limitations:
- As your organization grows, keeping track of end users' public/private keys becomes an administrative nightmare.
- Using SSH public/private keys has a number of limitations. Read why SSH Certificates are better.
- Once a machine has been bootstrapped with SSH Keys, there isn't an easy way to add new keys and delegate access.
Which Services can I use Teleport with?
You can use Teleport for all the services that you would SSH into. This guide is focused on EC2. We have a short blog post on using Teleport with EKS. We plan to expand the guide based on feedback but will plan to add instructions for the below.
- RDS
- Detailed EKS
- Lightsail
- Fargate
- AWS ECS
Teleport Introduction
This guide will cover how to setup, configure and run Teleport on AWS.
AWS Services required to run Teleport in HA
We recommend setting up Teleport in high availability mode (HA). In HA mode DynamoDB stores the state of the system and S3 will store audit logs.
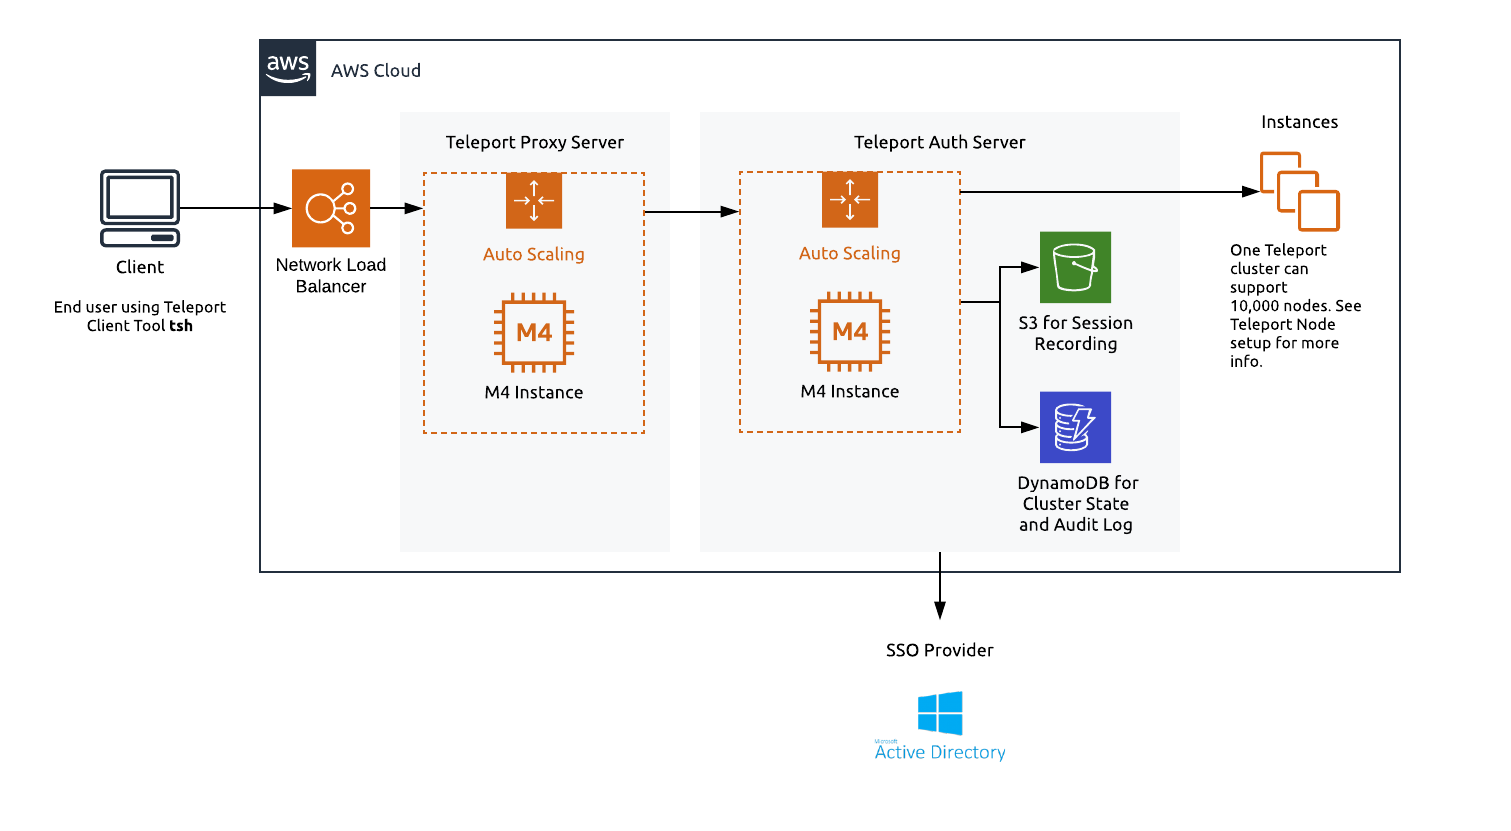
EC2 / Autoscale
To run Teleport in a HA configuration we recommend using m4.large instances. It's best practice to separate the proxy and authentication server, using autoscaling groups for both machines. We have pre-built AMIs for both Teleport OSS and Enterprise editions. Instructions on using these AMIs are below.
DynamoDB
DynamoDB is a key-value and document database that delivers single-digit millisecond performance at any scale. For large clusters you can provision usage but for smaller deployments you can leverage DynamoDB's autoscaling.
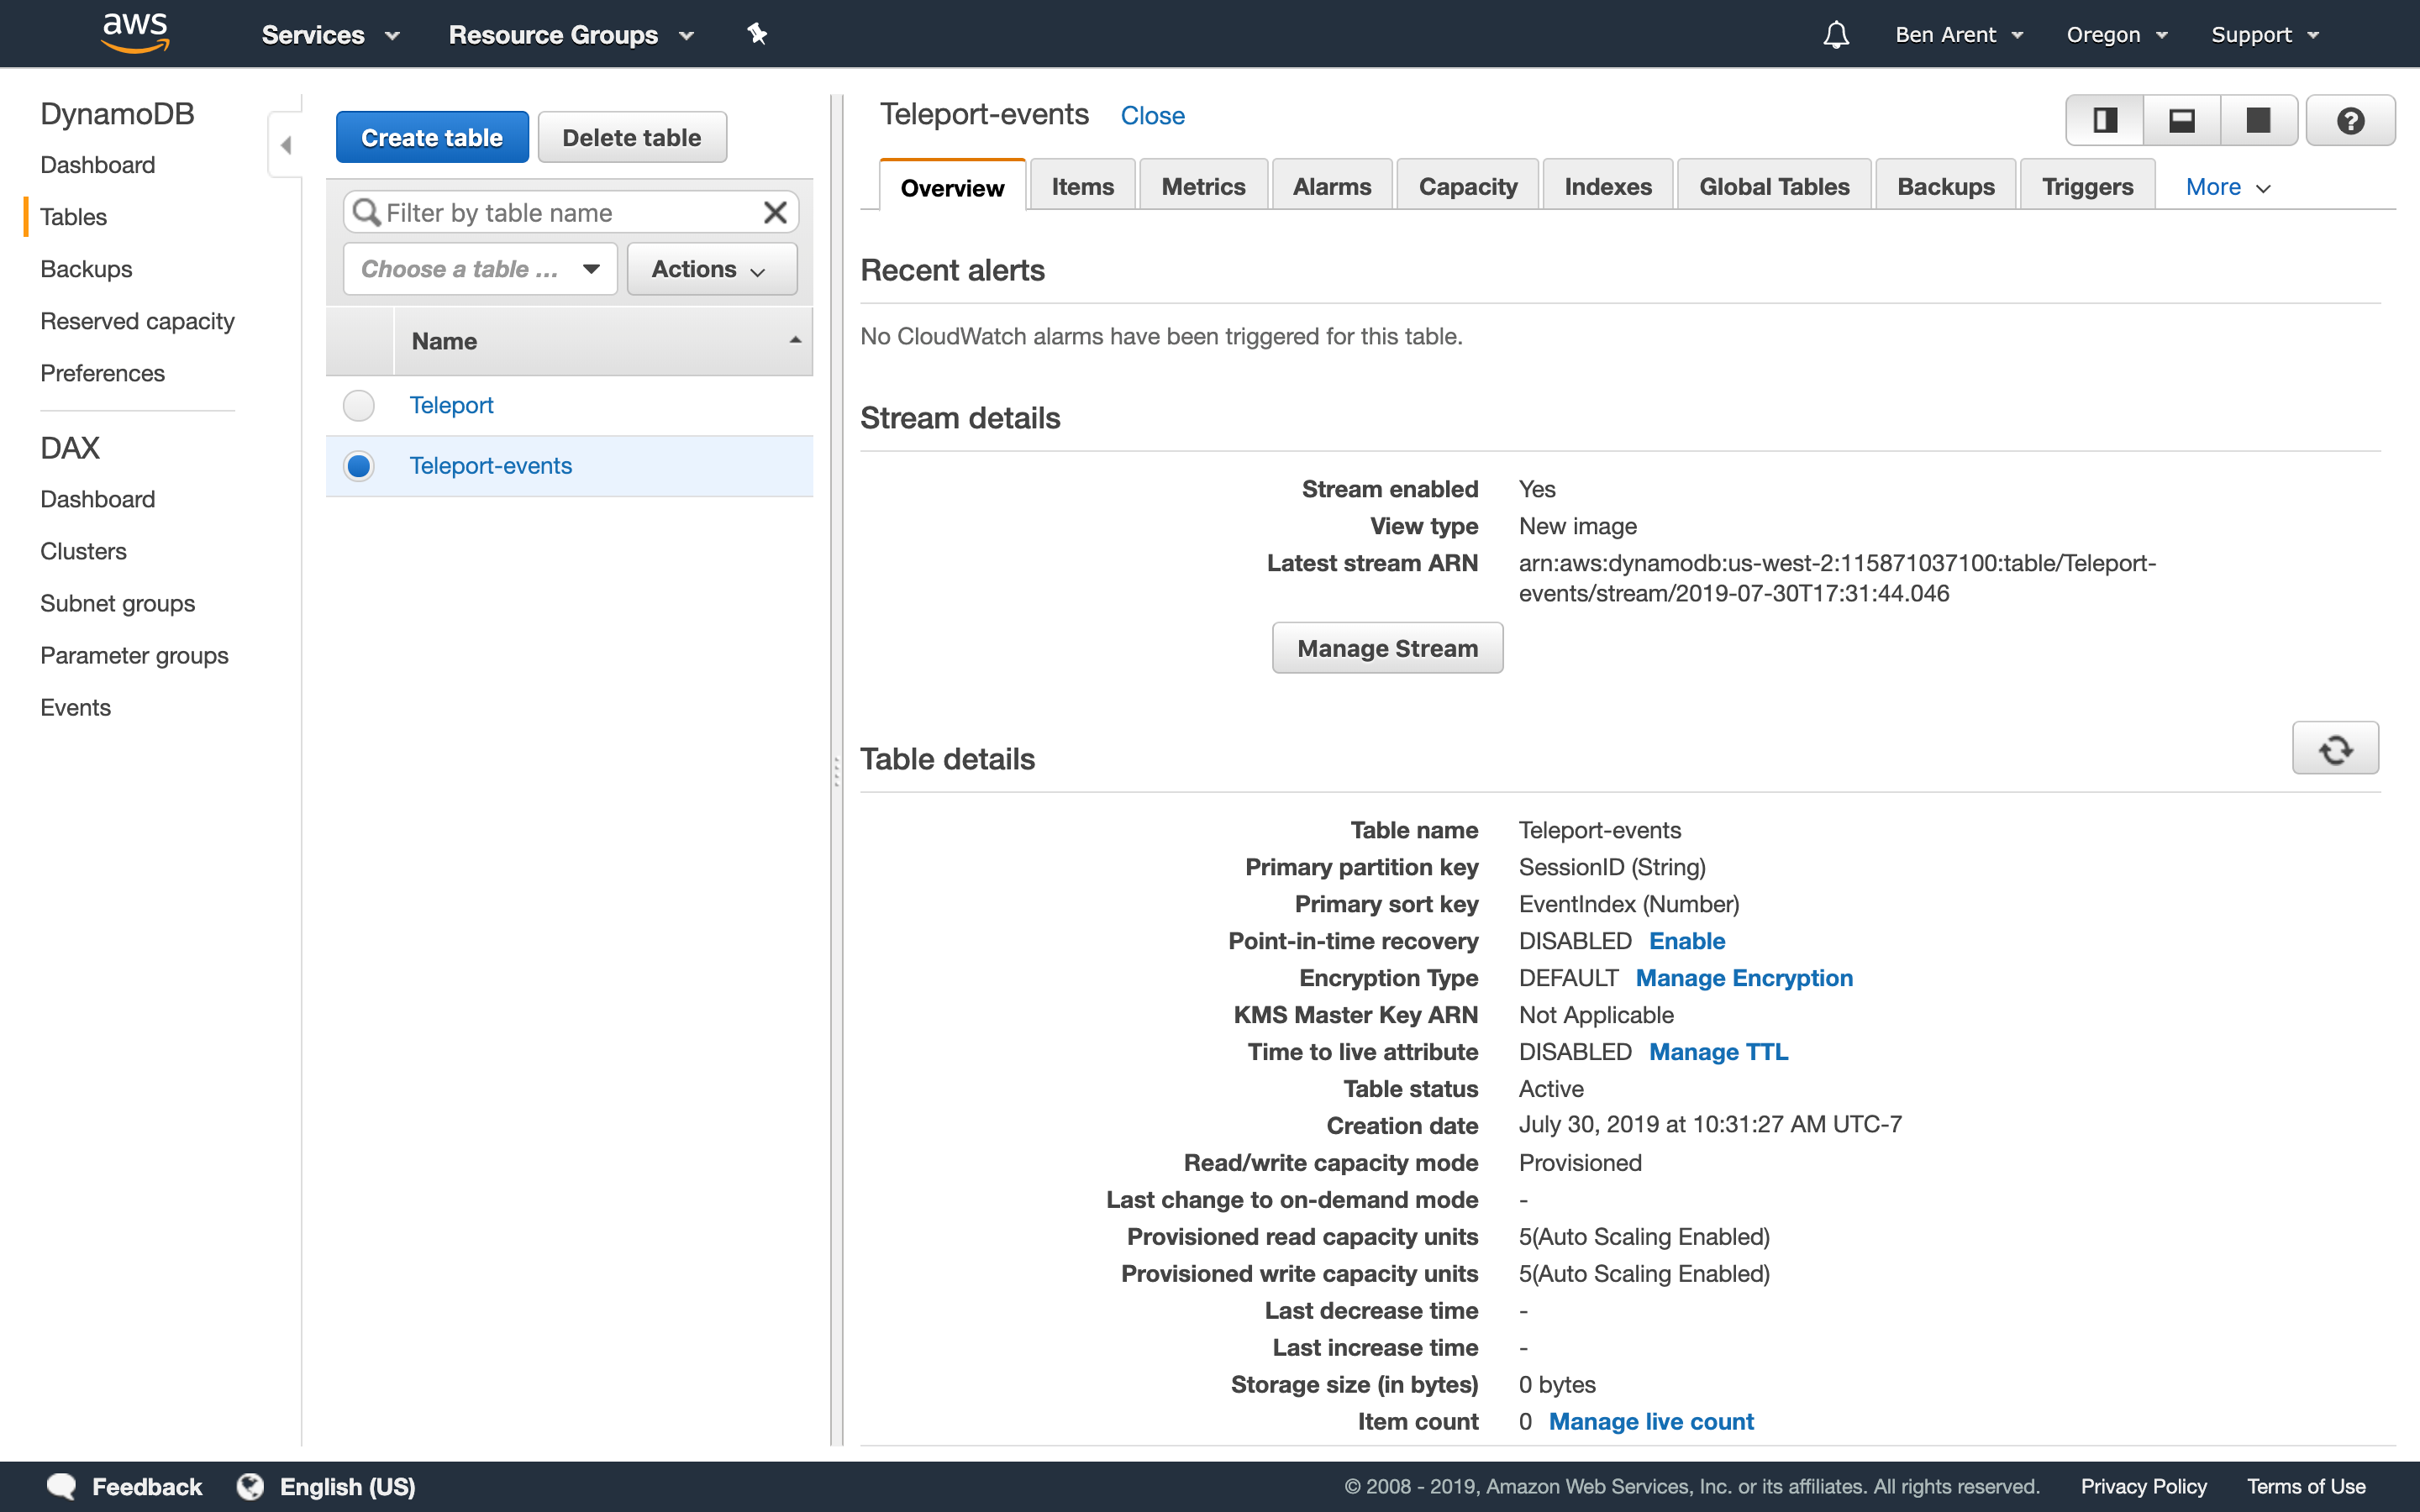
Teleport 4.0 leverages DynamoDB's streaming feature. When turning this on, you'll need
to specify New Image from the streaming options. DynamoDB back-end supports two
types of Teleport data:
- Cluster state
- Audit log events
See DynamoDB Admin Guide for more information
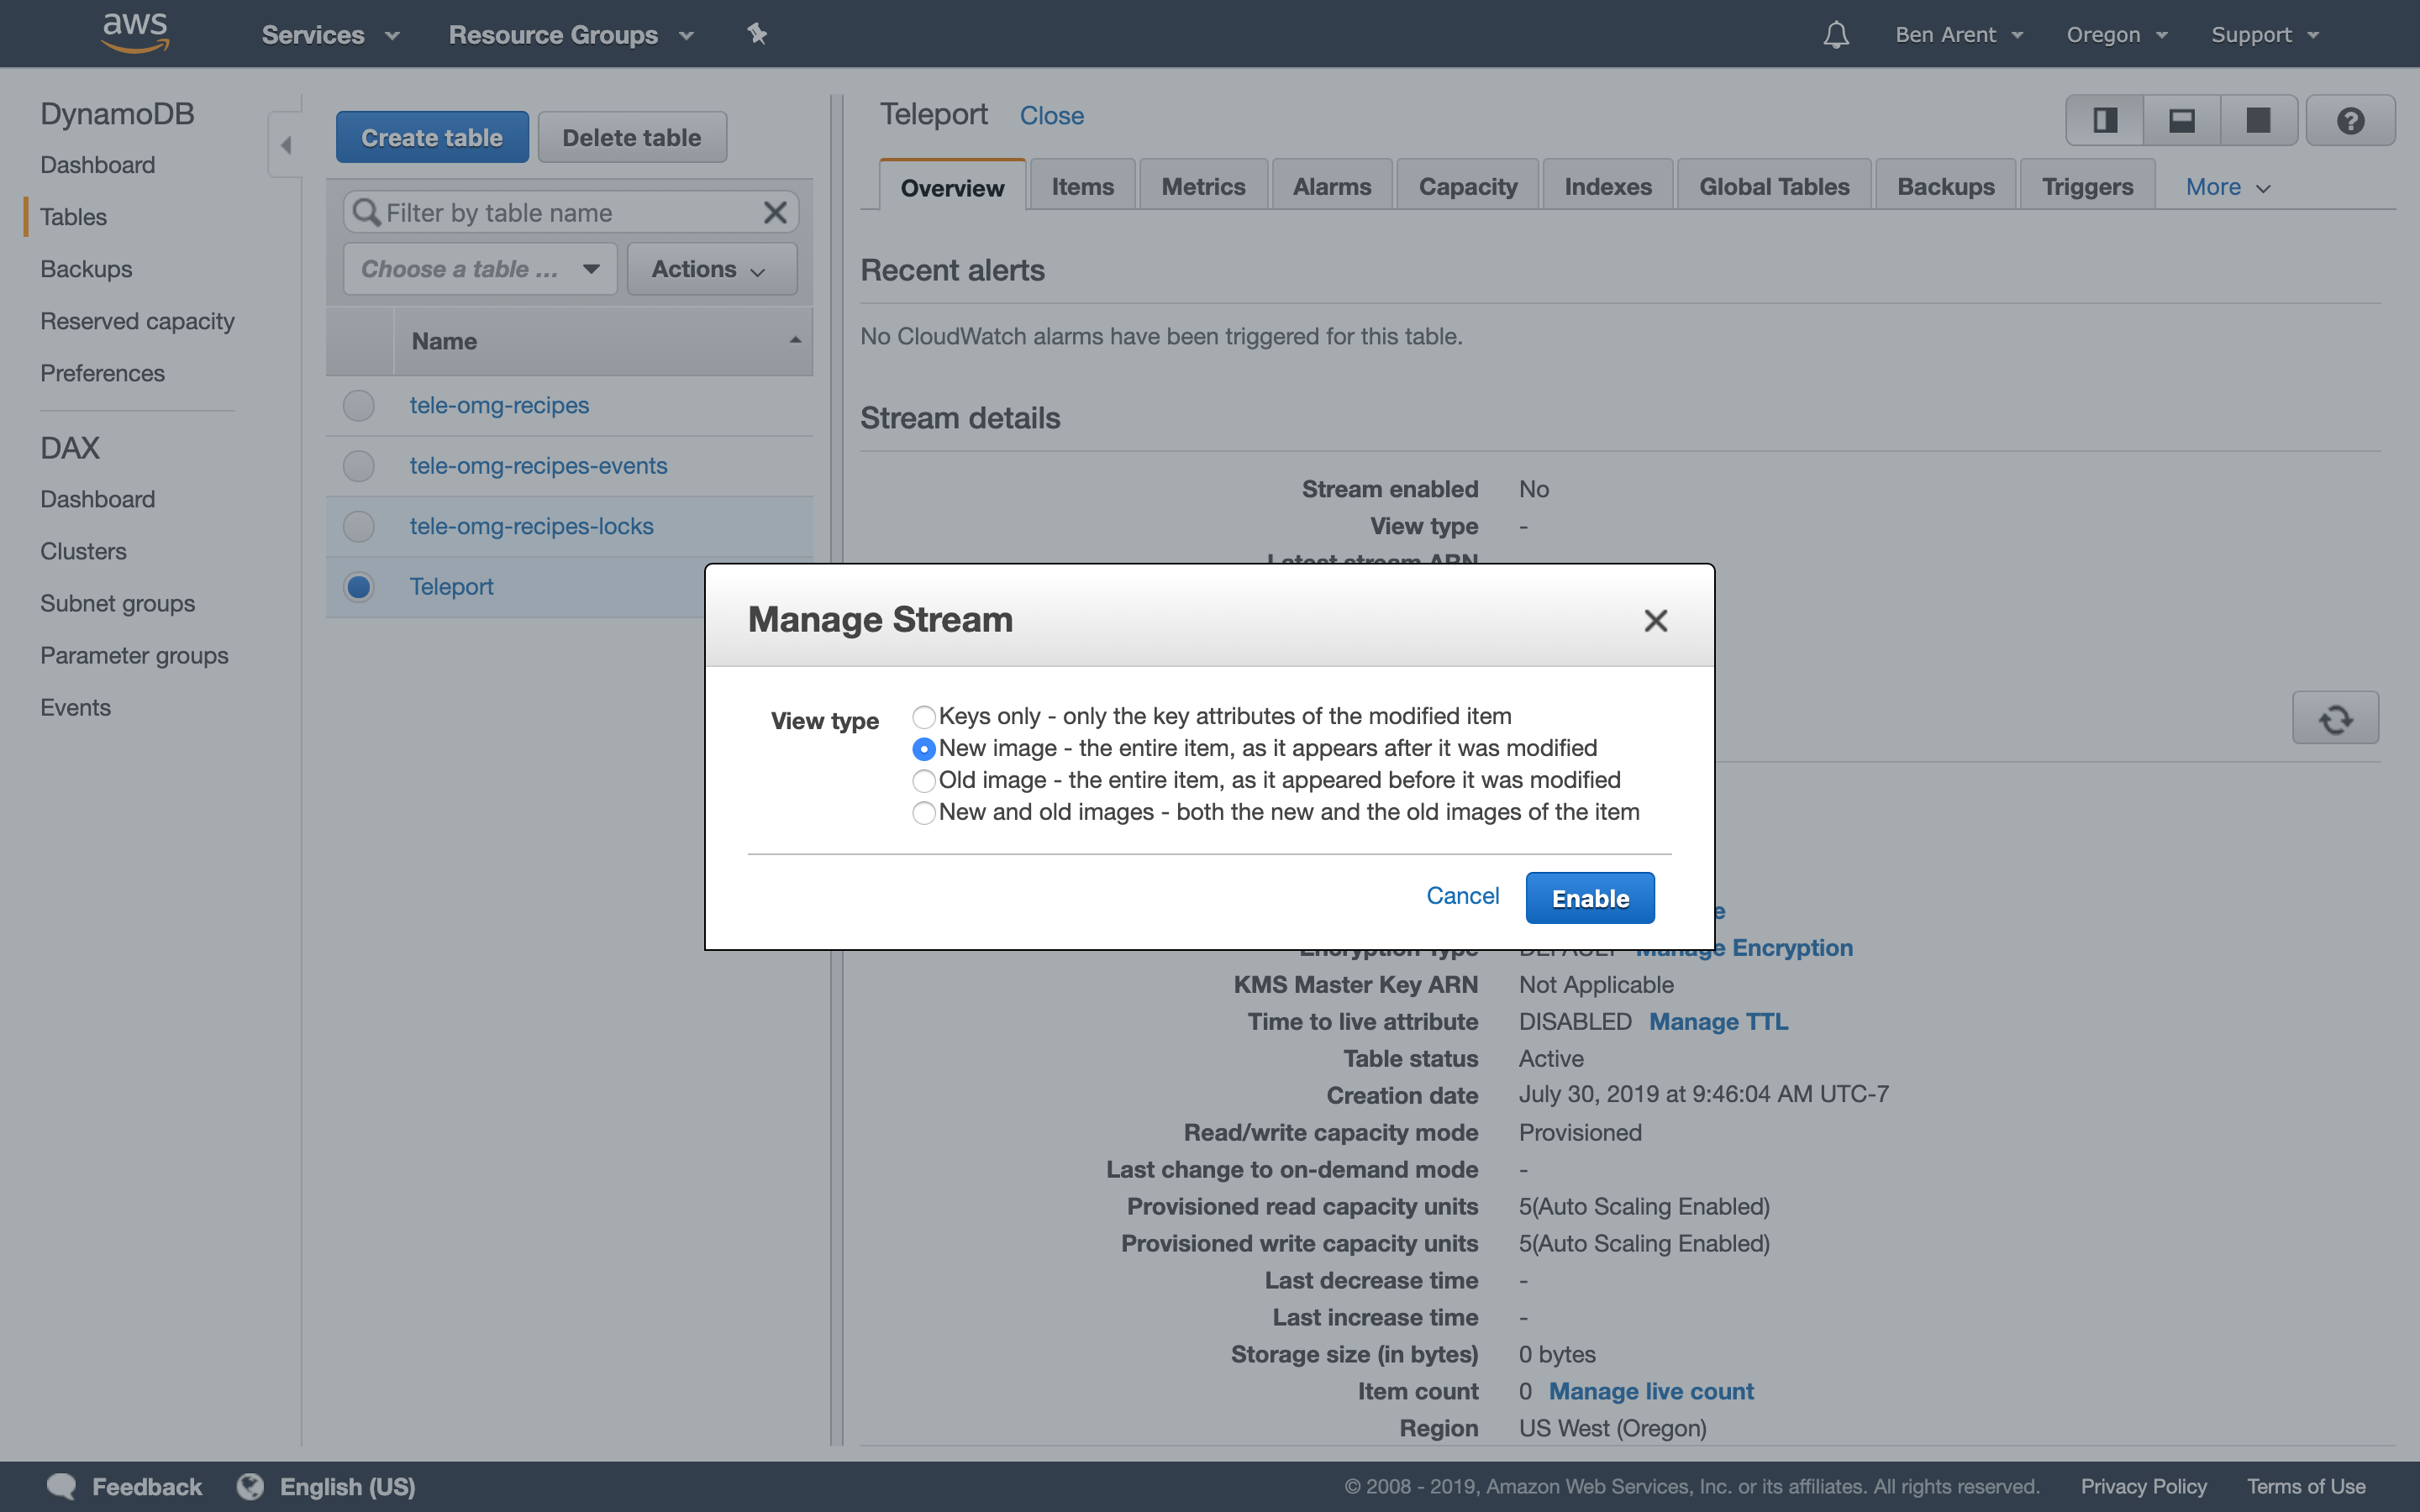 Setting Stream to
 NEW IMAGE
For maintainability and ease of use, we recommend following our Terraform example but below are high level definitions for the tables required to run Teleport.
Cluster State:
| Table name | teleport-cluster-name |
|---|---|
| Primary partition key | HashKey (String) |
| Primary sort key | FullPath (String) |
S3
Amazon Simple Storage Service (Amazon S3) is an object storage service that offers industry-leading scalability, data availability, security, and performance. In this Teleport setup, S3 will provide storage for recorded sessions.
We recommend using Amazon S3 Standard.
!!! tip "Tip"
S3 provides [Amazon S3 Object Lock](https://docs.aws.amazon.com/AmazonS3/latest/dev/object-lock.html),
which is useful for customers deploying Teleport in regulated environments.
Route53
Route53 is a highly available Domain Name System (DNS) provided by AWS. It'll be needed to setup a URL for the proxy - we recommend using a subdomain.
e.g. teleport.acmeinc.com
NLB: Network Load Balancer
AWS provides many different load balancers. To setup Teleport, we recommend using a Network Load Balancer. Network Load Balancers provides TLS for the Teleport proxy and provides the TCP connections needed for Teleport proxy SSH connections.
IAM
IAM is the recommended tool for creating service access. This guide will follow the best practice of principle of least privilege (PoLP).
IAM for Amazon S3
In order to grant an IAM user in your AWS account access to one of your buckets, example.s3.bucket you will need to grant the following permissions: s3:ListBucket, s3:ListBucketVersions, s3:PutObject, s3:GetObject, s3:GetObjectVersion
An example policy is shown below:
{
   "Version": "2012-10-17",
   "Statement": [
     {
       "Effect": "Allow",
       "Action": [
         "s3:ListBucket",
         "s3:ListBucketVersions"
        ],
       "Resource": ["arn:aws:s3:::example.s3.bucket"]
     },
     {
       "Effect": "Allow",
       "Action": [
         "s3:PutObject",
         "s3:GetObject",
         "s3:GetObjectVersion"
       ],
       "Resource": ["arn:aws:s3:::example.s3.bucket/*"]
     }
   ]
 }
!!! note "Note"
`example.s3.bucket` will need to be replaced with your bucket name.
IAM for DynamoDB
In order to grant an IAM user access to DynamoDB make sure that the IAM role assigned to Teleport is configured with proper permissions.
An example policy is shown below:
{
    "Version": "2012-10-17",
    "Statement": [
        {
            "Sid": "AllAPIActionsOnTeleportAuth",
            "Effect": "Allow",
            "Action": "dynamodb:*",
            "Resource": "arn:aws:dynamodb:eu-west-1:123456789012:table/prod.teleport.auth"
        },
        {
            "Sid": "AllAPIActionsOnTeleportStreams",
            "Effect": "Allow",
            "Action": "dynamodb:*",
            "Resource": "arn:aws:dynamodb:eu-west-1:123456789012:table/prod.teleport.auth/stream/*"
        }
    ]
}
!!! note "Note"
`eu-west-1:123456789012:table/prod.teleport.auth` will need to be replaced with your DynamoDB instance.
ACM
With AWS Certificate Manager, you can quickly request SSL/TLS certificates.
- TLS Cert: Used to provide SSL for the proxy.
- SSH Certs (not in ACM): Created and self signed by the
authentication serverand are used to delegate access to Teleport nodes.
AWS Systems Manager Parameter Store
To add new nodes to a Teleport Cluster, we recommend using a strong static token. SSM can be also used to store the enterprise licence.
Setting up a HA Teleport Cluster
Teleport's config based setup offers a wide range of customization for customers. This guide offers a range of setup options for AWS. If you have a very large account, multiple accounts, or over 10k users we would recommend getting in touch. We are more than happy to help you architect, setup and deploy Teleport into your environment.
We have these options for you.
- Using AWS Marketplace (Manual Setup)
- Deploying with CloudFormation
- Deploying with Terraform HA + Monitoring
Single OSS Teleport AMIs (Manual / GUI Setup)
This guide provides instructions on deploying Teleport using AMIs, the below instructions are designed for using the AMI and GUI. It doesn't setup Teleport in HA, so we recommend this as a starting point, but then look at the more advanced sections.
Prerequisites
- Obtain a SSL/TLS Certificate using ACM.
!!! TIP "Prerequisites setup"
Generate and issue a certificate in [ACM](https://console.aws.amazon.com/acm/home?#)
for `teleport.acmeinc.com`, use email or DNS validation as appropriate and make sure
it’s approved successfully.
Step 1: Subscribe to Teleport Community Edition
Subscribe to the Teleport Community Edition on the AWS Marketplace.
- Select 'Continue to Subscribe'
- Review the Terms and Conditions, and click 'Continue to Configuration'
- Configure this software. Keep options as set, you might want to change region to be in the same place as the rest of your infrastructure. Click Continue to Launch
- Launch this software Under Choose Action, select Launch through EC2.
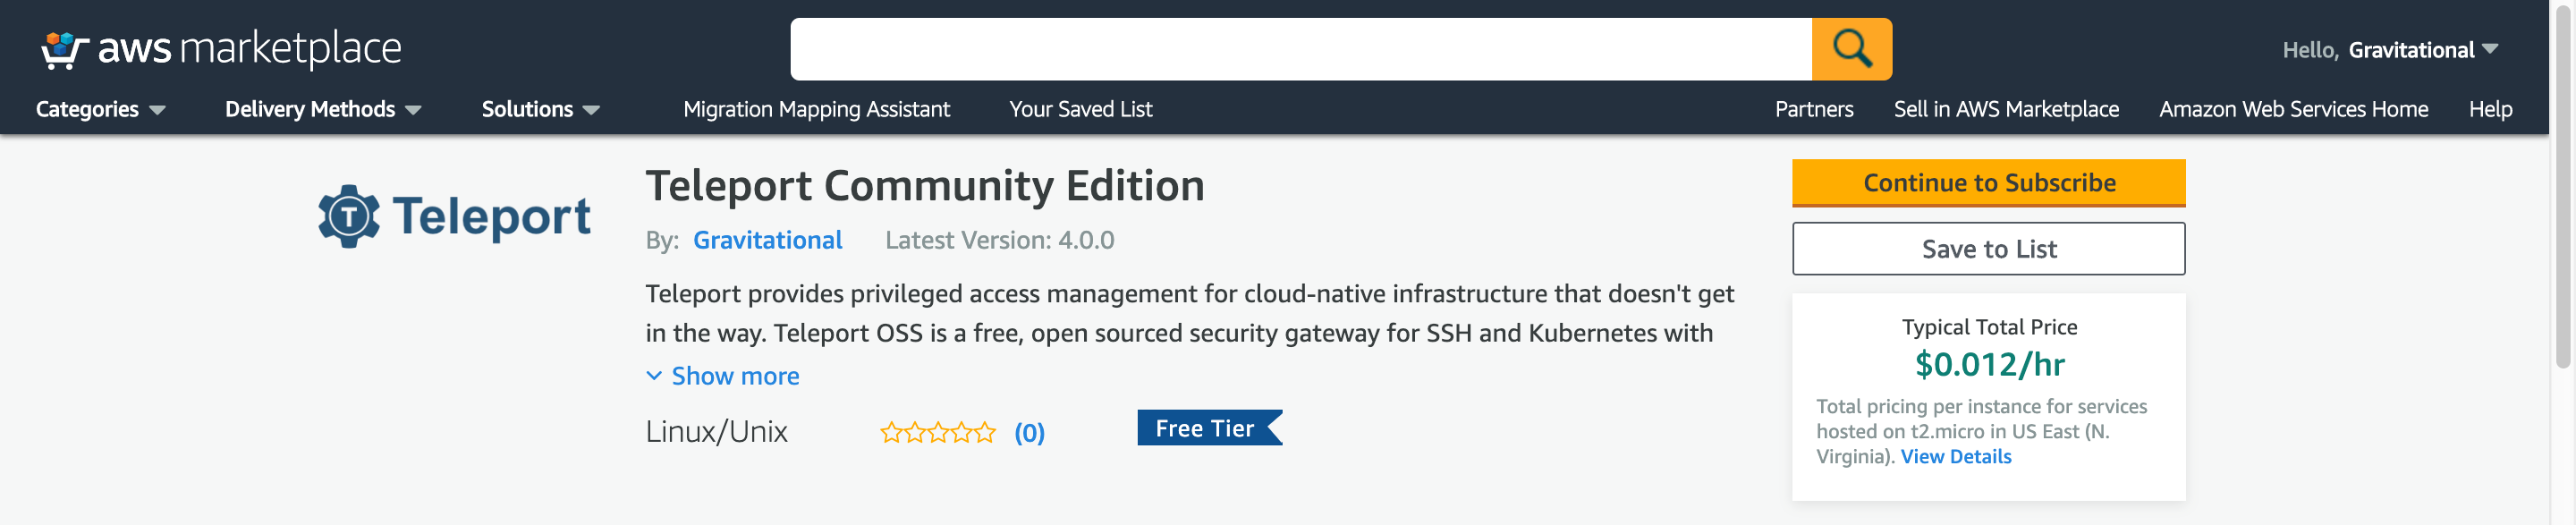
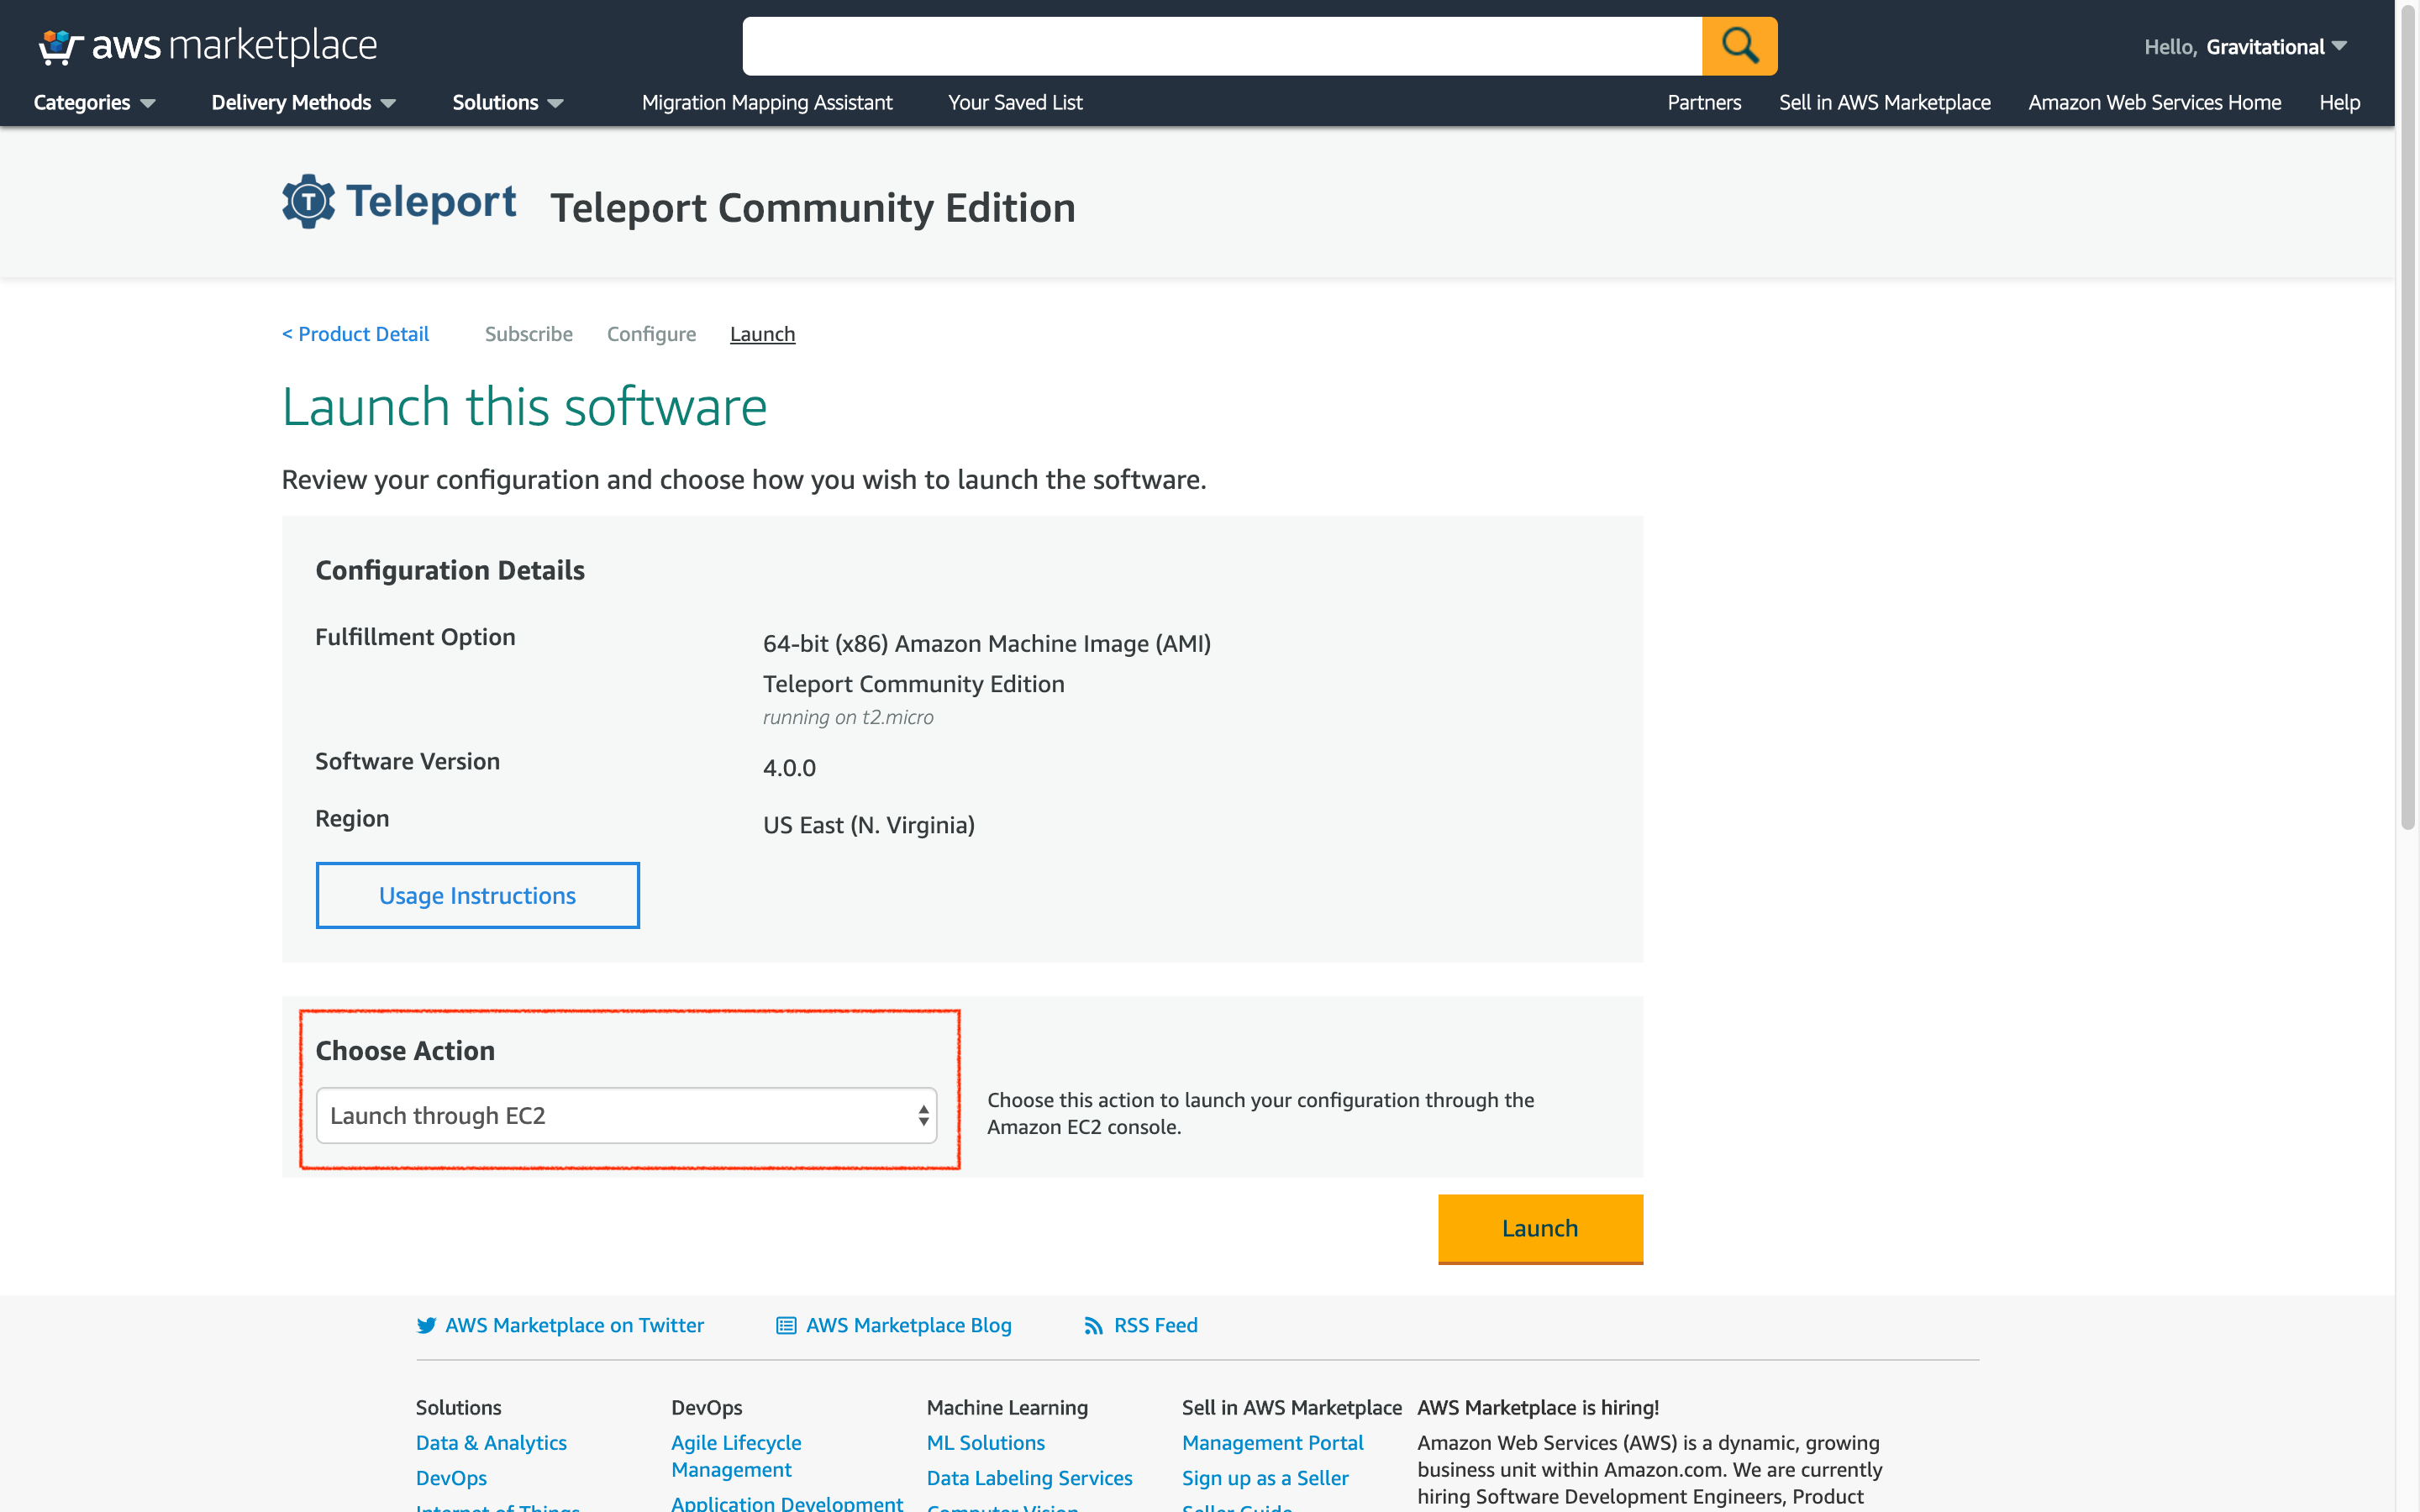
- Launch through EC2. At this point AWS will take you from the marketplace and drop you into the EC2 panel. Link: Shortcut to EC2 Wizard
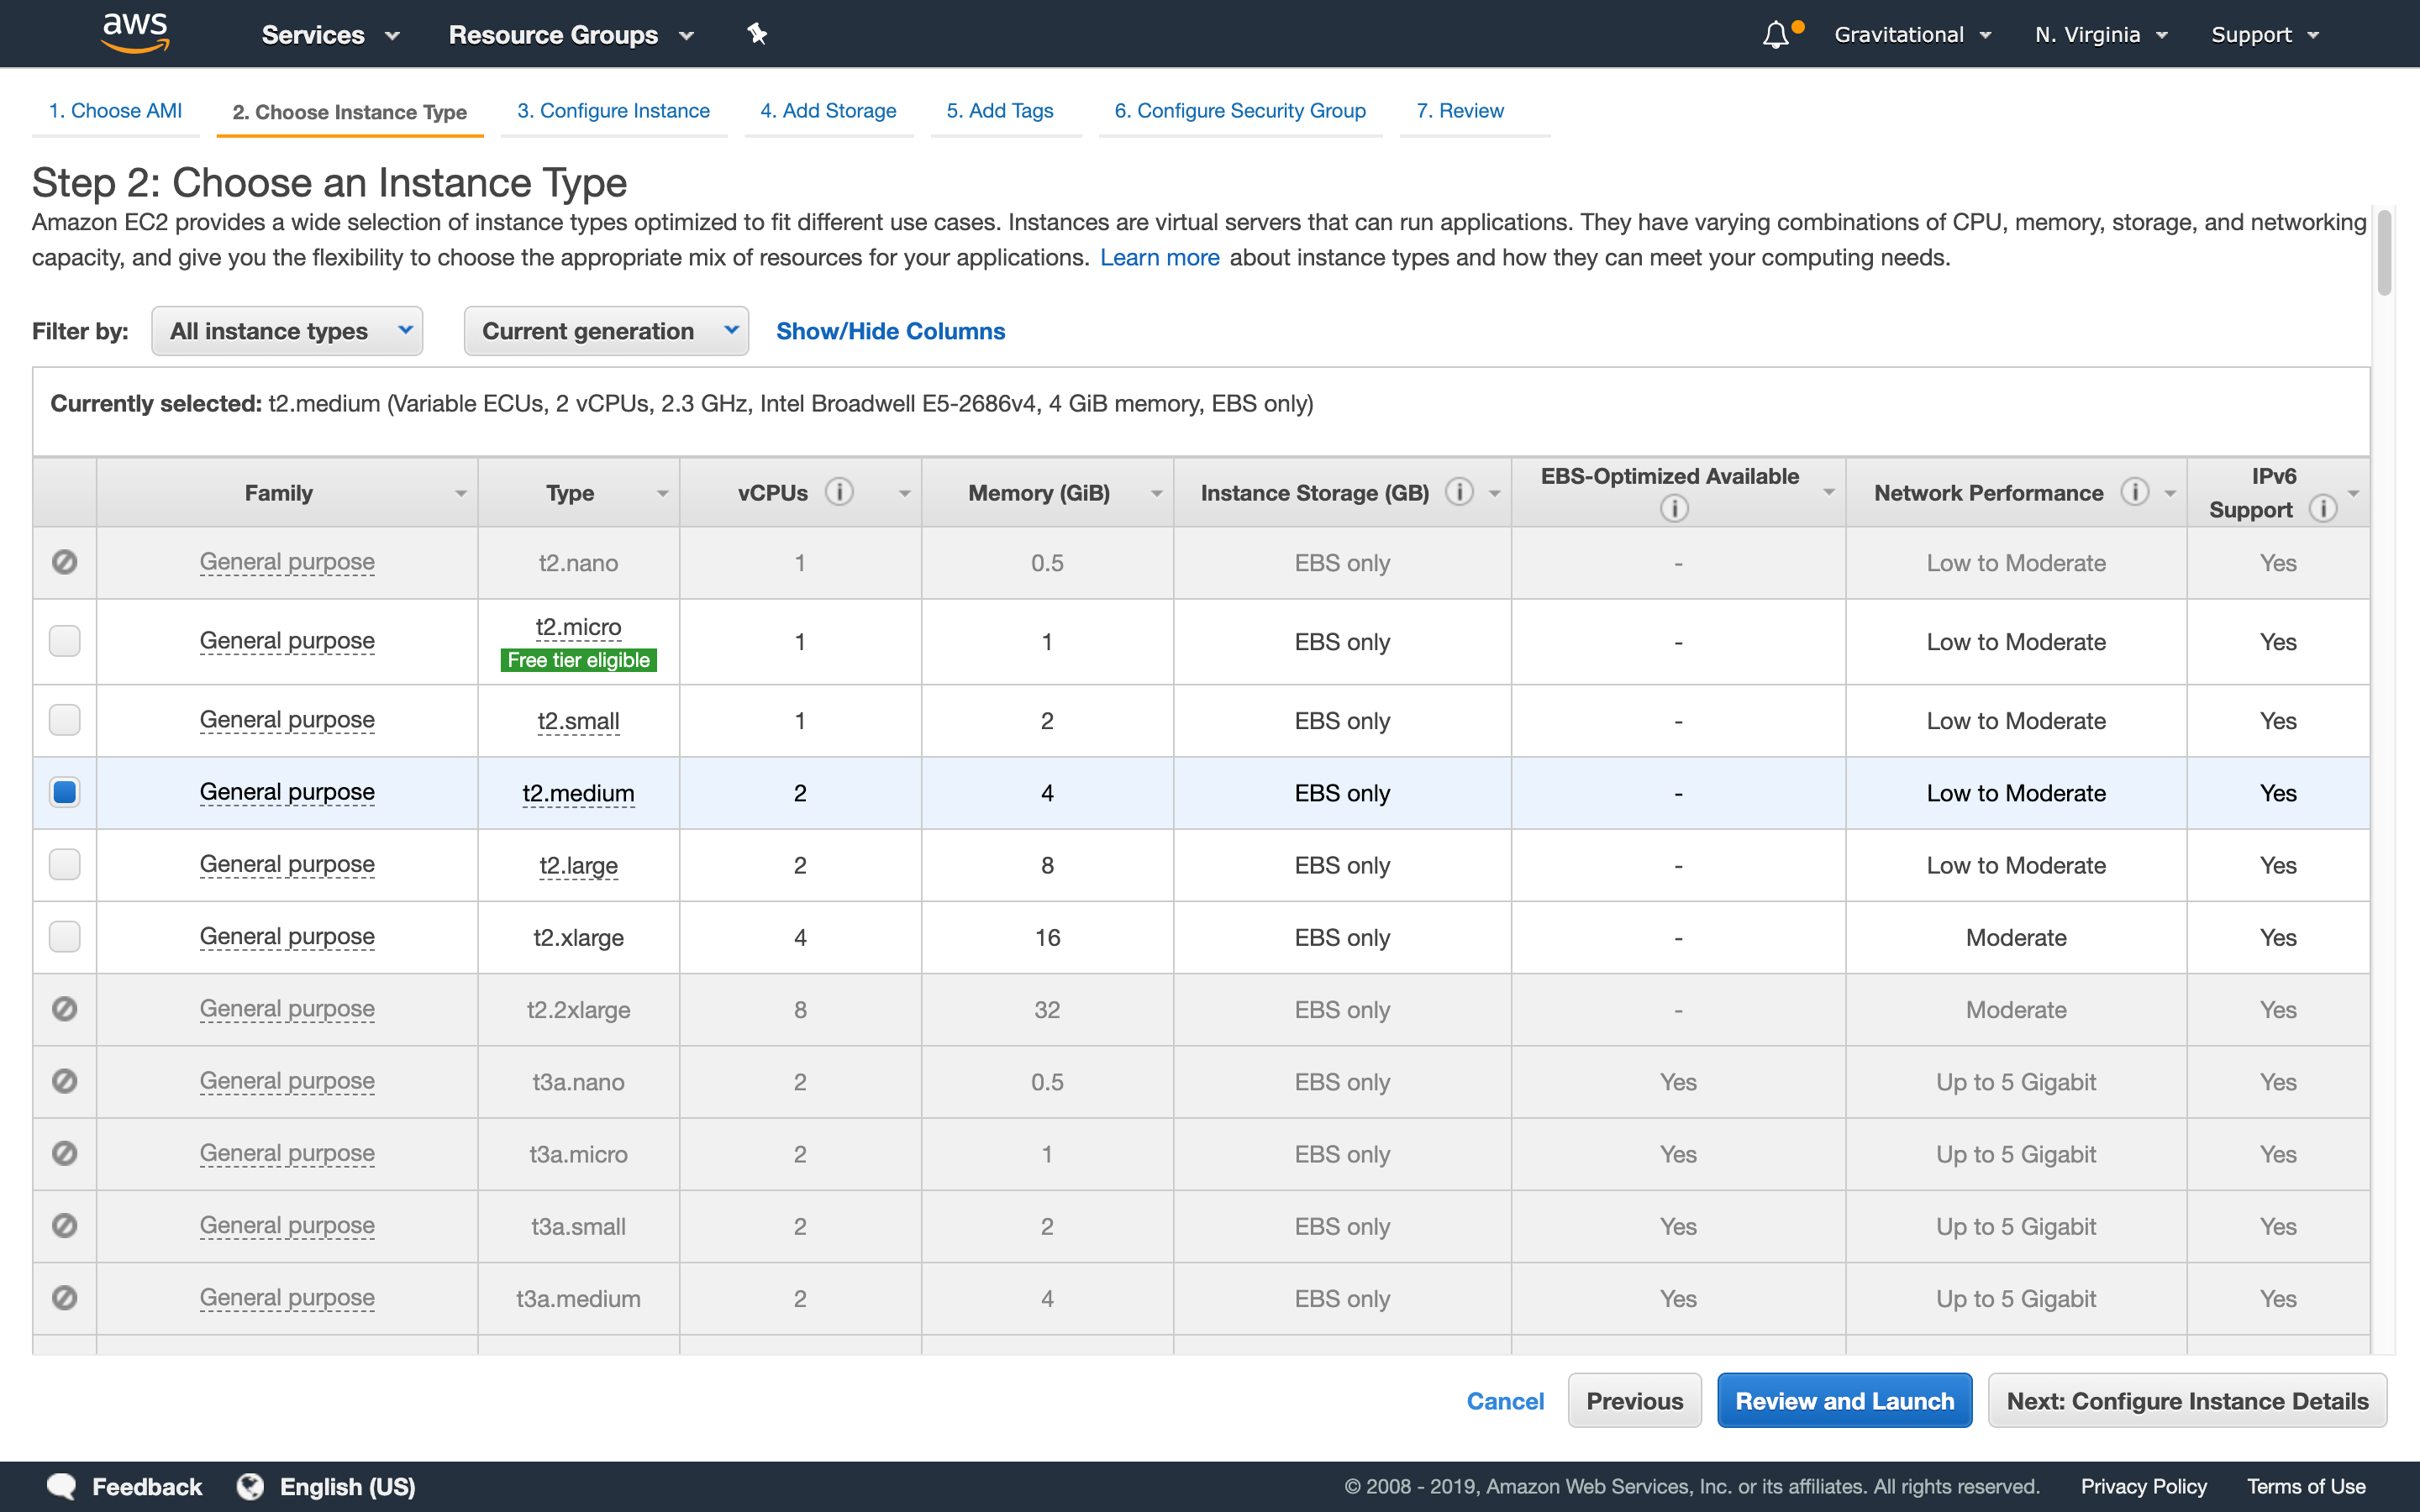
Step 2: Build instance
We recommend using an m4.large, but a t2.medium should be good for POC testing.
- Make sure to write appropriate values to
/etc/teleport.d/confvia user-data (using something like this):
#!/bin/bash
cat >/etc/teleport.d/conf <<EOF
USE_ACM="true"
TELEPORT_DOMAIN_NAME="teleport.acmeinc.com"
TELEPORT_EXTERNAL_HOSTNAME="teleport.acmeinc.com"
TELEPORT_EXTERNAL_PORT="443"
TELEPORT_AUTH_SERVER_LB="teleport-nlb.acmeinc.com"
EOF
Screenshot of where to put it in via AWS console.
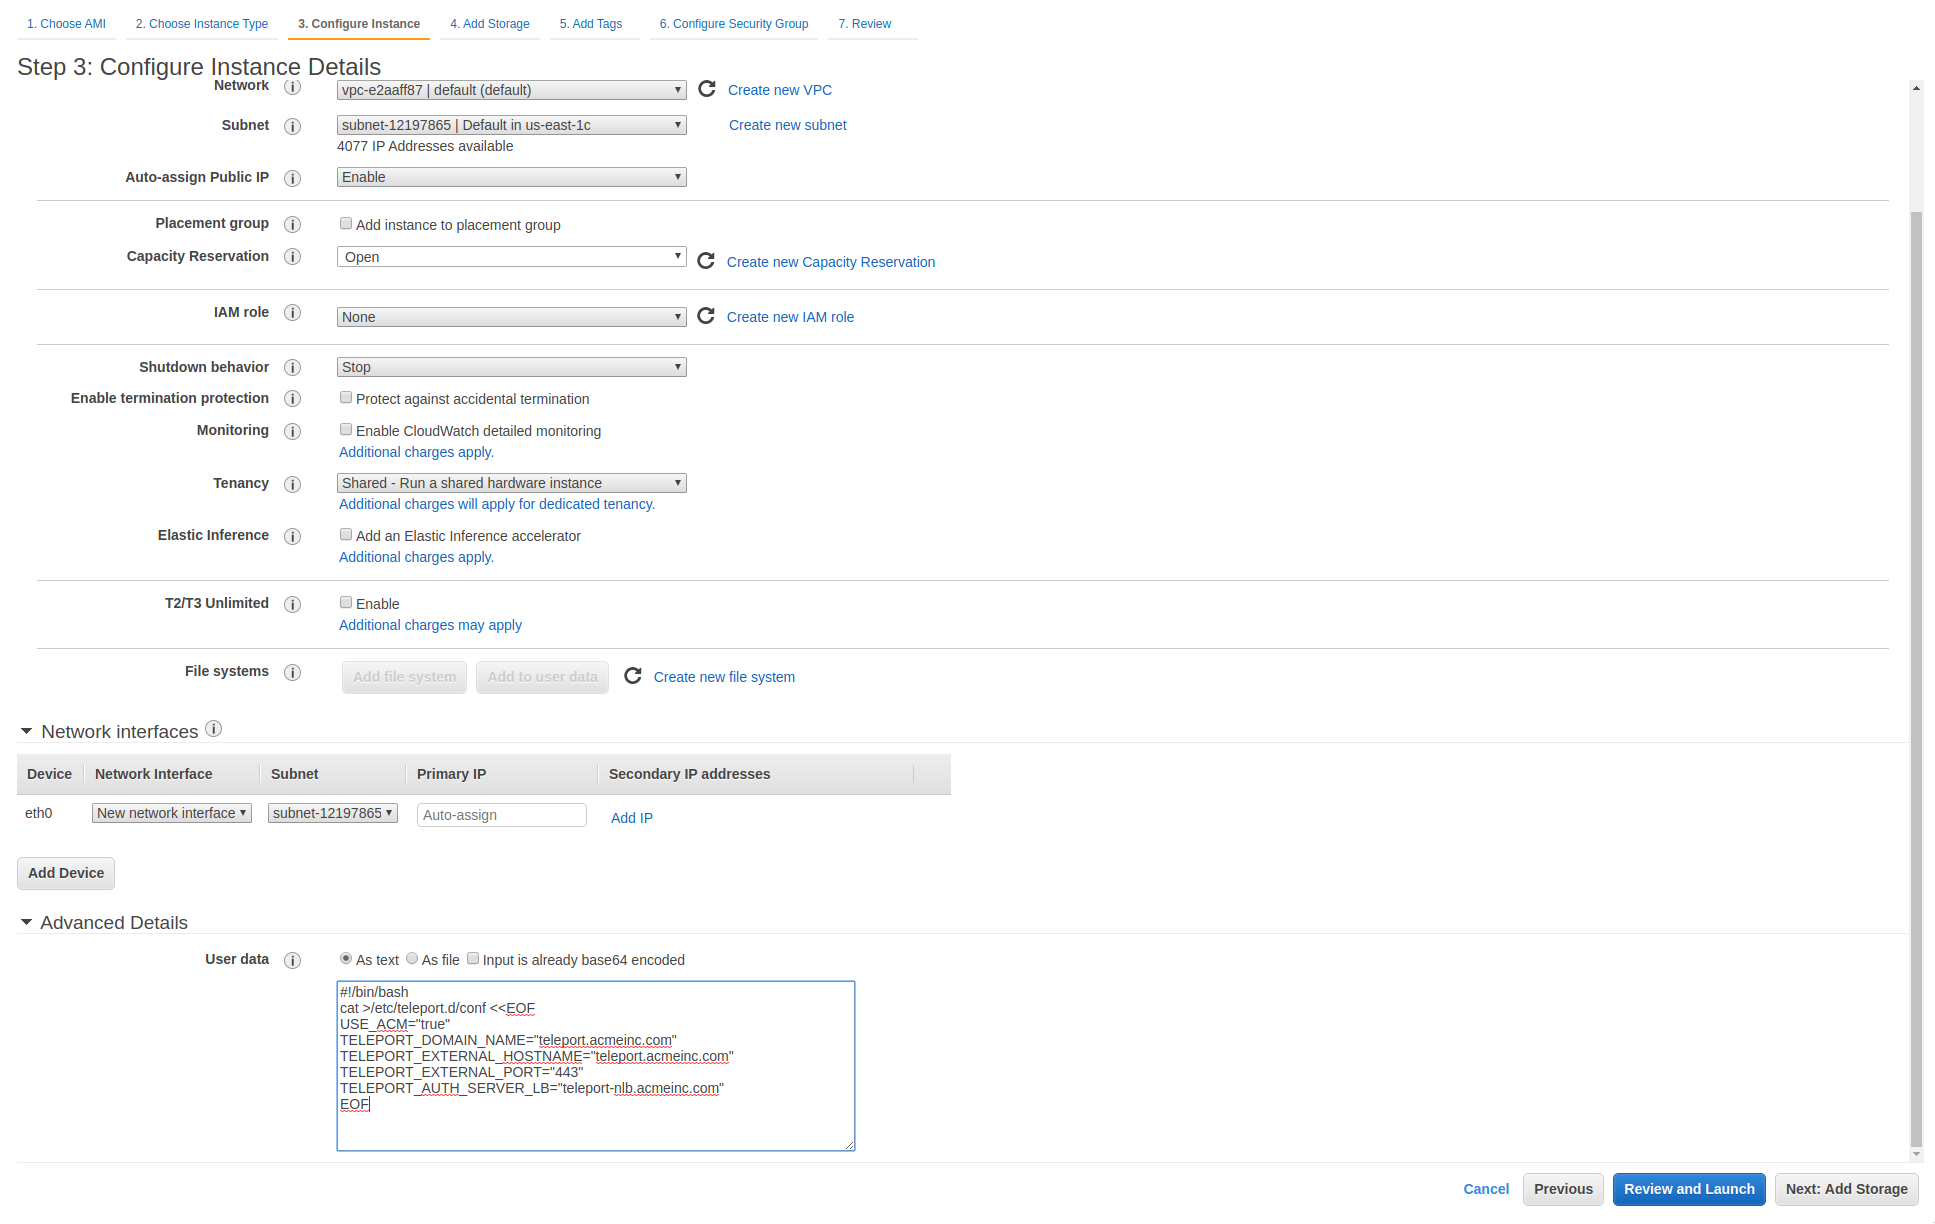
!!! note "Note"
`TELEPORT_DOMAIN_NAME` and `TELEPORT_EXTERNAL_HOSTNAME` are more or less the
same thing but we keep them separate just in case you want to use a load balancer
on a different hostname.
The CA certificates for the server will be generated to have TELEPORT_EXTERNAL_HOSTNAME as a CN,
assuming it's set when the server starts.
Step 3: Create the Load Balancers
- When using ACM you must use an application load balancer (ALB) as this will terminate SSL.
- Add the ACM certificate that you approved for
teleport.acmeinc.com
- Add a listener on the ALB for HTTPS on
443/tcp - Target group will point to your instance - point to HTTP on
3080/tcp - Create a http health check, point to
/webapi/ping. - Create a DNS record for
teleport.acmeinc.com - Point this to the public A record of the ALB as provided by Amazon.
- Add the ACM certificate that you approved for
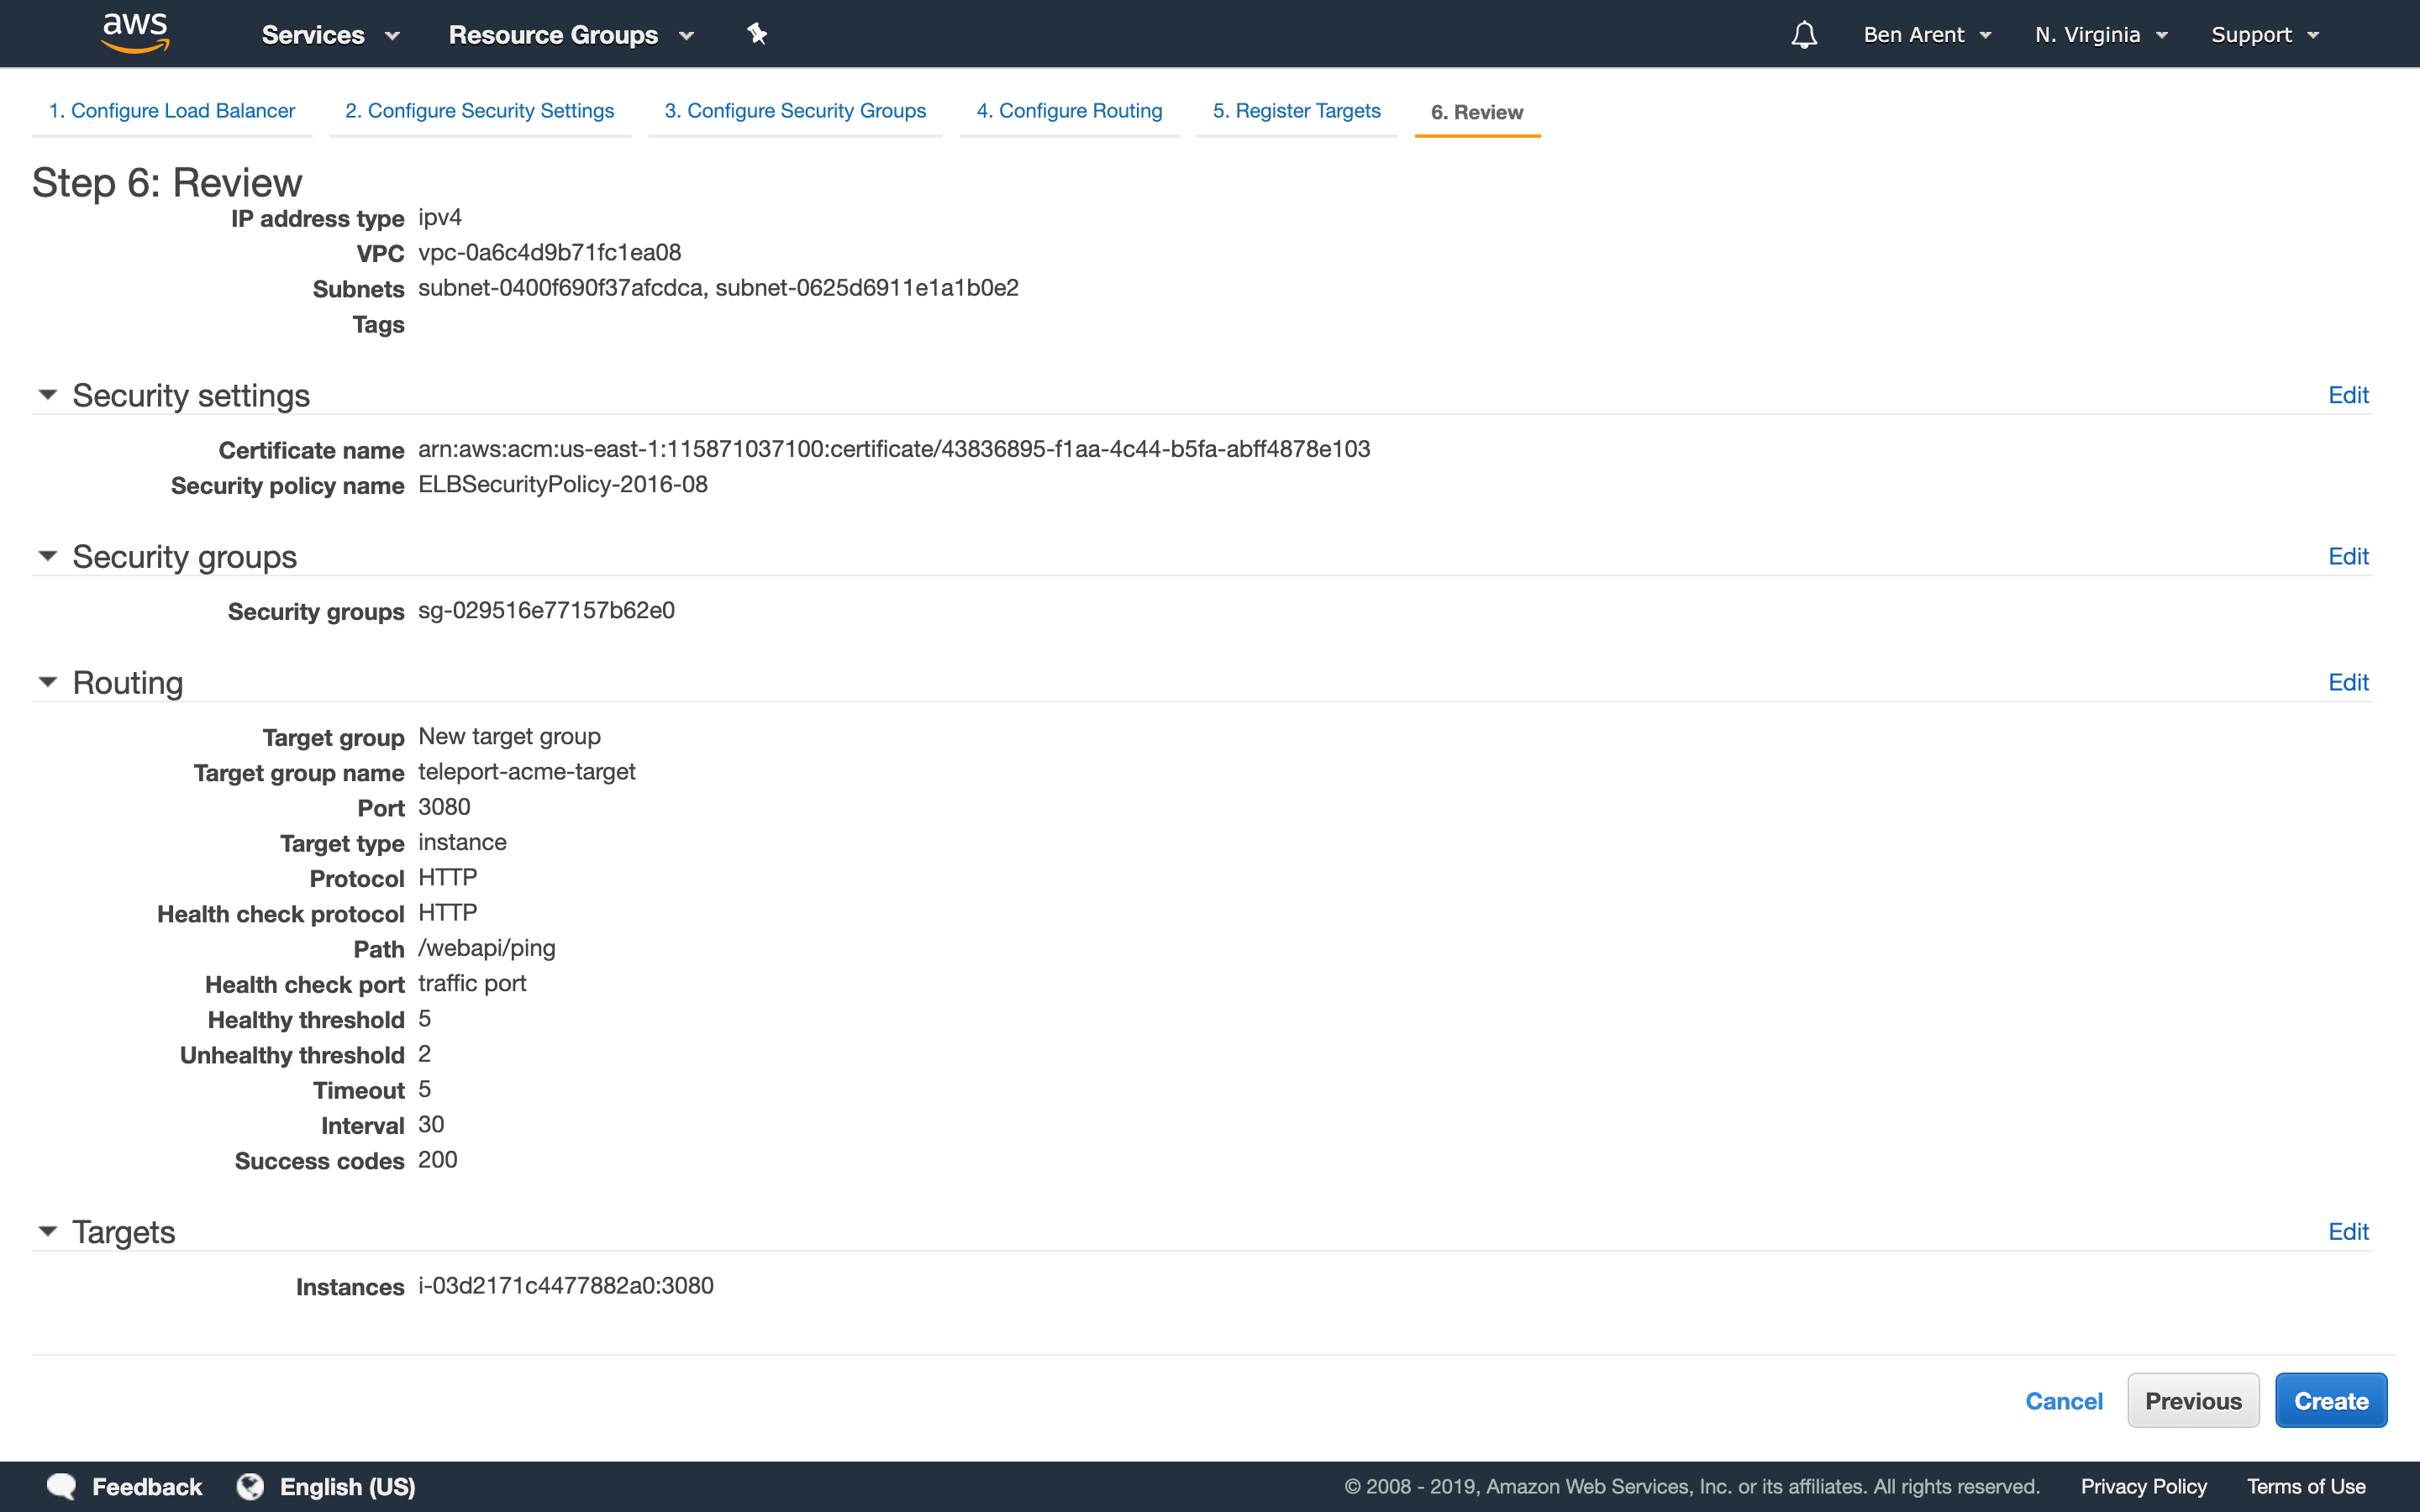
- You also need to set up a network load balancer (NLB) for the auth traffic:
- Set up a listener on
3025/tcp
- Target group will point to your instance - point to
3025/tcp - Create a DNS record for
teleport-nlb.acmeinc.com - Point this to the public A record of the NLB as provided by Amazon
- Make sure that your DNS record is also reflected in
TELEPORT_AUTH_SERVER_LBin the user data - Launch the instance (you can also use an already-running instance if you follow the instructions at the bottom of this section)
- Set up a listener on
Step 4: Create Teleport user
- We are going to use
tctlcommand to create a user for Teleport. The first step is to SSH into the newly created OSS Teleport box.
$ ssh -i id_rsa ec2-user@52.87.213.96
# Replace with IP given available from the EC2 instance list.
➜  ~ ssh -i id_rsa ec2-user@52.87.213.96
Warning: Identity file id_rsa not accessible: No such file or directory.
The authenticity of host '52.87.213.96 (52.87.213.96)' can't be established.
ECDSA key fingerprint is SHA256:YnTAP29shPpaAbLasfwazkIx7qFsKVWP3Pw40ehiHKg.
Are you sure you want to continue connecting (yes/no/[fingerprint])? yes
Warning: Permanently added '52.87.213.96' (ECDSA) to the list of known hosts.
Enter passphrase for key '/Users/benarent/.ssh/id_rsa':
Last login: Tue Jun 18 00:07:25 2019 from 13.88.188.155

       __|  __|_  )
       _|  (     /   Amazon Linux 2 AMI
      ___|\___|___|

https://aws.amazon.com/amazon-linux-2/
No packages needed for security; 7 packages available
Run "sudo yum update" to apply all updates.
[ec2-user@ip-172-30-0-111 ~]$
- Apply Updates
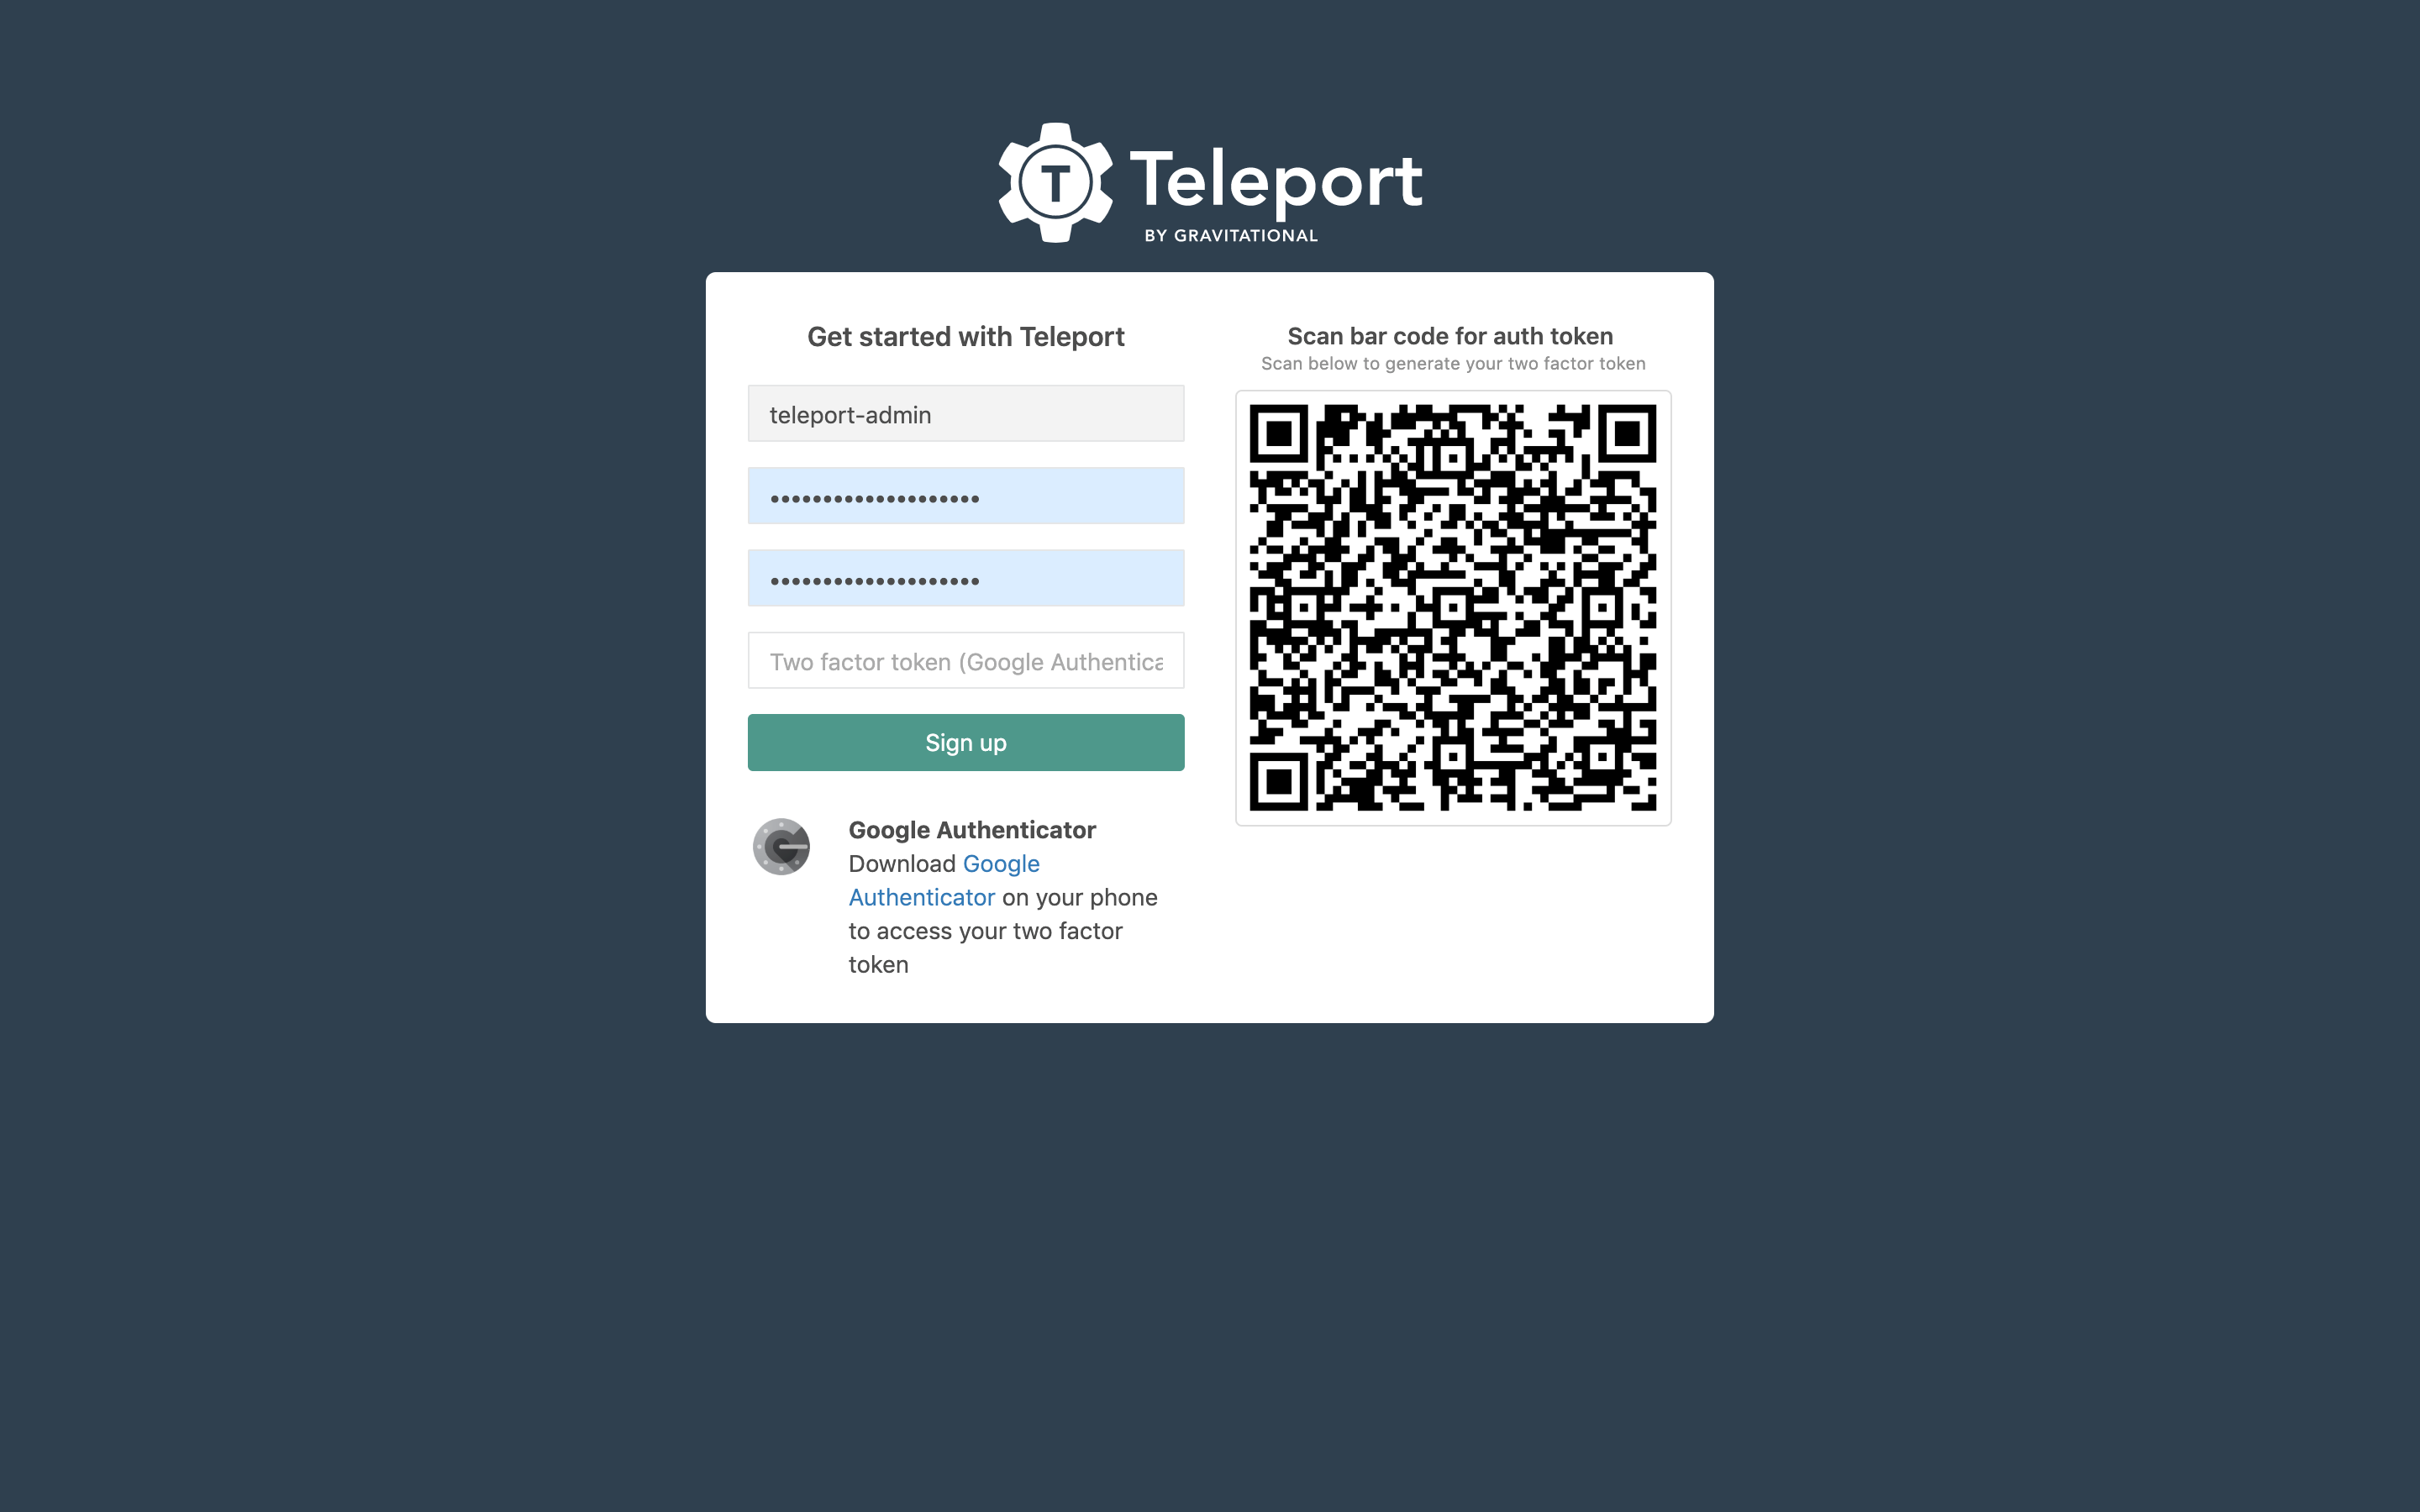
sudo yum update - Create a new admin user
sudo tctl users add teleport-admin ec2-user
[ec2-user@ip-172-30-0-111 ~]$ sudo tctl users add teleport-admin ec2-user
Signup token has been created and is valid for 1 hours. Share this URL with the user:
https://teleport.acmeinc.com:443/web/newuser/cea9871a42e780dff86528fa1b53f382

NOTE: Make sure teleport.acmeinc.com:443 points at a Teleport proxy which users can access.
Step 5: Finish You've now successfully setup a simple Teleport AMI, that uses local storage and has itself as a node. Next we'll look at using HA services to create a more scalable Teleport install.
Reconfiguring/using a pre-existing instance
To reconfigure any of this, or to do it on a running instance:
- Make the appropriate changes to
/etc/teleport.d/conf
rm -f /etc/teleport.yamlsystemctl restart teleport-generate-config.servicesystemctl restart teleport-acm.service
If you have changed the external hostname, you may need to delete /var/lib/teleport and start again.
Deploying with CloudFormation
We are currently working on an updated CloudFormation guide but you can start with our AWS Marketplace example. It requires a VPC, but we expect customers to deploy within an already existing VPC.
Deploying with Terraform
To deploy Teleport in AWS using Terraform look at our Terraform based provisioning example (Amazon single AMI).
Installing Teleport to EC2 Server
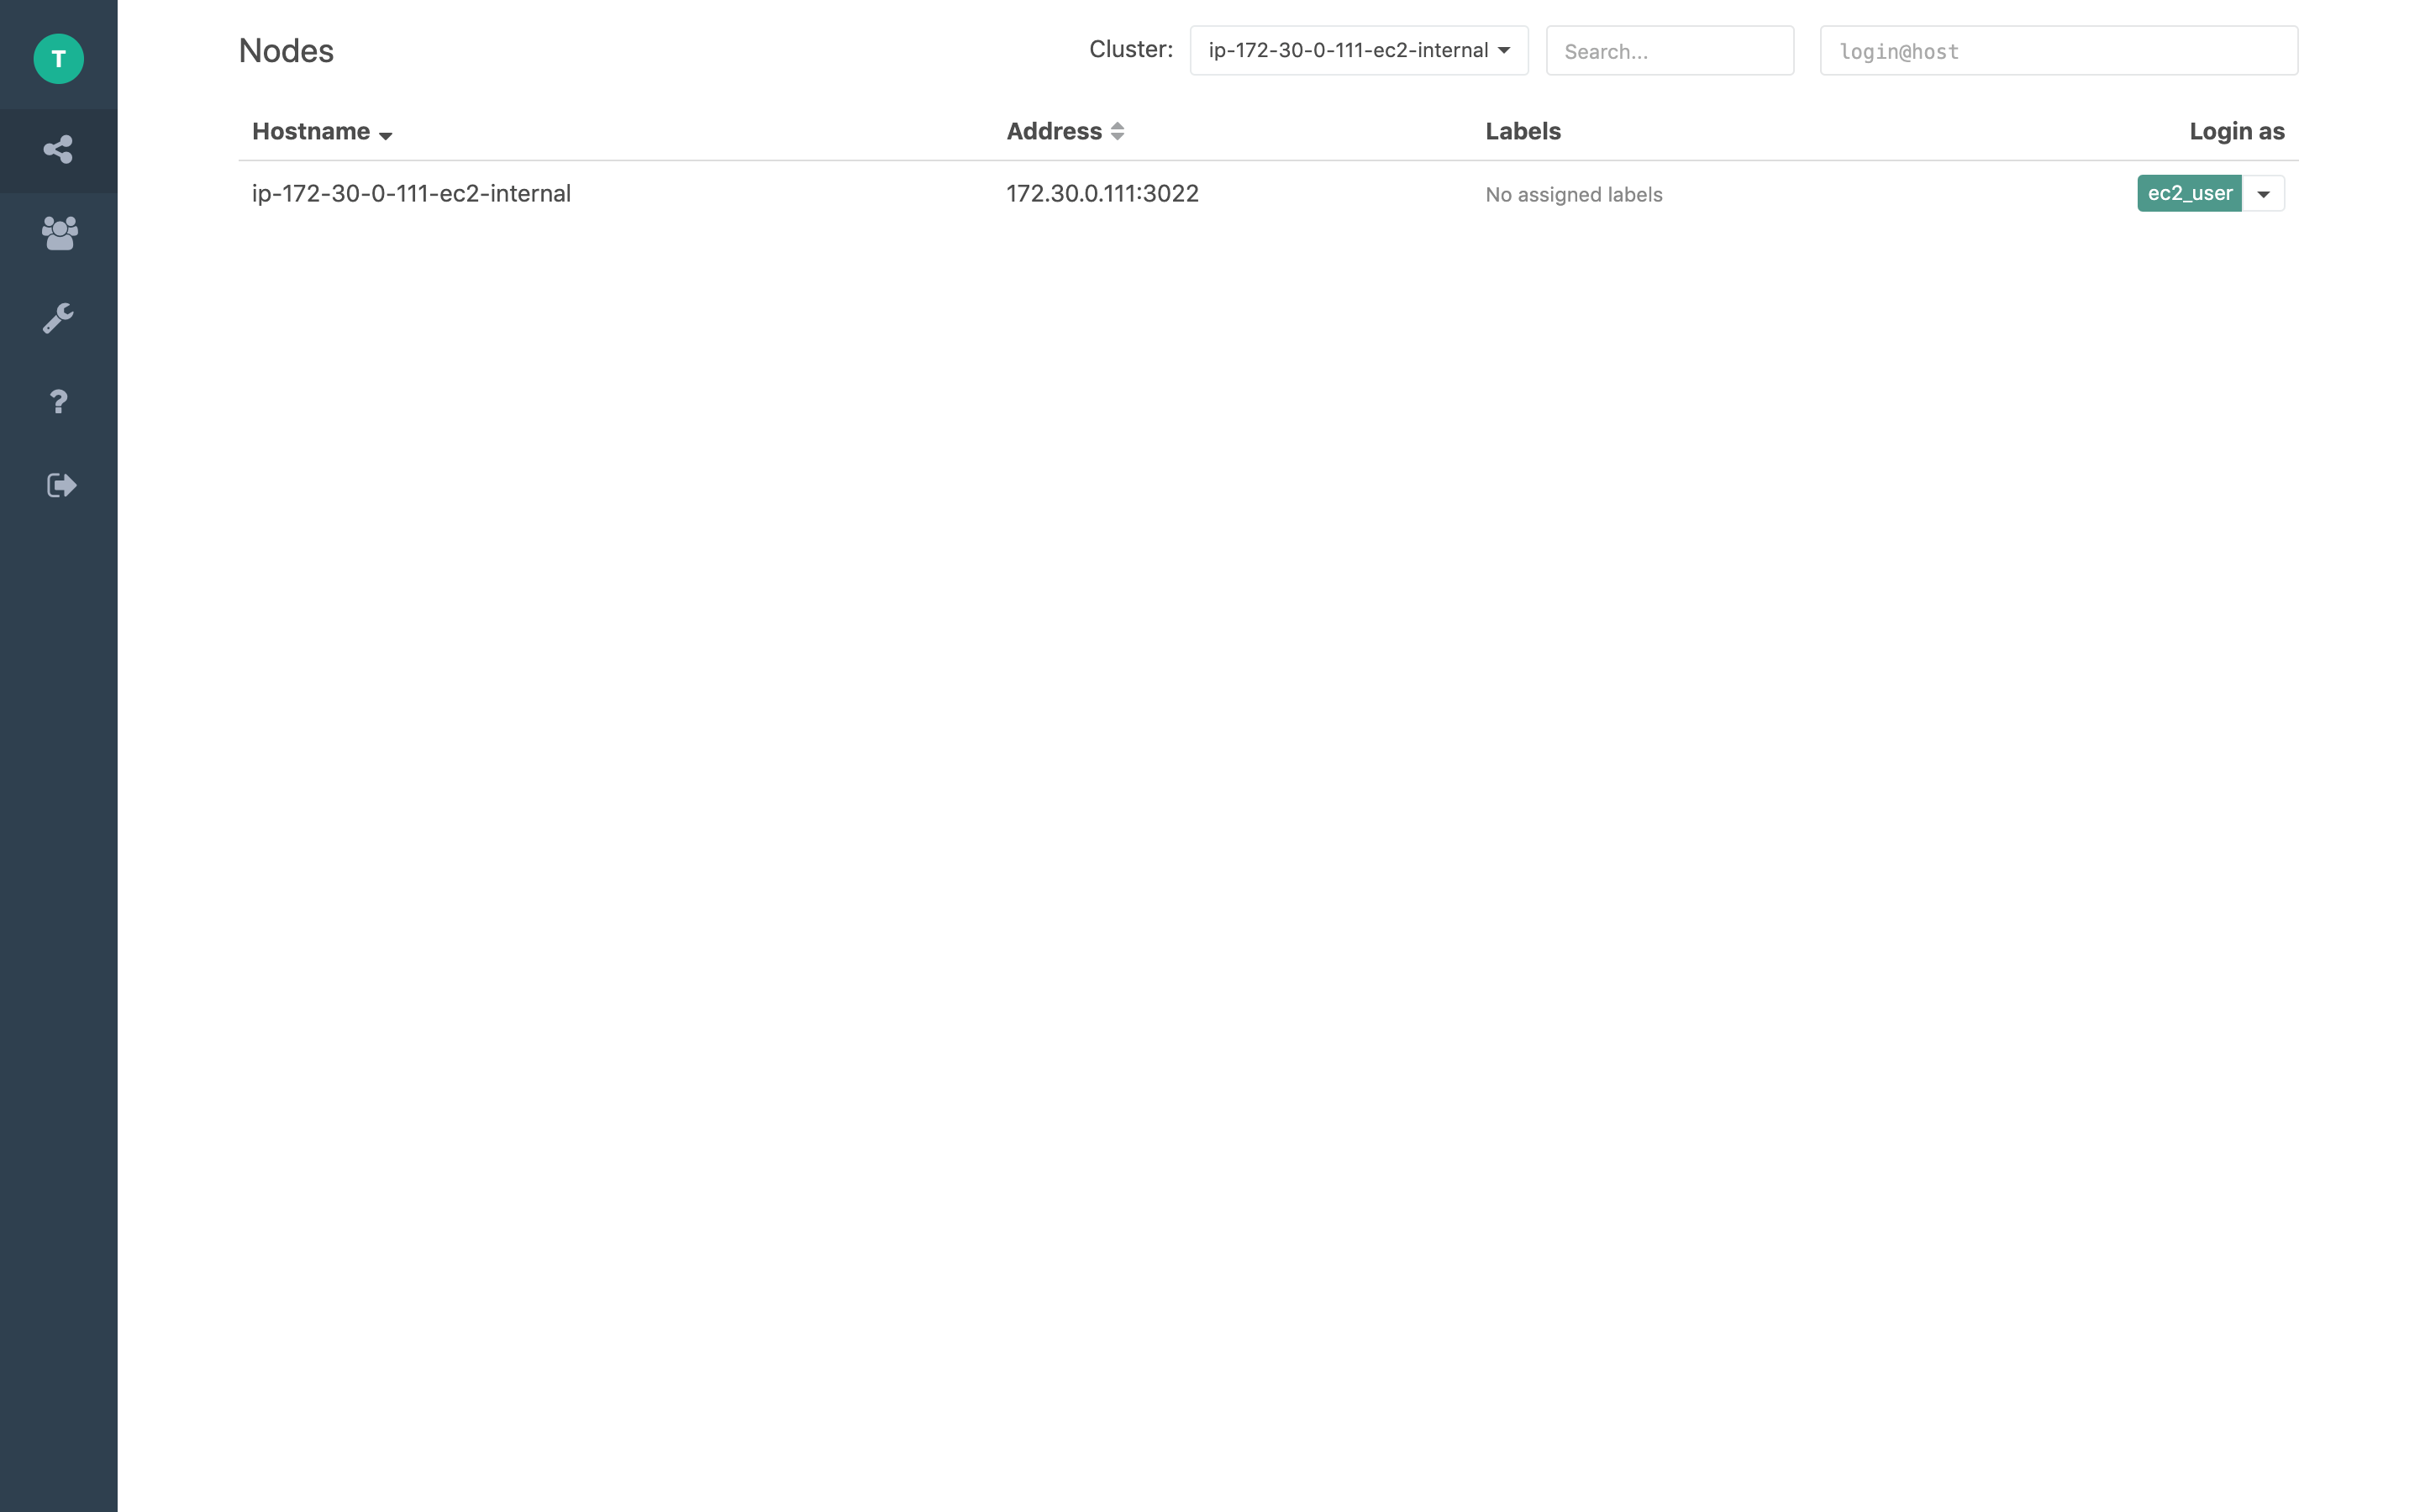
Customers run many workloads within EC2 and depending on how you work there are many ways to integrate Teleport onto your servers. We recommend looking at our Admin manual.
In short, to add new nodes / EC2 servers that you can "SSH into" you'll need to
Using Teleport with EKS
We are working on a step by step guide for working with EKS. This blog post is a good place to start.
Upgrading
To upgrade to a newer version of Teleport:
- Back up
/etc/teleport.yaml,/etc/teleport.d/and the contents of/var/lib/teleport - Launch a new instance with the correct AMI for a newer version of Teleport
- Copy
/etc/teleport.yaml,/etc/teleport.d/and/var/lib/teleportto the new instance, overwriting anything that already exists - Copy and its contents should also be backed up and copied over to the new instance.
- Either restart the instance, or log in via SSH and run
sudo systemctl restart teleport.service
Running Teleport Enterprise on AWS
Most of this guide has been designed for OSS Teleport. Most of this guide also applies to Teleport Enterprise with a few extra notes around adding a license and getting the correct binary. If you would like help setting up Teleport Enterprise on AWS, please mail us at info@gravitational.com
Running Teleport in HA on AWS
We have a guide for setting up Teleport in a high availability configuration on AWS.
Teleport AWS Tips & Tricks
Generating labels from AWS tags
Labels can be a useful addition to the Teleport UI. Simply add some or all of the
below to Teleport Nodes in etc/teleport.yaml to have helpful labels in the Teleport UI.
    commands:
      - name: arch
        command: [uname, -p]
        period: 1h0m0s
      - name: kernel
        command: [uname, -r]
        period: 1h0m0s
      - name: uptime
        command: [uptime, -p]
        period: 1h0m0s
      - name: internal
        command: [curl, "http://169.254.169.254/latest/meta-data/local-ipv4"]
        period: 1h0m0s
      - name: external
        command: [curl, "http://169.254.169.254/latest/meta-data/public-ipv4"]
        period: 1h0m0s
Create labels based on EC2 Tags.