* Update all connector YAML configs
* User <cluster-url> as standard
* Leverage markdown_include.include
* Include screenshots for Buttons based on Display.
7 KiB
SSH Authentication with ADFS
This guide will cover how to configure Active Directory Federation Services ADFS to issue SSH credentials to specific groups of users. When used in combination with role based access control (RBAC) it allows SSH administrators to define policies like:
- Only members of "DBA" group can SSH into machines running PostgreSQL.
- Developers must never SSH into production servers.
- ... and many others.
!!! warning "Version Warning"
This guide requires a commercial edition of Teleport. The open source
edition of Teleport only supports [Github](admin-guide.md#github-oauth-20) as
an SSO provider.
Enable ADFS Authentication
First, configure Teleport auth server to use ADFS authentication instead of the local
user database. Update /etc/teleport.yaml as shown below and restart the
teleport daemon.
auth_service:
    authentication:
        type: saml
Configure ADFS
You'll need to configure ADFS to export claims about a user (Claims Provider Trust in ADFS terminology) and you'll need to configure AD FS to trust Teleport (a Relying Party Trust in ADFS terminology).
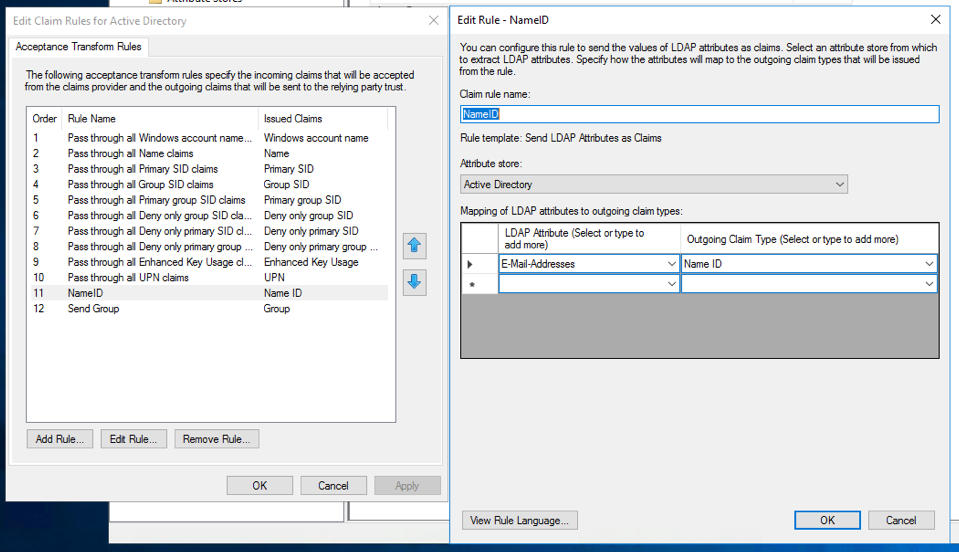
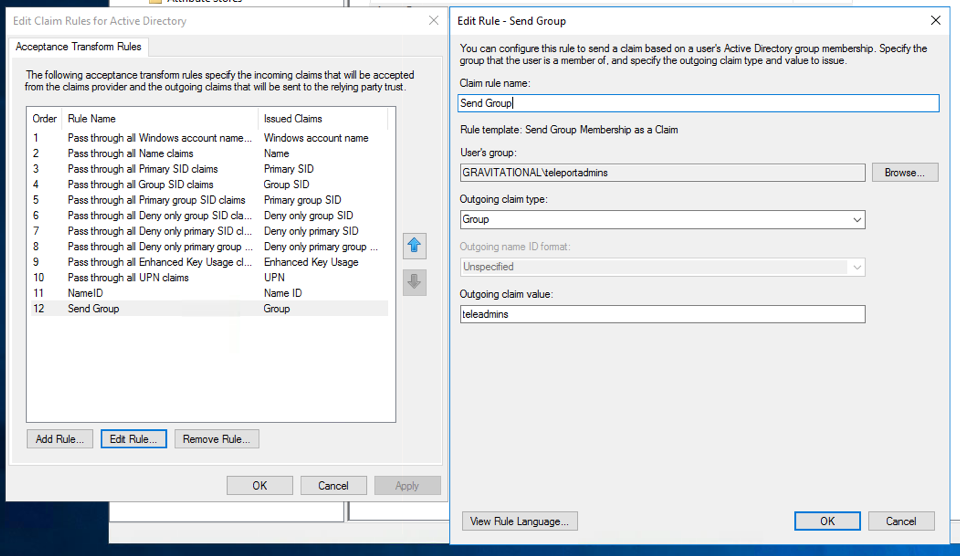
For Claims Provider Trust configuration you'll need to specify at least the
following two incoming claims: Name ID and Group. Name ID should be a
mapping of the LDAP Attribute E-Mail-Addresses to Name ID. A group
membership claim should be used to map users to roles (for example to
separate normal users and admins).
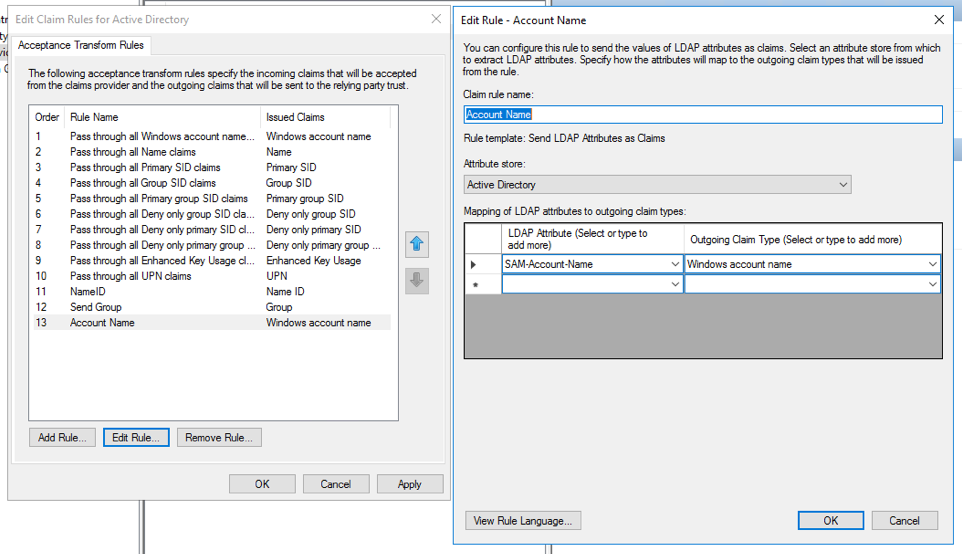
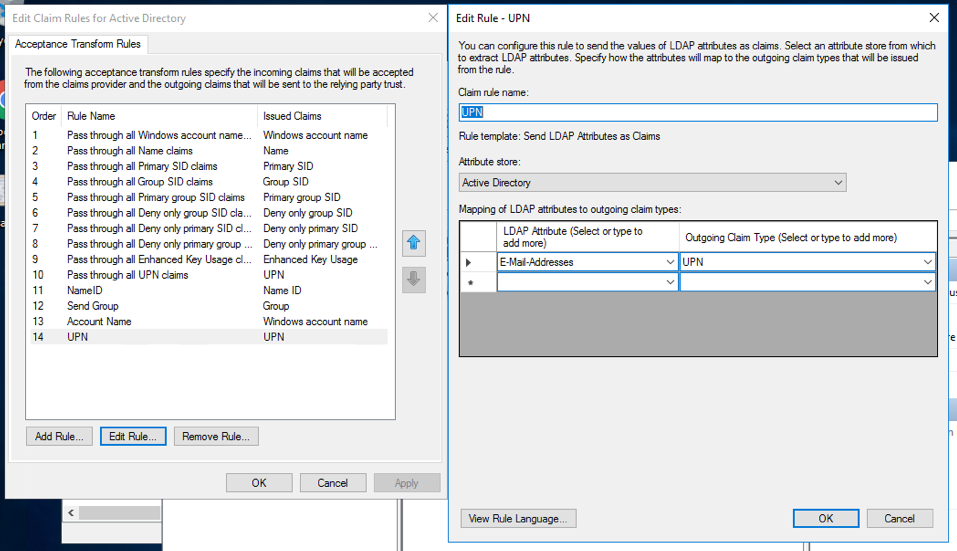
In addition if you are using dynamic roles (see below), it may be useful to map
the LDAP Attribute SAM-Account-Name to Windows account name and create
another mapping of E-Mail-Addresses to UPN.
You'll also need to create a Relying Party Trust, use the below information to
help guide you through the Wizard. Note, for development purposes we recommend
using https://localhost:3080/v1/webapi/saml/acs as the Assertion Consumer
Service (ACS) URL, but for production you'll want to change this to a domain
that can be accessed by other users as well.
- Create a claims aware trust.
- Enter data about the relying party manually.
- Set the display name to something along the lines of "Teleport".
- Skip the token encryption certificate.
- Select "Enable support for SAML 2.0 Web SSO protocol" and set the URL to
https://localhost:3080/v1/webapi/saml/acs. - Set the relying party trust identifier to
https://localhost:3080/v1/webapi/saml/acsas well. - For access control policy select "Permit everyone".
Once the Relying Party Trust has been created, update the Claim Issuance Policy
for it. Like before make sure you send at least Name ID and Group claims to the
relying party (Teleport). If you are using dynamic roles, it may be useful to
map the LDAP Attribute SAM-Account-Name to "Windows account name" and create
another mapping of E-Mail-Addresses to "UPN".
Lastly, ensure the user you create in Active Directory has an email address associated with it. To check this open Server Manager then "Tools -> Active Directory Users and Computers" and select the user and right click and open properties. Make sure the email address field is filled out.
Create Teleport Roles
Lets create two Teleport roles: one for administrators and the other is for
normal users. You can create them using tctl create {file name} CLI command
or via the Web UI.
# admin-role.yaml
kind: "role"
version: "v3"
metadata:
  name: "admin"
spec:
  options:
    max_session_ttl: "8h0m0s"
  allow:
    logins: [ root ]
    node_labels:
      "*": "*"
    rules:
      - resources: ["*"]
        verbs: ["*"]
# user-role.yaml
kind: "role"
version: "v3"
metadata:
  name: "dev"
spec:
  options:
    # regular users can only be guests and their certificates will have a TTL of 1 hour:
    max_session_ttl: "1h"
  allow:
    # only allow login as either ubuntu or the 'windowsaccountname' claim
    logins: [ '{% raw %}{{external."http://schemas.microsoft.com/ws/2008/06/identity/claims/windowsaccountname"}}{% endraw %}', ubuntu ]
    node_labels:
      "access": "relaxed"
This role declares:
- Devs are only allowed to login to nodes labelled with
access: relaxedlabel. - Developers can log in as
ubuntuuser - Notice
{% raw %}{{external."http://schemas.microsoft.com/ws/2008/06/identity/claims/windowsaccountname"}}{% endraw %}login. It configures Teleport to look at "http://schemas.microsoft.com/ws/2008/06/identity/claims/windowsaccountname" ADFS claim and use that field as an allowed login for each user. Also note the double quotes (") around the claim name - these are important. - Developers also do not have any "allow rules" i.e. they will not be able to see/replay past sessions or re-configure the Teleport cluster.
Next, create a SAML connector resource:
{!examples/resources/adfs-connector.yaml!}
The acs field should match the value you set in ADFS earlier and you can
obtain the entity_descriptor_url from ADFS under "ADFS -> Service -> Endpoints -> Metadata".
The attributes_to_roles is used to map attributes to the Teleport roles you
just created. In our situation, we are mapping the "Group" attribute whose full
name is http://schemas.xmlsoap.org/claims/Group with a value of "teleadmins"
to the "admin" role. Groups with the value "teleusers" is being mapped to the
"users" role.
Export the Signing Key
For the last step, you'll need to export the signing key:
$ tctl saml export adfs
Save the output to a file named saml.crt, return back to ADFS, open the
"Relying Party Trust" and add this file as one of the signature verification
certificates.
Testing
The Web UI will now contain a new button: "Login with MS Active Directory". The CLI is the same as before:
$ tsh --proxy=proxy.example.com login
This command will print the SSO login URL (and will try to open it automatically in a browser).
!!! tip "Tip"
Teleport can use multiple SAML connectors. In this case a connector name
can be passed via `tsh login --auth=connector_name`
!!! note "IMPORTANT"
Teleport only supports sending party initiated flows for SAML 2.0. This
means you can not initiate login from your identity provider, you have to
initiate login from either the Teleport Web UI or CLI.
Troubleshooting
If you get "access denied errors" the number one place to check is the audit
log on the Teleport auth server. It is located in /var/lib/teleport/log by
default and it will contain the detailed reason why a user's login was denied.
Some errors (like filesystem permissions or misconfigured network) can be
diagnosed using Teleport's stderr log, which is usually available via:
$ sudo journalctl -fu teleport
If you wish to increase the verbosity of Teleport's syslog, you can pass
--debug flag to teleport start command.