89 KiB
Teleport Admin Manual
This manual covers the installation and configuration of Teleport and the ongoing management of a Teleport cluster. It assumes that the reader has good understanding of Linux administration.
Installing
To install, download the official binaries from the Teleport Downloads section on our web site and run:
$ tar -xzf teleport-binary-release.tar.gz
$ sudo make install
Installing from Source
Gravitational Teleport is written in Go language. It requires Golang v1.8.3 or newer.
# get the source & build:
$ mkdir -p $GOPATH/src/github.com/gravitational
$ cd $GOPATH/src/github.com/gravitational
$ git clone https://github.com/gravitational/teleport.git
$ cd teleport
$ make full

# create the default data directory before starting:
$ sudo mkdir -p /var/lib/teleport
Teleport Checksum
Gravitational Teleport provides a checksum from the Downloads page. This can be used to verify the integrity of our binary.
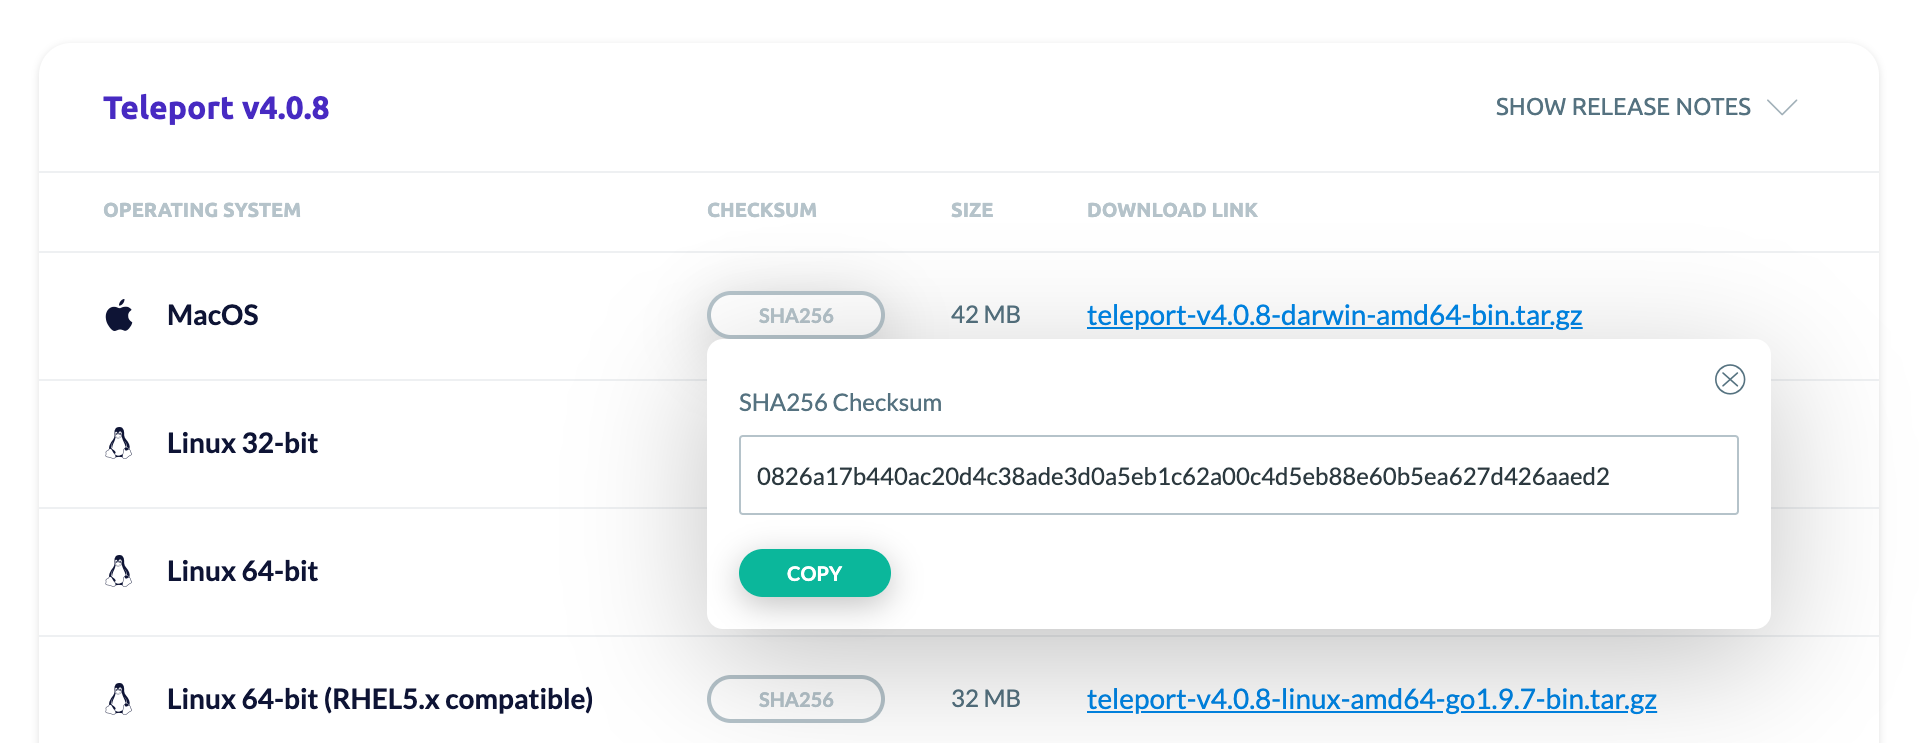
Checking Checksum on Mac OS
$ shasum -a 256 teleport-v4.0.8-darwin-amd64-bin.tar.gz
0826a17b440ac20d4c38ade3d0a5eb1c62a00c4d5eb88e60b5ea627d426aaed2  teleport-v4.0.8-darwin-amd64-bin.tar.gz
Checking Checksum on Linux
$ sha256sum teleport-v4.0.8-darwin-amd64-bin.tar.gz
0826a17b440ac20d4c38ade3d0a5eb1c62a00c4d5eb88e60b5ea627d426aaed2  teleport-v4.0.8-darwin-amd64-bin.tar.gz
Checking Checksum on Automated Systems
If you download Teleport via an automated system, you can programmatically obtain the checksum
by adding .sha256 to the binary.
$ curl https://get.gravitational.com/teleport-v4.0.8-darwin-amd64-bin.tar.gz.sha256
0826a17b440ac20d4c38ade3d0a5eb1c62a00c4d5eb88e60b5ea627d426aaed2  teleport-v4.0.8-darwin-amd64-bin.tar.gz
Definitions
Before diving into configuring and running Teleport, it helps to take a look at the Teleport Architecture and review the key concepts this document will be referring to:
| Concept | Description |
|---|---|
| Node | Synonym to "server" or "computer", something one can "SSH to". A node must be running the teleport daemon with "node" role/service turned on. |
| Certificate Authority (CA) | A pair of public/private keys Teleport uses to manage access. A CA can sign a public key of a user or node, establishing their cluster membership. |
| Teleport Cluster | A Teleport Auth Service contains two CAs. One is used to sign user keys and the other signs node keys. A collection of nodes connected to the same CA is called a "cluster". |
| Cluster Name | Every Teleport cluster must have a name. If a name is not supplied via teleport.yaml configuration file, a GUID will be generated. IMPORTANT: renaming a cluster invalidates its keys and all certificates it had created. |
| Trusted Cluster | Teleport Auth Service can allow 3rd party users or nodes to connect if their public keys are signed by a trusted CA. A "trusted cluster" is a pair of public keys of the trusted CA. It can be configured via teleport.yaml file. |
Teleport Daemon
The Teleport daemon is called teleport and it supports the following commands:
| Command | Description |
|---|---|
| start | Starts the Teleport daemon. |
| configure | Dumps a sample configuration file in YAML format into standard output. |
| version | Shows the Teleport version. |
| status | Shows the status of a Teleport connection. This command is only available from inside of an active SSH session. |
| help | Shows help. |
When experimenting, you can quickly start teleport with verbose logging by typing
teleport start -d.
!!! danger "WARNING":
Teleport stores data in /var/lib/teleport. Make sure that regular/non-admin users do not
have access to this folder on the Auth server.
Systemd Unit File
In production, we recommend starting teleport daemon via an init system like
systemd. Here's the recommended Teleport service unit file for systemd:
[Unit]
Description=Teleport SSH Service
After=network.target

[Service]
Type=simple
Restart=on-failure
ExecStart=/usr/local/bin/teleport start --config=/etc/teleport.yaml --pid-file=/run/teleport.pid
ExecReload=/bin/kill -HUP $MAINPID
PIDFile=/run/teleport.pid

[Install]
WantedBy=multi-user.target
Graceful Restarts
If using the systemd service unit file above, executing systemctl reload teleport
will perform a graceful restart, i.e. the Teleport daemon will fork a new
process to handle new incoming requests, leaving the old daemon process running
until existing clients disconnect.
!!! warning "Version warning": Graceful restarts only work if Teleport is deployed using network-based storage like DynamoDB or etcd 3.3+. Future versions of Teleport will not have this limitation.
You can also perform restarts/upgrades by sending kill signals
to a Teleport daemon manually.
| Signal | Teleport Daemon Behavior |
|---|---|
USR1 |
Dumps diagnostics/debugging information into syslog. |
TERM, INT or KILL |
Immediate non-graceful shutdown. All existing connections will be dropped. |
USR2 |
Forks a new Teleport daemon to serve new connections. |
HUP |
Forks a new Teleport daemon to serve new connections and initiates the graceful shutdown of the existing process when there are no more clients connected to it. |
Ports
Teleport services listen on several ports. This table shows the default port numbers.
| Port | Service | Description |
|---|---|---|
| 3022 | Node | SSH port. This is Teleport's equivalent of port #22 for SSH. |
| 3023 | Proxy | SSH port clients connect to. A proxy will forward this connection to port #3022 on the destination node. |
| 3024 | Proxy | SSH port used to create "reverse SSH tunnels" from behind-firewall environments into a trusted proxy server. |
| 3025 | Auth | SSH port used by the Auth Service to serve its API to other nodes in a cluster. |
| 3080 | Proxy | HTTPS connection to authenticate tsh users and web users into the cluster. The same connection is used to serve a Web UI. |
| 3026 | Kubernetes Proxy | HTTPS Kubernetes proxy (if enabled) |
Filesystem Layout
By default, a Teleport node has the following files present. The location of all of them is configurable.
| Full path | Purpose |
|---|---|
/etc/teleport.yaml |
Teleport configuration file (optional). |
/usr/local/bin/teleport |
Teleport daemon binary. |
/usr/local/bin/tctl |
Teleport admin tool. It is only needed for auth servers. |
/var/lib/teleport |
Teleport data directory. Nodes keep their keys and certificates there. Auth servers store the audit log and the cluster keys there, but the audit log storage can be further configured via auth_service section in the config file. |
Configuration
You should use a configuration file to configure the teleport daemon.
For simple experimentation, you can use command line flags with the teleport start
command:
$ teleport start --help
usage: teleport start [<flags>]

Starts the Teleport service.

Flags:
  -d, --debug            Enable verbose logging to stderr
      --insecure-no-tls  Disable TLS for the web socket
  -r, --roles            Comma-separated list of roles to start with [proxy,node,auth]
      --pid-file         Full path to the PID file. By default no PID file will be created
      --advertise-ip     IP to advertise to clients if running behind NAT
  -l, --listen-ip        IP address to bind to [0.0.0.0]
      --auth-server      Address of the auth server [127.0.0.1:3025]
      --token            Invitation token to register with an auth server [none]
      --ca-pin           CA pin to validate the Auth Server
      --nodename         Name of this node, defaults to hostname
  -c, --config           Path to a configuration file [/etc/teleport.yaml]
      --labels           List of labels for this node
      --insecure         Insecure mode disables certificate validation
      --fips             Start Teleport in FedRAMP/FIPS 140-2 mode.
Configuration Flags
Let's cover some of these flags in more detail:
-
--insecure-no-tlsflag tells Teleport proxy to not generate default self-signed TLS certificates. This is useful when running Teleport on kubernetes (behind reverse proxy) or behind things like AWS ELBs, GCP LBs or Azure Load Balancers where SSL termination is provided externally. The possible values aretrueorfalse. The default value isfalse. -
--rolesflag tells Teleport which services to start. It is a comma-separated list of roles. The possible values areauth,nodeandproxy. The default value isauth,node,proxy. These roles are explained in the Teleport Architecture document. -
--advertise-ipflag can be used when Teleport nodes are running behind NAT and their externally routable IP cannot be automatically determined. For example, assume that a host "foo" can be reached via10.0.0.10but there is noADNS record for "foo", so you cannot connect to it viatsh ssh foo. If you start teleport on "foo" with--advertise-ip=10.0.0.10, it will automatically tell Teleport proxy to use that IP when someone tries to connect to "foo". This is also useful when connecting to Teleport nodes using their labels. -
--nodenameflag lets you assign an alternative name for the node which can be used by clients to login. By default it's equal to the value returned byhostnamecommand. -
--listen-ipshould be used to tellteleportdaemon to bind to a specific network interface. By default it listens on all. -
--labelsflag assigns a set of labels to a node. See the explanation of labeling mechanism in the Labeling Nodes section below. -
--pid-fileflag creates a PID file if a path is given. -
--permit-user-envflag reads in environment variables from~/.tsh/environmentwhen creating a session.
Configuration File
Teleport uses the YAML file format for configuration. A sample configuration file is shown below. By default, it is stored in /etc/teleport.yaml
!!! note "IMPORTANT": When editing YAML configuration, please pay attention to how your editor handles white space. YAML requires consistent handling of tab characters.
# By default, this file should be stored in /etc/teleport.yaml

# This section of the configuration file applies to all teleport
# services.
teleport:
    # nodename allows to assign an alternative name this node can be reached by.
    # by default it's equal to hostname
    nodename: graviton

    # Data directory where Teleport daemon keeps its data.
    # See "Filesystem Layout" section above for more details.
    data_dir: /var/lib/teleport

    # Invitation token used to join a cluster. it is not used on
    # subsequent starts
    auth_token: xxxx-token-xxxx

    # Optional CA pin of the auth server. This enables more secure way of adding new
    # nodes to a cluster. See "Adding Nodes" section above.
    ca_pin: "sha256:7e12c17c20d9cb504bbcb3f0236be3f446861f1396dcbb44425fe28ec1c108f1"

    # When running in multi-homed or NATed environments Teleport nodes need
    # to know which IP it will be reachable at by other nodes
    #
    # This value can be specified as FQDN e.g. host.example.com
    advertise_ip: 10.1.0.5

    # list of auth servers in a cluster. you will have more than one auth server
    # if you configure teleport auth to run in HA configuration.
    # If adding a node located behind NAT, use the Proxy URL. e.g.
    #  auth_servers:
    #     - teleport-proxy.example.com:3080
    auth_servers:
        - 10.1.0.5:3025
        - 10.1.0.6:3025

    # Teleport throttles all connections to avoid abuse. These settings allow
    # you to adjust the default limits
    connection_limits:
        max_connections: 1000
        max_users: 250

    # Logging configuration. Possible output values to disk via '/var/lib/teleport/teleport.log',
    # 'stdout', 'stderr' and 'syslog'. Possible severity values are INFO, WARN
    # and ERROR (default).
    log:
        output: /var/lib/teleport/teleport.log
        severity: ERROR

    # Configuration for the storage back-end used for the cluster state and the
    # audit log. Several back-end types are supported. See "High Availability"
    # section of this Admin Manual below to learn how to configure DynamoDB,
    # S3, etcd and other highly available back-ends.
    storage:
        # By default teleport uses the `data_dir` directory on a local filesystem
        type: dir

        # Array of locations where the audit log events will be stored. by
        # default they are stored in `/var/lib/teleport/log`
        audit_events_uri: ['file:///var/lib/teleport/log', 'dynamodb://events_table_name', 'stdout://']

        # Use this setting to configure teleport to store the recorded sessions in
        # an AWS S3 bucket. see "Using Amazon S3" chapter for more information.
        audit_sessions_uri: 's3://example.com/path/to/bucket?region=us-east-1'

    # Cipher algorithms that the server supports. This section only needs to be
    # set if you want to override the defaults.
    ciphers:
      - aes128-ctr
      - aes192-ctr
      - aes256-ctr
      - aes128-gcm@openssh.com
      - chacha20-poly1305@openssh.com

    # Key exchange algorithms that the server supports. This section only needs
    # to be set if you want to override the defaults.
    kex_algos:
      - curve25519-sha256@libssh.org
      - ecdh-sha2-nistp256
      - ecdh-sha2-nistp384
      - ecdh-sha2-nistp521

    # Message authentication code (MAC) algorithms that the server supports.
    # This section only needs to be set if you want to override the defaults.
    mac_algos:
      - hmac-sha2-256-etm@openssh.com
      - hmac-sha2-256

    # List of the supported ciphersuites. If this section is not specified,
    # only the default ciphersuites are enabled.
    ciphersuites:
       - tls-ecdhe-rsa-with-aes-128-gcm-sha256
       - tls-ecdhe-ecdsa-with-aes-128-gcm-sha256
       - tls-ecdhe-rsa-with-aes-256-gcm-sha384
       - tls-ecdhe-ecdsa-with-aes-256-gcm-sha384
       - tls-ecdhe-rsa-with-chacha20-poly1305
       - tls-ecdhe-ecdsa-with-chacha20-poly1305


# This section configures the 'auth service':
auth_service:
    # Turns 'auth' role on. Default is 'yes'
    enabled: yes

    # A cluster name is used as part of a signature in certificates
    # generated by this CA.
    #
    # We strongly recommend to explicitly set it to something meaningful as it
    # becomes important when configuring trust between multiple clusters.
    #
    # By default an automatically generated name is used (not recommended)
    #
    # IMPORTANT: if you change cluster_name, it will invalidate all generated
    # certificates and keys (may need to wipe out /var/lib/teleport directory)
    cluster_name: "main"

    authentication:
        # default authentication type. possible values are 'local', 'oidc' and 'saml'
        # only local authentication (Teleport's own user DB) is supported in the open
        # source version
        type: local
        # second_factor can be off, otp, or u2f
        second_factor: otp
        # this section is used if second_factor is set to 'u2f'
        u2f:
            # app_id must point to the URL of the Teleport Web UI (proxy) accessible
            # by the end users
            app_id: https://localhost:3080
            # facets must list all proxy servers if there are more than one deployed
            facets:
            - https://localhost:3080

    # IP and the port to bind to. Other Teleport nodes will be connecting to
    # this port (AKA "Auth API" or "Cluster API") to validate client
    # certificates
    listen_addr: 0.0.0.0:3025

    # The optional DNS name the auth server if located behind a load balancer.
    # (see public_addr section below)
    public_addr: auth.example.com:3025

    # Pre-defined tokens for adding new nodes to a cluster. Each token specifies
    # the role a new node will be allowed to assume. The more secure way to
    # add nodes is to use `ttl node add --ttl` command to generate auto-expiring
    # tokens.
    #
    # We recommend to use tools like `pwgen` to generate sufficiently random
    # tokens of 32+ byte length.
    tokens:
        - "proxy,node:xxxxx"
        - "auth:yyyy"

    # Optional setting for configuring session recording. Possible values are:
    #    "node"  : sessions will be recorded on the node level  (the default)
    #    "proxy" : recording on the proxy level, see "recording proxy mode" section.
    #    "off"   : session recording is turned off
    session_recording: "node"

    # This setting determines if a Teleport proxy performs strict host key checks.
    # Only applicable if session_recording=proxy, see "recording proxy mode" for details.
    proxy_checks_host_keys: yes

    # Determines if SSH sessions to cluster nodes are forcefully terminated
    # after no activity from a client (idle client).
    # Examples: "30m", "1h" or "1h30m"
    client_idle_timeout: never

    # Determines if the clients will be forcefully disconnected when their
    # certificates expire in the middle of an active SSH session. (default is 'no')
    disconnect_expired_cert: no

    # Determines the interval at which Teleport will send keep-alive messages. The
    # default value mirrors sshd at 15 minutes.  keep_alive_count_max is the number
    # of missed keep-alive messages before the server tears down the connection to the
    # client.
    keep_alive_interval: 15
    keep_alive_count_max: 3

    # License file to start auth server with. Note that this setting is ignored
    # in open-source Teleport and is required only for Teleport Pro, Business
    # and Enterprise subscription plans.
    #
    # The path can be either absolute or relative to the configured `data_dir`
    # and should point to the license file obtained from Teleport Download Portal.
    #
    # If not set, by default Teleport will look for the `license.pem` file in
    # the configured `data_dir`.
    license_file: /var/lib/teleport/license.pem

    # DEPRECATED in Teleport 3.2 (moved to proxy_service section)
    kubeconfig_file: /path/to/kubeconfig

# This section configures the 'node service':
ssh_service:
    # Turns 'ssh' role on. Default is 'yes'
    enabled: yes

    # IP and the port for SSH service to bind to.
    listen_addr: 0.0.0.0:3022

    # The optional public address the SSH service. This is useful if administrators
    # want to allow users to connect to nodes directly, bypassing a Teleport proxy
    # (see public_addr section below)
    public_addr: node.example.com:3022

    # See explanation of labels in "Labeling Nodes" section below
    labels:
        role: master
        type: postgres

    # List of the commands to periodically execute. Their output will be used as node labels.
    # See "Labeling Nodes" section below for more information and more examples.
    commands:
    # this command will add a label 'arch=x86_64' to a node
    - name: arch
      command: ['/bin/uname', '-p']
      period: 1h0m0s

    # enables reading ~/.tsh/environment before creating a session. by default
    # set to false, can be set true here or as a command line flag.
    permit_user_env: false

    # configures PAM integration. see below for more details.
    pam:
        enabled: no
        service_name: teleport

# This section configures the 'proxy service'
proxy_service:
    # Turns 'proxy' role on. Default is 'yes'
    enabled: yes

    # SSH forwarding/proxy address. Command line (CLI) clients always begin their
    # SSH sessions by connecting to this port
    listen_addr: 0.0.0.0:3023

    # Reverse tunnel listening address. An auth server (CA) can establish an
    # outbound (from behind the firewall) connection to this address.
    # This will allow users of the outside CA to connect to behind-the-firewall
    # nodes.
    tunnel_listen_addr: 0.0.0.0:3024

    # The HTTPS listen address to serve the Web UI and also to authenticate the
    # command line (CLI) users via password+HOTP
    web_listen_addr: 0.0.0.0:3080

    # The DNS name the proxy HTTPS endpoint as accessible by cluster users.
    # Defaults to the proxy's hostname if not specified. If running multiple
    # proxies behind a load balancer, this name must point to the load balancer
    # (see public_addr section below)
    public_addr: proxy.example.com:3080

    # The DNS name of the proxy SSH endpoint as accessible by cluster clients.
    # Defaults to the proxy's hostname if not specified. If running multiple proxies
    # behind a load balancer, this name must point to the load balancer.
    # Use a TCP load balancer because this port uses SSH protocol.
    ssh_public_addr: proxy.example.com:3023

    # TLS certificate for the HTTPS connection. Configuring these properly is
    # critical for Teleport security.
    https_key_file: /var/lib/teleport/webproxy_key.pem
    https_cert_file: /var/lib/teleport/webproxy_cert.pem

    # This section configures the Kubernetes proxy service
    kubernetes:
        # Turns 'kubernetes' proxy on. Default is 'no'
        enabled: yes

        # Kubernetes proxy listen address.
        listen_addr: 0.0.0.0:3026

        # The DNS name of the Kubernetes proxy server that is accessible by cluster clients.
        # If running multiple proxies behind  a load balancer, this name must point to the
        # load balancer.
        public_addr: ['kube.example.com:3026']

        # This setting is not required if the Teleport proxy service is
        # deployed inside a Kubernetes cluster. Otherwise, Teleport proxy
        # will use the credentials from this file:
        kubeconfig_file: /path/to/kube/config
Public Addr
Notice that all three Teleport services (proxy, auth, node) have an optional
public_addr property. The public address can take an IP or a DNS name.
It can also be a list of values:
public_addr: ["proxy-one.example.com", "proxy-two.example.com"]
Specifying a public address for a Teleport service may be useful in the following use cases:
- You have multiple identical services, like proxies, behind a load balancer.
- You want Teleport to issue SSH certificate for the service with the additional principals, e.g. host names.
Authentication
Teleport uses the concept of "authentication connectors" to authenticate users when
they execute tsh login command. There are three types of authentication connectors:
Local Connector
Local authentication is used to authenticate against a local Teleport user database. This database
is managed by tctl users command. Teleport also supports second factor authentication
(2FA) for the local connector. There are three possible values (types) of 2FA:
otpis the default. It implements TOTP standard. You can use Google Authenticator or Authy or any other TOTP client.u2fimplements U2F standard for utilizing hardware (USB) keys for second factor.offturns off second factor authentication.
Here is an example of this setting in the teleport.yaml:
auth_service:
  authentication:
    type: local
    second_factor: off
Github OAuth 2.0 Connector
This connector implements Github OAuth 2.0 authentication flow. Please refer to Github documentation on Creating an OAuth App to learn how to create and register an OAuth app.
Here is an example of this setting in the teleport.yaml:
auth_service:
  authentication:
    type: github
See Github OAuth 2.0 for details on how to configure it.
SAML
This connector type implements SAML authentication. It can be configured against any external identity manager like Okta or Auth0. This feature is only available for Teleport Enterprise.
Here is an example of this setting in the teleport.yaml:
auth_service:
  authentication:
    type: saml
OIDC
Teleport implements OpenID Connect (OIDC) authentication, which is similar to SAML in principle. This feature is only available for Teleport Enterprise.
Here is an example of this setting in the teleport.yaml:
auth_service:
  authentication:
    type: oidc
FIDO U2F
Teleport supports FIDO U2F hardware keys as a second authentication factor. By default U2F is disabled. To start using U2F:
- Enable U2F in Teleport configuration
/etc/teleport.yaml. - For CLI-based logins you have to install u2f-host utility.
- For web-based logins you have to use Google Chrome, as it is the only browser supporting U2F at this time.
# snippet from /etc/teleport.yaml to show an example configuration of U2F:
auth_service:
  authentication:
    type: local
    second_factor: u2f
    # this section is needed only if second_factor is set to 'u2f'
    u2f:
       # app_id must point to the URL of the Teleport Web UI (proxy) accessible
       # by the end users
       app_id: https://localhost:3080
       # facets must list all proxy servers if there are more than one deployed
       facets:
       - https://localhost:3080
For single-proxy setups, the app_id setting can be equal to the domain name of the
proxy, but this will prevent you from adding more proxies without changing the
app_id. For multi-proxy setups, the app_id should be an HTTPS URL pointing to
a JSON file that mirrors facets in the auth config.
!!! warning "Warning":
The app_id must never change in the lifetime of the cluster. If the App ID
changes, all existing U2F key registrations will become invalid and all users
who use U2F as the second factor will need to re-register.
When adding a new proxy server, make sure to add it to the list of "facets"
in the configuration file, but also to the JSON file referenced by app_id
Logging in with U2F
For logging in via the CLI, you must first install u2f-host. Installing:
# OSX:
$ brew install libu2f-host

# Ubuntu 16.04 LTS:
$ apt-get install u2f-host
Then invoke tsh ssh as usual to authenticate:
tsh --proxy <proxy-addr> ssh <hostname>
!!! tip "Version Warning":
External user identities are only supported in Teleport Enterprise. Please reach
out to sales@gravitational.com for more information.
Adding and Deleting Users
This section covers internal user identities, i.e. user accounts created and stored in Teleport's internal storage. Most production users of Teleport use external users via Github or Okta or any other SSO provider (Teleport Enterprise supports any SAML or OIDC compliant identity provider).
A user identity in Teleport exists in the scope of a cluster. The member nodes of a cluster have multiple OS users on them. A Teleport administrator creates Teleport user accounts and maps them to the allowed OS user logins they can use.
Let's look at this table:
| Teleport User | Allowed OS Logins | Description |
|---|---|---|
| joe | joe,root | Teleport user 'joe' can login into member nodes as OS user 'joe' or 'root' |
| bob | bob | Teleport user 'bob' can login into member nodes only as OS user 'bob' |
| ross | If no OS login is specified, it defaults to the same name as the Teleport user. |
To add a new user to Teleport, you have to use the tctl tool on the same node where
the auth server is running, i.e. teleport was started with --roles=auth.
$ tctl users add joe joe,root
Teleport generates an auto-expiring token (with a TTL of 1 hour) and prints the token URL which must be used before the TTL expires.
Signup token has been created. Share this URL with the user:
https://<proxy>:3080/web/newuser/xxxxxxxxxxxx

NOTE: make sure the <proxy> host is accessible.
The user completes registration by visiting this URL in their web browser, picking a password and
configuring the 2nd factor authentication. If the credentials are correct, the auth
server generates and signs a new certificate and the client stores this key and will use
it for subsequent logins. The key will automatically expire after 12 hours by default after which
the user will need to log back in with her credentials. This TTL can be configured to a different value. Once authenticated, the account will become visible via tctl:
$ tctl users ls

User           Allowed Logins
----           --------------
admin          admin,root
ross           ross
joe            joe,root
Joe would then use the tsh client tool to log in to member node "luna" via
bastion "work" as root:
$ tsh --proxy=work --user=joe root@luna
To delete this user:
$ tctl users rm joe
Editing Users
Users entries can be manipulated using the generic resource commands
via tctl. For example, to see the full list of user records, an administrator
can execute:
$ tctl get users
To edit the user "joe":
# dump the user definition into a file:
$ tctl get user/joe > joe.yaml
# ... edit the contents of joe.yaml

# update the user record:
$ tctl create -f joe.yaml
Some fields in the user record are reserved for internal use. Some of them
will be finalized and documented in the future versions. Fields like
is_locked or traits/logins can be used starting in version 2.3
Adding Nodes to the Cluster
Teleport is a "clustered" system, meaning it only allows access to nodes (servers) that had been previously granted cluster membership.
A cluster membership means that a node receives its own host certificate signed
by the cluster's auth server. To receive a host certificate upon joining a cluster,
a new Teleport host must present an "invite token". An invite token also defines
which role a new host can assume within a cluster: auth, proxy or node.
There are two ways to create invitation tokens:
- Static Tokens are easy to use and somewhat less secure.
- Dynamic Tokens are more secure but require more planning.
Static Tokens
Static tokens are defined ahead of time by an administrator and stored in the auth server's config file:
# Config section in `/etc/teleport.yaml` file for the auth server
auth_service:
    enabled: true
    tokens:
    # This static token allows new hosts to join the cluster as "proxy" or "node"
    - "proxy,node:secret-token-value"
    # A token can also be stored in a file. In this example the token for adding
    # new auth servers is stored in /path/to/tokenfile
    - "auth:/path/to/tokenfile"
Short-lived Tokens
A more secure way to add nodes to a cluster is to generate tokens as they are needed. Such token can be used multiple times until its time to live (TTL) expires.
Use the tctl tool to register a new invitation token (or it can also generate a new token
for you). In the following example a new token is created with a TTL of 5 minutes:
$ tctl nodes add --ttl=5m --roles=node,proxy --token=secret-value
The invite token: secret-value
If --token is not provided, tctl will generate one:
# generate a short-lived invitation token for a new node:
$ tctl nodes add --ttl=5m --roles=node,proxy
The invite token: e94d68a8a1e5821dbd79d03a960644f0

# you can also list all generated non-expired tokens:
$ tctl tokens ls
Token                            Type            Expiry Time
---------------                  -----------     ---------------
e94d68a8a1e5821dbd79d03a960644f0 Node            25 Sep 18 00:21 UTC

# ... or revoke an invitation before it's used:
$ tctl tokens rm e94d68a8a1e5821dbd79d03a960644f0
Using Node Invitation Tokens
Both static and short-lived tokens are used the same way. Execute the following command on a new node to add it to a cluster:
# adding a new regular SSH node to the cluster:
$ teleport start --roles=node --token=secret-token-value --auth-server=10.0.10.5

# adding a new regular SSH node using Teleport Node Tunneling:
$ teleport start --roles=node --token=secret-token-value --auth-server=teleport-proxy.example.com:3080

# adding a new proxy service on the cluster:
$ teleport start --roles=proxy --token=secret-token-value --auth-server=10.0.10.5
As new nodes come online, they start sending ping requests every few seconds to the CA of the cluster. This allows users to explore cluster membership and size:
$ tctl nodes ls

Node Name     Node ID                                  Address            Labels
---------     -------                                  -------            ------
turing        d52527f9-b260-41d0-bb5a-e23b0cfe0f8f     10.1.0.5:3022      distro:ubuntu
dijkstra      c9s93fd9-3333-91d3-9999-c9s93fd98f43     10.1.0.6:3022      distro:debian
Untrusted Auth Servers
Teleport nodes use the HTTPS protocol to offer the join tokens to the auth
server running on 10.0.10.5 in the example above. In a zero-trust
environment, you must assume that an attacker can highjack the IP address of
the auth server e.g. 10.0.10.5.
To prevent this from happening, you need to supply every new node with an additional bit of information about the auth server. This technique is called "CA Pinning". It works by asking the auth server to produce a "CA Pin", which is a hashed value of it's private key, i.e. it cannot be forged by an attacker.
On the auth server:
$ tctl status
Cluster  staging.example.com
User CA  never updated
Host CA  never updated
CA pin   sha256:7e12c17c20d9cb504bbcb3f0236be3f446861f1396dcbb44425fe28ec1c108f1
The "CA pin" at the bottom needs to be passed to the new nodes when they're starting for the first time, i.e. when they join a cluster:
Via CLI:
$ teleport start \
   --roles=node \
   --token=1ac590d36493acdaa2387bc1c492db1a \
   --ca-pin=sha256:7e12c17c20d9cb504bbcb3f0236be3f446861f1396dcbb44425fe28ec1c108f1 \
   --auth-server=10.12.0.6:3025
or via /etc/teleport.yaml on a node:
teleport:
  auth_token: "1ac590d36493acdaa2387bc1c492db1a"
  ca_pin: "sha256:7e12c17c20d9cb504bbcb3f0236be3f446861f1396dcbb44425fe28ec1c108f1"
  auth_servers:
    - "10.12.0.6:3025"
!!! warning "Warning":
If a CA pin not provided, Teleport node will join a cluster but it will print
a WARN message (warning) into it's standard error output.
!!! warning "Warning":
The CA pin becomes invalid if a Teleport administrator performs the CA
rotation by executing tctl auth rotate.
Revoking Invitations
As you have seen above, Teleport uses tokens to invite users to a cluster (sign-up tokens) or to add new nodes to it (provisioning tokens).
Both types of tokens can be revoked before they can be used. To see a list of outstanding tokens, run this command:
$ tctl tokens ls

Token                                Role       Expiry Time (UTC)
-----                                ----       -----------------
eoKoh0caiw6weoGupahgh6Wuo7jaTee2     Proxy      never
696c0471453e75882ff70a761c1a8bfa     Node       17 May 16 03:51 UTC
6fc5545ab78c2ea978caabef9dbd08a5     Signup     17 May 16 04:24 UTC
In this example, the first token has a "never" expiry date because it is a static token configured via a config file.
The 2nd token with "Node" role was generated to invite a new node to this cluster. And the 3rd token was generated to invite a new user.
The latter two tokens can be deleted (revoked) via tctl tokens del command:
$ tctl tokens del 696c0471453e75882ff70a761c1a8bfa
Token 696c0471453e75882ff70a761c1a8bfa has been deleted
Labeling Nodes
In addition to specifying a custom nodename, Teleport also allows for the application of arbitrary key:value pairs to each node, called labels. There are two kinds of labels:
-
static labelsdo not change over time, whileteleportprocess is running. Examples of static labels are physical location of nodes, name of the environment (staging vs production), etc. -
dynamic labelsalso known as "label commands" allow to generate labels at runtime. Teleport will execute an external command on a node at a configurable frequency and the output of a command becomes the label value. Examples include reporting load averages, presence of a process, time after last reboot, etc.
There are two ways to configure node labels.
- Via command line, by using
--labelsflag toteleport startcommand. - Using
/etc/teleport.yamlconfiguration file on the nodes.
To define labels as command line arguments, use --labels flag like shown below.
This method works well for static labels or simple commands:
$ teleport start --labels uptime=[1m:"uptime -p"],kernel=[1h:"uname -r"]
Alternatively, you can update labels via a configuration file:
ssh_service:
  enabled: "yes"
  # Static labels are simple key/value pairs:
  labels:
    environment: test
To configure dynamic labels via a configuration file, define a commands array
as shown below:
ssh_service:
  enabled: "yes"
  # Dynamic labels AKA "commands":
  commands:
  - name: arch
    command: ['/path/to/executable', 'flag1', 'flag2']
    # this setting tells teleport to execute the command above
    # once an hour. this value cannot be less than one minute.
    period: 1h0m0s
/path/to/executable must be a valid executable command (i.e. executable bit must be set)
which also includes shell scripts with a proper shebang line.
Important: notice that command setting is an array where the first element is
a valid executable and each subsequent element is an argument, i.e:
# valid syntax:
command: ["/bin/uname", "-m"]

# INVALID syntax:
command: ["/bin/uname -m"]

# if you want to pipe several bash commands together, here's how to do it:
# notice how ' and " are interchangeable and you can use it for quoting:
command: ["/bin/sh", "-c", "uname -a | egrep -o '[0-9]+\.[0-9]+\.[0-9]+'"]
Audit Log
Teleport logs every SSH event into its audit log. There are two components of the audit log:
- SSH Events: Teleport logs events like successful user logins along with the metadata like remote IP address, time and the session ID.
- Recorded Sessions: Every SSH shell session is recorded and can be replayed later. The recording is done by the nodes themselves, by default, but can be configured to be done by the proxy.
Refer to the "Audit Log" chapter in the Teleport Architecture to learn more about how the audit Log and session recording are designed.
SSH Events
Teleport supports multiple storage back-ends for storing the SSH events. The section below
uses the dir backend as an example. dir backend uses the local filesystem of an
auth server using the configurable data_dir directory.
For highly available (HA) configuration users can refer to DynamoDB or etcd
chapters on how to configure the SSH events and recorded sessions to be stored
on network storage. It is even possible to store the audit log in multiple places at the same time,
see audit_events_uri setting in the sample configuration file above for how to do that.
Let's examine the Teleport audit log using the dir backend. The event log is
stored in data_dir under log directory, usually /var/lib/teleport/log.
Each day is represented as a file:
$ ls -l /var/lib/teleport/log/
total 104
-rw-r----- 1 root root  31638 Jan 22 20:00 2017-01-23.00:00:00.log
-rw-r----- 1 root root  91256 Jan 31 21:00 2017-02-01.00:00:00.log
-rw-r----- 1 root root  15815 Feb 32 22:54 2017-02-03.00:00:00.log
The log files use JSON format. They are human-readable but can also be programmatically parsed. Each line represents an event and has the following format:
{
   // Event type. See below for the list of all possible event types
   "event"      : "session.start",
   // Teleport user name
   "user"       : "ekontsevoy",
   // OS login
   "login"      : "root",
   // Server namespace. This field is reserved for future use.
   "namespace"  : "default",
   // Unique server ID.
   "server_id"  : "f84f7386-5e22-45ff-8f7d-b8079742e63f",
   // Session ID. Can be used to replay the session.
   "sid"        : "8d3895b6-e9dd-11e6-94de-40167e68e931",
   // Address of the SSH node
   "addr.local" : "10.5.l.15:3022",
   // Address of the connecting client (user)
   "addr.remote": "73.223.221.14:42146",
   // Terminal size
   "size"       : "80:25",
   // Timestamp
   "time"       : "2017-02-03T06:54:05Z"
}
The possible event types are:
| Event Type | Description |
|---|---|
| auth | Authentication attempt. Adds the following fields: {"success": "false", "error": "access denied"} |
| session.start | Started an interactive shell session. |
| session.end | An interactive shell session has ended. |
| session.join | A new user has joined the existing interactive shell session. |
| session.leave | A user has left the session. |
| exec | Remote command has been executed via SSH, like tsh ssh root@node ls /. The following fields will be logged: {"command": "ls /", "exitCode": 0, "exitError": ""} |
| scp | Remote file copy has been executed. The following fields will be logged: {"path": "/path/to/file.txt", "len": 32344, "action": "read" } |
| resize | Terminal has been resized. |
| user.login | A user logged into web UI or via tsh. The following fields will be logged: {"user": "alice@example.com", "method": "local"}. |
Recorded Sessions
In addition to logging session.start and session.end events, Teleport also records the entire
stream of bytes going to/from standard input and standard output of an SSH session.
Teleport can store the recorded sessions in an AWS S3 bucket or in a local filesystem (including NFS).
The recorded sessions are stored as raw bytes in the sessions directory under log.
Each session consists of two files, both are named after the session ID:
.bytesfile represents the raw session bytes and is somewhat human-readable, although you are better off usingtsh playor the Web UI to replay it..logfile contains the copies of the event log entries that are related to this session.
$ ls /var/lib/teleport/log/sessions/default
-rw-r----- 1 root root 506192 Feb 4 00:46 4c146ec8-eab6-11e6-b1b3-40167e68e931.session.bytes
-rw-r----- 1 root root  44943 Feb 4 00:46 4c146ec8-eab6-11e6-b1b3-40167e68e931.session.log
To replay this session via CLI:
$ tsh --proxy=proxy play 4c146ec8-eab6-11e6-b1b3-40167e68e931
Recording Proxy Mode
See Audit Log Architecture to understand how the session
recording works. By default, the recording is not
available if a cluster runs sshd (the OpenSSH daemon) on the nodes.
To enable session recording for sshd nodes, the cluster must be switched to
"recording proxy" mode. In this mode, the recording will be done on the proxy level:
# snippet from /etc/teleport.yaml
auth_service:
   session_recording: "proxy"  # can also be "off" and "node" (default)
Next, sshd must be told to allow users to log in with certificates generated by the
Teleport User CA. Start by exporting the Teleport CA public key:
$ tctl auth export --type=user
To allow access to a single user, copy the above output to ~/.ssh/authorized_keys. To apply this for all users, remove "cert-authority" from the start of tctl output and
copy it to /etc/ssh/teleport_user_ca.pub.
Add the following line to /etc/ssh/sshd_config:
TrustedUserCAKeys /etc/ssh/teleport_user_ca.pub
Now sshd will trust users who present a Teleport-issued certificate. The next step
is to configure host authentication.
When in recording mode, Teleport will check that the host certificate of the node a user connects to is signed by a Teleport CA. By default this is a strict check. If the node presents just a key, or a certificate signed by a different CA, Teleport will reject this connection with the error message saying "ssh: handshake failed: remote host presented a public key, expected a host certificate"
You can disable strict host checks as shown below. However, this opens the possibility for Man-in-the-Middle (MITM) attacks and is not recommended.
# snippet from /etc/teleport.yaml
auth_service:
  proxy_checks_host_keys: no
The recommended solution is to ask Teleport to issue valid host certificates for all OpenSSH nodes. To generate a host certificate run this on your auth server:
$ tctl auth sign \
      --host=node.example.com \
      --format=openssh
Then add the following lines to /etc/ssh/sshd_config and restart sshd.
HostKey /etc/ssh/teleport_host_key
HostCertificate /etc/ssh/teleport_host_key-cert.pub
Now you can use tsh ssh user@host.example.com to login into any sshd node in the cluster
and the session will be recorded. If you want to use OpenSSH ssh client for logging
into sshd servers behind a proxy in "recording mode", you have to tell the ssh client
to use the jump host and enable the agent forwarding, otherwise a recording proxy will not
be able to terminate the SSH connection to record it:
# Note that agent forwarding is enabled twice: one from a client to a proxy
# (mandatory if using a recording proxy), and then optionally from a proxy
# to the end server if you want your agent running on the end server or not
ssh -o "ForwardAgent yes" \
    -o "ProxyCommand ssh -o 'ForwardAgent yes' -p 3023 %r@p.example.com -s proxy:%h:%p" \
    user@host.example.com
!!! tip "Tip":
To avoid typing all this and use the usual ssh user@host.example.com, users can update their
~/.ssh/config file. See "Using Teleport with OpenSSH" chapter for more examples.
IMPORTANT
It's important to remember that SSH agent forwarding must be enabled on the client. Verify that a Teleport certificate is loaded into the agent after logging in:
# Login as Joe
$ tsh login --proxy=proxy.example.com joe
# see if the certificate is present (look for "teleport:joe") at the end of the cert
$ ssh-add -L
!!! warning "GNOME Keyring SSH Agent":
It is well-known that Gnome Keyring SSH agent, used by many popular Linux
desktops like Ubuntu, does not support SSH certificates. We recommend using
the ssh-agent command from openssh-client package.
OpenSSH Rate Limiting
When using a Teleport proxy in "recording mode", be aware of OpenSSH built-in rate limiting. On large number of proxy connections you may encounter errors like:
channel 0: open failed: connect failed: ssh: handshake failed: EOF
See MaxStartups setting in man sshd_config. This setting means that by
default OpenSSH only allows 10 unauthenticated connections at a time and starts
dropping connections 30% of the time when the number of connections goes over
10 and when it hits 100 authentication connections, all new connections are
dropped.
To increase the concurrency level, increase the value to something like MaxStartups 50:30:100. This allows 50 concurrent connections and a max of 100.
Resources
A Teleport administrator has two tools to configure a Teleport cluster:
- The configuration file is used for static configuration like the cluster name.
- The
tctladmin tool is used for manipulating dynamic records like Teleport users.
tctl has convenient subcommands for dynamic configuration, like tctl users or tctl nodes.
However, for dealing with more advanced topics, like connecting clusters together or
troubleshooting trust, tctl offers the more powerful, although lower-level
CLI interface called resources.
The concept is borrowed from the REST programming pattern. A cluster is composed
of different objects (aka, resources) and there are just four common operations
that can be performed on them: get, create, remove.
A resource is defined as a YAML file. Every resource in Teleport has three required fields:
Kind- The type of resourceName- A required field in themetadatato uniquely identify the resourceVersion- The version of the resource format
Everything else is resource-specific and any component of a Teleport cluster can be manipulated with just 3 CLI commands:
| Command | Description | Examples |
|---|---|---|
tctl get |
Get one or multiple resources | tctl get users or tctl get user/joe |
tctl rm |
Delete a resource by type/name | tctl rm user/joe |
tctl create |
Create a new resource from a YAML file. Use -f to override / update |
tctl create -f joe.yaml |
!!! warning "YAML Format": By default Teleport uses YAML format to describe resources. YAML is a wonderful and very human-readable alternative to JSON or XML, but it's sensitive to white space. Pay attention to spaces vs tabs!
Here's an example how the YAML resource definition for a user Joe might look like.
It can be retrieved by executing tctl get user/joe
kind: user
version: v2
metadata:
  name: joe
spec:
  roles:
  - admin
  status:
    # users can be temporarily locked in a Teleport system, but this
    # functionality is reserved for internal use for now.
    is_locked: false
    lock_expires: 0001-01-01T00:00:00Z
    locked_time: 0001-01-01T00:00:00Z
  traits:
    # these are "allowed logins" which are usually specified as the
    # last argument to `tctl users add`
    logins:
    - joe
    - root
  # any resource in Teleport can automatically expire.
  expires: 0001-01-01T00:00:00Z
  # for internal use only
  created_by:
    time: 0001-01-01T00:00:00Z
    user:
      name: builtin-Admin
!!! tip "Note": Some of the fields you will see when printing resources are used only internally and are not meant to be changed. Others are reserved for future use.
Here's the list of resources currently exposed via tctl:
| Resource Kind | Description |
|---|---|
| user | A user record in the internal Teleport user DB. |
| node | A registered SSH node. The same record is displayed via tctl nodes ls |
| cluster | A trusted cluster. See here for more details on connecting clusters together. |
| role | A role assumed by users. The open source Teleport only includes one role: "admin", but Enterprise teleport users can define their own roles. |
| connector | Authentication connectors for single sign-on (SSO) for SAML, OIDC and Github. |
Examples:
# list all connectors:
$ tctl get connectors

# dump a connector called "okta":
$ tctl get connectors/okta

# delete a connector called "okta":
$ tctl rm connectors/okta

# delete a local user called "admin":
$ tctl rm users/admin
Trusted Clusters
As explained in the architecture document, Teleport can partition compute infrastructure into multiple clusters. A cluster is a group of nodes connected to the cluster's auth server, acting as a certificate authority (CA) for all users and nodes.
To retrieve an SSH certificate, users must authenticate with a cluster through a
proxy server. So, if users want to connect to nodes belonging to different
clusters, they would normally have to use a different --proxy flag for each
cluster. This is not always convenient.
The concept of trusted clusters allows Teleport administrators to connect multiple clusters together and establish trust between them. Trusted clusters allow users of one cluster to seamlessly SSH into the nodes of another cluster without having to "hop" between proxy servers. Moreover, users don't even need to have a direct connection to other clusters' proxy servers. Trusted clusters also have their own restrictions on user access. The user experience looks like this:
# login using the "main" cluster credentials:
$ tsh login --proxy=main.example.com

# SSH into some host inside the "main" cluster:
$ tsh ssh host

# SSH into the host located in another cluster called "east"
# The connection is established through main.example.com:
$ tsh ssh --cluster=east host

# See what other clusters are available
$ tsh clusters
Selecting the Default Cluster
To avoid using --cluster switch with tsh commands, you can also specify
which trusted cluster you want to become the default from the start:
# login into "main" but request "east" to be the default for subsequent
# tsh commands:
$ tsh login --proxy=main.example.com east
Connectivity
The design of trusted clusters allows Teleport users to connect to compute infrastructure located behind firewalls without any open TCP ports. The real world usage examples of this capability include:
- Managed service providers (MSP) remotely managing infrastructure of their clients.
- Device manufacturers remotely maintaining computing appliances deployed on premises.
- Large cloud software vendors manage multiple data centers using a common proxy.
Let's take a look at how a connection is established between the "main" cluster and the "east" cluster:

This setup works as follows:
- The "east" creates an outbound reverse SSH tunnel to "main" and keeps the tunnel open.
- Accessibility only works in one direction. The "east" cluster allows users from "main" to access its nodes but users in the "east" cluster can not access the "main" cluster.
- When a user tries to connect to a node inside "east" using main's proxy, the reverse tunnel from step 1 is used to establish this connection shown as the green line above.
!!! tip "Load Balancers": The scheme above also works even if the "main" cluster uses multiple proxies behind a load balancer (LB) or a DNS entry with multiple values. This works by "east" establishing a tunnel to every proxy in "main", assuming that an LB uses round-robin or a similar non-sticky balancing algorithm.
Example Configuration
Connecting two clusters together is similar to adding nodes:
- Generate an invitation token on "main" cluster, or use a pre-defined static token.
- On the "east" side, create a trusted cluster resource.
Creating a Cluster Join Token
Just like with adding nodes, you can use either a static cluster token defined
in /etc/teleport.yaml or you can generate an auto-expiring token:
To define a static cluster join token using the configuration file on "main":
# fragment of /etc/teleport.yaml:
auth_service:
  enabled: true
  tokens:
  - trusted_cluster:secret-token-to-add-new-clusters
If you wish to use auto-expiring cluster tokens, execute this CLI command on the "main" side:
$ tctl tokens add --type=trusted_cluster
The cluster invite token: generated-token-to-add-new-clusters
Using a Cluster Join Token
Now, the administrator of "east (leaf)" must create the following resource file:
# cluster.yaml
kind: trusted_cluster
version: v2
metadata:
  # the trusted cluster name MUST match the 'cluster_name' setting of the
  # cluster
  name: east
spec:
  # this field allows to create tunnels that are disabled, but can be enabled later.
  enabled: true
  # the token expected by the "main" cluster:
  token: secret-token-to-add-new-clusters
  # the address in 'host:port' form of the reverse tunnel listening port on the
  # "main" proxy server:
  tunnel_addr: main.example.com:3024
  # the address in 'host:port' form of the web listening port on the
  # "main" proxy server:
  web_proxy_addr: main.example.com:3080
  # the role mapping allows to map user roles from one cluster to another
  # (enterprise editions of Teleport only)
  role_map:
    - remote: "admin"    # users who have "admin" role on "main"
      local: ["auditor"] # will be assigned "auditor" role when logging into "east"
Then, use tctl create to add the file:
$ tctl create cluster.yaml
At this point the users of the main cluster should be able to see "east" in the list of available clusters.
!!! warning "HTTPS configuration":
If the web_proxy_addr endpoint of the main cluster uses a self-signed or
invalid HTTPS certificate, you will get an error: "the trusted cluster
uses misconfigured HTTP/TLS certificate". For ease of testing the teleport
daemon of "east" can be started with --insecure CLI flag to accept
self-signed certificates. Make sure to configure HTTPS properly and remove
the insecure flag for production use.
Using Trusted Clusters
As mentioned above, accessibility is only granted in one direction. So, only users from the "main" (root cluster) can now access nodes in the "east" (leaf cluster). Users in the "east" cluster will not be able to access the "main" cluster.
# login into the main cluster:
$ tsh --proxy=proxy.main login joe

# see the list of available clusters
$ tsh clusters

Cluster Name   Status
------------   ------
main           online
east           online

# see the list of machines (nodes) behind the eastern cluster:
$ tsh ls --cluster=east

Node Name Node ID            Address        Labels
--------- ------------------ -------------- -----------
db1.east  cf7cc5cd-935e-46f1 10.0.5.2:3022  role=db-leader
db2.east  3879d133-fe81-3212 10.0.5.3:3022  role=db-follower

# SSH into any node in "east":
$ tsh ssh --cluster=east root@db1.east
Disabling Trust
To temporarily disable trust between clusters, i.e. to disconnect the "east"
cluster from "main", edit the YAML definition of the trusted cluster resource
and set enabled to "false", then update it:
$ tctl create --force cluster.yaml
If you want to permanently disconnect one cluster from the other:
# execute this command on "main" side to disconnect "east":
$ tctl rm tc/east
While accessibility is only granted in one direction, trust is granted in both directions. If you remote "east" from "main", the following will happen:
- Two clusters will be disconnected, because "main" will drop the inbound SSH tunnel connection from "east" and will not allow a new one.
- "main" will stop trusting certificates issued by "east".
- "east" will continue to trust certificates issued by "main".
If you wish to permanently remove all trust relationships and the connections between both clusters:
# execute on "main":
$ tctl rm tc/east
# execute on "east":
$ tctl rm tc/main
Advanced Configuration
Take a look at Trusted Clusters Guide to learn more about advanced topics:
- Using dynamic cluster join tokens instead of pre-defined static tokens for enhanced security.
- Defining role-mapping between clusters (Teleport Enterprise only).
Github OAuth 2.0
Teleport supports authentication and authorization via external identity providers such as Github. First, the Teleport auth service must be configured to use Github for authentication:
# snippet from /etc/teleport.yaml
auth_service:
  authentication:
      type: github
Next step is to define a Github connector:
# Create a file called github.yaml:
kind: github
version: v3
metadata:
  # connector name that will be used with `tsh --auth=github login`
  name: github
spec:
  # client ID of Github OAuth app
  client_id: <client-id>
  # client secret of Github OAuth app
  client_secret: <client-secret>
  # connector display name that will be shown on web UI login screen
  display: Github
  # callback URL that will be called after successful authentication
  redirect_url: https://<proxy-address>/v1/webapi/github/callback
  # mapping of org/team memberships onto allowed logins and roles
  teams_to_logins:
    - organization: octocats # Github organization name
      team: admins # Github team name within that organization
      # allowed logins for users in this org/team
      logins:
        - root

      # List of Kubernetes groups this Github team is allowed to connect to
      # (see Kubernetes integration for more information)
      kubernetes_groups: ["system:masters"]
!!! note
For open-source Teleport the logins field contains a list of allowed OS
logins. For the commercial Teleport Enterprise offering, which supports
role-based access control, the same field is treated as a list of roles
that users from the matching org/team assume after going through the
authorization flow.
To obtain client ID and client secret, please follow Github documentation
on how to create and register an OAuth app.
Be sure to set the "Authorization callback URL" to the same value as redirect_url
in the resource spec.
Finally, create the connector using tctl resource management command:
$ tctl create github.yaml
!!! tip When going through the Github authentication flow for the first time, the application must be granted the access to all organizations that are present in the "teams to logins" mapping, otherwise Teleport will not be able to determine team memberships for these orgs.
HTTP CONNECT Proxies
Some networks funnel all connections through a proxy server where they can be audited and access control rules are applied. For these scenarios Teleport supports HTTP CONNECT tunneling.
To use HTTP CONNECT tunneling, simply set either the HTTPS_PROXY or
HTTP_PROXY environment variables and when Teleport builds and establishes the
reverse tunnel to the main cluster, it will funnel all traffic though the proxy.
Specifically, if using the default configuration, Teleport will tunnel ports
3024 (SSH, reverse tunnel) and 3080 (HTTPS, establishing trust) through the
proxy.
The value of HTTPS_PROXY or HTTP_PROXY should be in the format
scheme://host:port where scheme is either https or http. If the
value is host:port, Teleport will prepend http.
It's important to note that in order for Teleport to use HTTP CONNECT tunnelling, the HTTP_PROXY and HTTPS_PROXY
environment variables must be set within Teleport's environment. You can also optionally set the NO_PROXY environment
variable to avoid use of the proxy when accessing specified hosts/netmasks. When launching Teleport with systemd, this
will probably involve adding some lines to your systemd unit file:
[Service]
Environment="HTTP_PROXY=http://proxy.example.com:8080/"
Environment="HTTPS_PROXY=http://proxy.example.com:8080/"
Environment="NO_PROXY=localhost,127.0.0.1,192.168.0.0/16,172.16.0.0/12,10.0.0.0/8"
!!! tip "Note":
localhost and 127.0.0.1 are invalid values for the proxy host. If for
some reason your proxy runs locally, you'll need to provide some other DNS
name or a private IP address for it.
PAM Integration
Teleport SSH daemon can be configured to integrate with PAM. This allows Teleport to create user sessions using PAM session profiles.
To enable PAM on a given Linux machine, update /etc/teleport.yaml with:
teleport:
   ssh_service:
      pam:
         # "no" by default
         enabled: yes
         # use /etc/pam.d/sshd configuration (the default)
         service_name: "sshd"
Please note that most Linux distributions come with a number of PAM services in
/etc/pam.d and Teleport will try to use sshd by default, which will be
removed if you uninstall openssh-server package. We recommend creating your
own PAM service file like /etc/pam.d/teleport and specifying it as
service_name above.
Using Teleport with OpenSSH
Teleport is a standards-compliant SSH proxy and it can work in environments with existing SSH implementations, such as OpenSSH. This section will cover:
- Configuring OpenSSH client
sshto login into nodes inside a Teleport cluster. - Configuring OpenSSH server
sshdto join a Teleport cluster.
Using OpenSSH Client
It is possible to use the OpenSSH client ssh to connect to nodes within a Teleport
cluster. Teleport supports SSH subsystems and includes a proxy subsystem that
can be used like netcat is with ProxyCommand to connect through a jump host.
First, you need to export the public keys of cluster members. This has to be done on a node which runs Teleport auth server:
$ tctl auth export --type=host > cluster_node_keys
$ cat cluster_node_keys
@cert-authority *.graviton-auth ssh-rsa AAAAB3NzaC1yc2EAAAADAQABAAABAQDLNduBoHQaqi+kgkq3gLYjc6JIyBBnCFLgm63b5rtmWl/CJD7T9HWHxZphaS1jra6CWdboLeTp6sDUIKZ/Qw1MKFlfoqZZ8k6to43bxx7DvAHs0Te4WpuS/YRmWFhb6mMVOa8Rd4/9jE+c0f9O/t7X4m5iR7Fp7Tt+R/pjJfr03Loi6TYP/61AgXD/BkVDf+IcU4+9nknl+kaVPSGcPS9/Vbni1208Q+VN7B7Umy71gCh02gfv3rBGRgjT/cRAivuVoH/z3n5UwWg+9R3GD/l+XZKgv+pfe3OHoyDFxYKs9JaX0+GWc504y3Grhos12Lb8sNmMngxxxQ/KUDOV9z+R type=host
!!! tip "Note":
When sharing the @cert-authority make sure that the URL for the proxy is correct.
In the above example, *.graviton-auth should be changed to teleport.example.com.
On your client machine, you need to import these keys. It will allow your OpenSSH client to verify that host's certificates are signed by the trusted CA key:
$ cat cluster_node_keys >> ~/.ssh/known_hosts
Make sure you are running OpenSSH's ssh-agent, and have logged in to the Teleport proxy:
$ eval `ssh-agent`
$ tsh --proxy=work.example.com login
ssh-agent will print environment variables into the console. Either eval the output
as in the example above, or copy and paste the output into the shell you will be using to
connect to a Teleport node. The output exports the SSH_AUTH_SOCK and SSH_AGENT_PID
environment variables that allow OpenSSH clients to find the SSH agent.
Lastly, configure the OpenSSH client to use the Teleport proxy when connecting
to nodes with matching names. Edit ~/.ssh/config for your user or
/etc/ssh/ssh_config for global changes:
# work.example.com is the jump host (proxy). credentials will be obtained from the
# openssh agent.
Host work.example.com
    HostName 192.168.1.2
    Port 3023

# connect to nodes in the work.example.com cluster through the jump
# host (proxy) using the same. credentials will be obtained from the
# openssh agent.
Host *.work.example.com
    HostName %h
    Port 3022
    ProxyCommand ssh -p 3023 %r@work.example.com -s proxy:%h:%p

# when connecting to a node within a trusted cluster with name "remote-cluster",
# add the name of the cluster to the invocation of the proxy subsystem.
Host *.remote-cluster.example.com
   HostName %h
   Port 3022
   ProxyCommand ssh -p 3023 %r@work.example.com -s proxy:%h:%p@remote-cluster
When everything is configured properly, you can use ssh to connect to any node
behind work.example.com:
$ ssh root@database.work.example.com
!!! tip "NOTE":
Teleport uses OpenSSH certificates instead of keys which means you can not connect
to a Teleport node by IP address. You have to connect by DNS name. This is because
OpenSSH ensures the DNS name of the node you are connecting is listed under
the Principals section of the OpenSSH certificate to verify you are connecting
to the correct node.
Integrating with OpenSSH Servers
Existing sshd servers can be added to a Teleport cluster. For that to work, you
have to configure sshd to trust the Teleport CA.
Export the Teleport CA certificate into a file:
$ tctl auth export --type=user > teleport-user-ca.pub
To allow access per-user, append the contents of teleport-user-ca.pub to
~/.ssh/authorized_keys.
To allow access for all users:
- Edit
teleport-user-ca.puband removecert-authorityfrom the start of line. - Copy
teleport-user-ca.pubto/etc/ssh/teleport-user-ca.pub - Update
sshdconfiguration (usually/etc/ssh/sshd_config) to point to this file:TrustedUserCAKeys /etc/ssh/teleport-user-ca.pub
Certificate Rotation
Take a look at the Certificates chapter in the architecture document to learn how the certificate rotation works. This section will show you how to implement certificate rotation in practice.
The easiest way to start the rotation is to execute this command on a cluster's auth server:
$ tctl auth rotate
This will trigger a rotation process for both hosts and users with a grace period of 48 hours.
This can be customized, i.e.
# rotate only user certificates with a grace period of 200 hours:
$ tctl auth rotate --type=user --grace-period=200h

# rotate only host certificates with a grace period of 8 hours:
$ tctl auth rotate --type=host --grace-period=8h
The rotation takes time, especially for hosts, because each node in a cluster needs to be notified that a rotation is taking place and request a new certificate for itself before the grace period ends.
!!! warning "Warning": Be careful when choosing a grace period when rotating host certificates. The grace period needs to be long enough for all nodes in a cluster to request a new certificate. If some nodes go offline during the rotation and come back only after the grace period has ended, they will be forced to leave the cluster, i.e. users will no longer be allowed to SSH into them.
To check the status of certificate rotation:
$ tctl status
!!! danger "Version Warning": Certificate rotation can only be used with clusters running version 2.6 of Teleport or newer. If trusted clusters are used, make sure all connected clusters are running version 2.6+. If one of the trusted clusters is running an older version of Teleport the trust/connection to that cluster will be lost.
!!! warning "CA Pinning Warning" If you are using CA Pinning when adding new nodes, the CA pin will changes after the rotation.
Ansible Integration
Ansible uses the OpenSSH client by default. This makes it compatible with Teleport without any extra work, except configuring OpenSSH client to work with Teleport Proxy:
- configure your OpenSSH to connect to Teleport proxy and use
ssh-agentsocket - enable scp mode in the Ansible config file (default is
/etc/ansible/ansible.cfg):
scp_if_ssh = True
Kubernetes Integration
Teleport 3.0+ can be configured as a compliance gateway for Kubernetes
clusters. This allows users to authenticate against a Teleport proxy using
tsh login command to retrieve credentials for both SSH and Kubernetes API.
Below is a high-level diagram of how Teleport can be deployed in front of a Kubernetes cluster:
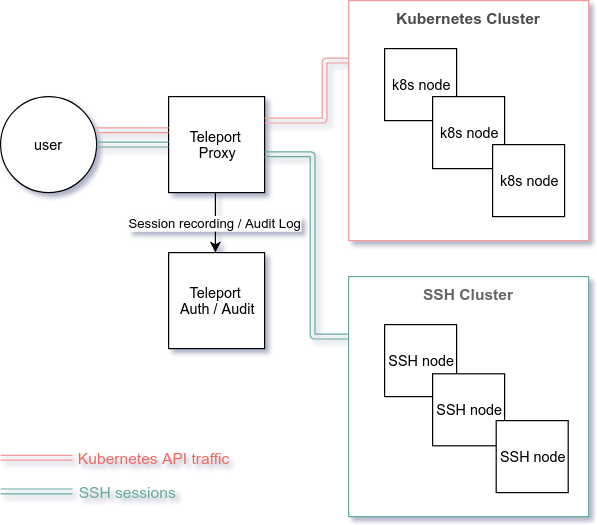
For more detailed information, please take a look at Kubernetes Integration with SSH section in the Architecture chapter.
In the scenario illustrated above a user would execute the following commands:
# Authentication step to retrieve the certificates. tsh login places the SSH
# certificate into `~/.tsh` as usual and updates kubeconfig with Kubernetes
# credentials:
$ tsh --proxy=teleport.example.com login

# Execute SSH commands to access SSH nodes:
$ tsh ssh login@ssh-node

# Execute any kubectl commands to access the Kubernetes cluster:
$ kubectl get pods
Kubernetes/Teleport Configuration
To enable the Kubernetes integration, first configure the Teleport proxy service as follows:
# snippet from /etc/teleport.yaml on the Teleport proxy service:
proxy_service:
    # create the 'kubernetes' section and set enabled to "yes" (it's "no" by default):
    kubernetes:
        enabled: yes
        # public_addr can be a scalar or list. this is the address seen as
        # "Kubernetes API endpoint" from the outside. if you are using a load-balancer
        # in front of several proxies, you have to use LB's address here:
        public_addr: [teleport-k8s-proxy.example.com:3026]
        # the listen address is what Teleport/Kubernetes proxy will listen on:
        listen_addr: localhost:3026
        # optional. see below.
        kubeconfig_file: /path/to/kubeconfig
To make this work, the Teleport proxy server must be able to access a Kubernetes API endpoint. This can be done either by:
- Deploying the proxy service inside a Kubernetes pod.
- Deploying the proxy service outside Kubernetes adding a valid
kubeconfigsetting to the configuration file as shown above.
When adding new local users you have to specify which Kubernetes groups they belong to:
$ tctl users add joe --k8s-groups="system:masters"
If using Teleport Community SSO with Github, Kubernetes groups can be assigned to Github teams with a Teleport connector. See example above in Github OAuth 2.0 Example for more information on how to setup Github SSO with Teleport.
If using Teleport Enterprise SSO with enterprise-grade identity providers (using SAML, OIDC and Active Directory),
kubernetes_groups are assigned to Teleport Roles as shown in the Teleport Enterprise RBAC
section.
You may also find it useful to read our Kubernetes guide which contains some more specific examples and instructions.
Multiple Kubernetes Clusters
You can take advantage of the Trusted Clusters feature of Teleport to federate trust across multiple Kubernetes clusters.
When multiple trusted clusters are present behind a Teleport proxy, the
kubeconfig generated by tsh login will contain the Kubernetes API endpoint
determined by the <cluster> argument to tsh login.
- There are three Teleport/Kubernetes clusters: "main", "east" and "west".
These are the names set in
cluster_namesetting in their configuration files. - The clusters "east" and "west" are trusted clusters for "main".
- Users always authenticate against "main" but use their certificates to access SSH nodes and Kubernetes API in all three clusters.
- The DNS name of the main proxy server is "main.example.com"
In this scenario, users usually login using this command:
# Using login without arguments
$ tsh --proxy=main.example.com login

# user's `kubeconfig` now contains one entry for the main Kubernetes
# endpoint, i.e. `proxy.example.com`.

# Receive a certificate for "east":
$ tsh --proxy=main.example.com login east

# user's `kubeconfig` now contains the entry for the "east" Kubernetes
# endpoint, i.e. `east.proxy.example.com`.
High Availability
!!! tip "Tip": Before continuing, please make sure to take a look at the Cluster State section in the Teleport Architecture documentation.
Usually there are two ways to achieve high availability. You can "outsource" this function to the infrastructure. For example, using a highly available network-based disk volumes (similar to AWS EBS) and by migrating a failed VM to a new host. In this scenario, there's nothing Teleport-specific to be done.
If high availability cannot be provided by the infrastructure (perhaps you're running Teleport on a bare metal cluster), you can still configure Teleport to run in a highly available fashion.
Auth Server HA
In order to run multiple instances of Teleport Auth Server, you must switch to a highly available secrets back-end first. Also, you must tell each node in a cluster that there is more than one auth server available. There are two ways to do this:
- Use a load balancer to create a single the auth API access point (AP) and
specify this AP in
auth_serverssection of Teleport configuration for all nodes in a cluster. This load balancer should do TCP level forwarding. - If a load balancer is not an option, you must specify each instance of an
auth server in
auth_serverssection of Teleport configuration.
IMPORTANT: with multiple instances of the auth servers running, special
attention needs to be paid to keeping their configuration identical. Settings
like cluster_name, tokens, storage, etc must be the same.
Teleport Proxy HA
The Teleport Proxy is stateless which makes running multiple instances trivial.
If using the default configuration, configure your load balancer to
forward ports 3023 and 3080 to the servers that run the Teleport proxy. If
you have configured your proxy to use non-default ports, you will need to
configure your load balancer to forward the ports you specified for
listen_addr and web_listen_addr in teleport.yaml. The load balancer for
web_listen_addr can terminate TLS with your own certificate that is valid
for your users, while the remaining ports should do TCP level forwarding, since
Teleport will handle its own SSL on top of that with its own certificates.
!!! tip "NOTE":
If you terminate TLS with your own certificate at a load balancer you'll need
to Teleport with --insecure
If your load balancer supports health checks, configure it to hit the
/webapi/ping endpoint on the proxy. This endpoint will reply 200 OK if the
proxy is running without problems.
!!! tip "NOTE":
As the new auth servers get added to the cluster and the old servers get decommissioned, nodes and proxies will refresh the list of available auth servers and store it in their local cache /var/lib/teleport/authservers.json. The values from the cache file will take precedence over the configuration
file.
We'll cover how to use etcd and DynamoDB storage back-ends to make Teleport
highly available below.
Using etcd
Teleport can use etcd as a storage backend to
achieve highly available deployments. You must take steps to protect access
to etcd in this configuration because that is where Teleport secrets like
keys and user records will be stored.
To configure Teleport for using etcd as a storage back-end:
- Make sure you are using etcd version 3.3 or newer.
- Install etcd and configure peer and client TLS authentication using the etcd security guide.
- Configure all Teleport Auth servers to use etcd in the "storage" section of the config file as shown below.
- Deploy several auth servers connected to etcd back-end.
- Deploy several proxy nodes that have
auth_serverspointed to list of auth servers to connect to.
teleport:
  storage:
     type: etcd

     # list of etcd peers to connect to:
     peers: ["https://172.17.0.1:4001", "https://172.17.0.2:4001"]

     # required path to TLS client certificate and key files to connect to etcd
     tls_cert_file: /var/lib/teleport/etcd-cert.pem
     tls_key_file: /var/lib/teleport/etcd-key.pem

     # optional file with trusted CA authority
     # file to authenticate etcd nodes
     tls_ca_file: /var/lib/teleport/etcd-ca.pem

     # etcd key (location) where teleport will be storing its state under:
     prefix: teleport

     # NOT RECOMMENDED: enables insecure etcd mode in which self-signed
     # certificate will be accepted
     insecure: false
Using Amazon S3
!!! tip "Tip": Before continuing, please make sure to take a look at the cluster state section in Teleport Architecture documentation.
!!! tip "AWS Authentication":
The configuration examples below contain AWS access keys and secret keys. They are optional,
they exist for your convenience but we DO NOT RECOMMEND using them in
production. If Teleport is running on an AWS instance it will automatically
use the instance IAM role. Teleport also will pick up AWS credentials from
the ~/.aws folder, just like the AWS CLI tool.
S3 buckets can only be used as a storage for the recorded sessions. S3 cannot store the audit log or the cluster state. Below is an example of how to configure a Teleport auth server to store the recorded sessions in an S3 bucket.
teleport:
  storage:
      # The region setting sets the default AWS region for all AWS services
      # Teleport may consume (DynamoDB, S3)
      region: us-west-1

      # Path to S3 bucket to store the recorded sessions in. The optional 'region'
      # parameter allows to override the region setting above, keeping S3 recordings
      # in a different region:
      audit_sessions_uri: s3://example.com/path/to/bucket?region=us-east-1

      # Authentication settings are optional (see below)
      access_key: BKZA3H2LOKJ1QJ3YF21A
      secret_key: Oc20333k293SKwzraT3ah3Rv1G3/97POQb3eGziSZ
The AWS authentication settings above can be omitted if the machine itself is running on an EC2 instance with an IAM role.
Using DynamoDB
!!! tip "Tip": Before continuing, please make sure to take a look at the cluster state section in Teleport Architecture documentation.
If you are running Teleport on AWS, you can use DynamoDB as a storage back-end to achieve high availability. DynamoDB back-end supports two types of Teleport data:
- Cluster state
- Audit log events
DynamoDB cannot store the recorded sessions. You are advised to use AWS S3 for that as shown above. To configure Teleport to use DynamoDB:
- Make sure you have AWS access key and a secret key which give you access to DynamoDB account. If you're using (as recommended) an IAM role for this, the policy with necessary permissions is listed below.
- Configure all Teleport Auth servers to use DynamoDB back-end in the "storage" section
of
teleport.yamlas shown below. - Deploy several auth servers connected to DynamoDB storage back-end.
- Deploy several proxy nodes.
- Make sure that all Teleport nodes have
auth_serversconfiguration setting populated with the auth servers.
teleport:
  storage:
    type: dynamodb
    region: eu-west-1

    # Name of the DynamoDB table. If it does not exist, Teleport will create it.
    table_name: teleport_table

    # Authentication settings are optional (see below)
    access_key: BKZA3H2LOKJ1QJ3YF21A
    secret_key: Oc20333k293SKwzraT3ah3Rv1G3/97POQb3eGziSZ

    # This setting configures Teleport to send the audit events to three places:
    # To keep a copy on a local filesystem, in DynamoDB and to Stdout.
    audit_events_uri:  ['file:///var/lib/teleport/audit/events', 'dynamodb://table_name', 'stdout://']

    # This setting configures Teleport to save the recorded sessions in an S3 bucket:
    audit_sessions_uri: 's3://example.com/teleport.events'
- Replace
regionandtable_namewith your own settings. Teleport will create the table automatically. - The AWS authentication setting above can be omitted if the machine itself is running on an EC2 instance with an IAM role.
- Audit log settings above are optional. If specified, Teleport will store the
audit log in DynamoDB and the session recordings must be stored in an S3
bucket, i.e. both
audit_xxxsettings must be present. If they are not set, Teleport will default to a local file system for the audit log, i.e./var/lib/teleport/logon an auth server. - If DynamoDB is used for the audit log, the logged events will be stored with a TTL of 1 year. Currently this TTL is not configurable.
!!! warning "Access to DynamoDB": Make sure that the IAM role assigned to Teleport is configured with the sufficient access to DynamoDB. Below is the example of the IAM policy you can use:
{
    "Version": "2012-10-17",
    "Statement": [
        {
            "Sid": "AllAPIActionsOnTeleportAuth",
            "Effect": "Allow",
            "Action": "dynamodb:*",
            "Resource": "arn:aws:dynamodb:eu-west-1:123456789012:table/prod.teleport.auth"
        },
        {
            "Sid": "AllAPIActionsOnTeleportStreams",
            "Effect": "Allow",
            "Action": "dynamodb:*",
            "Resource": "arn:aws:dynamodb:eu-west-1:123456789012:table/prod.teleport.auth/stream/*"
        }
    ]
}
Upgrading Teleport
Teleport is always a critical component of the infrastructure it runs on. This is why upgrading to a new version must be performed with caution.
Teleport is a much more capable system than a bare bones SSH server. While it offers significant benefits on a cluster level, it also adds some complexity to cluster upgrades. To ensure robust operation Teleport administrators must follow the upgrade rules listed below.
Production Releases
First of all, avoid running pre-releases (release candidates) in production environments. Teleport development team uses Semantic Versioning which makes it easy to tell if a specific version is recommended for production use.
Component Compatibility
When running multiple binaries of Teleport within a cluster (nodes, proxies, clients, etc), the following rules apply:
- Patch versions are always compatible, for example any 4.0.1 component will work with any 4.0.3 component.
- Other versions are always compatible with their previous release. This means you must not attempt to upgrade from 3.3 straight to 3.5. You must upgrade to 3.4 first.
- Teleport clients (
tshfor users andtctlfor admins) may not be compatible if older than the auth or the proxy server. They will print an error if there is an incompatibility. - While 4.0 is a major release. 3.2 can be upgraded to 4.0 using the same upgrade sequence below.
!!! warning "Upgrading to Teleport 4.0+":
Teleport 4.0+ switched to GRPC and HTTP/2 as an API protocol. The HTTP/2 spec bans
two previously recommended ciphers. tls-rsa-with-aes-128-gcm-sha256 & tls-rsa-with-aes-256-gcm-sha384, make sure these are removed from teleport.yaml
Visit our community for more details
Upgrade Sequence
When upgrading a single Teleport cluster:
- Upgrade the auth server first. The auth server keeps the cluster state and if there are data format changes introduced in the new version this will perform necessary migrations.
- Then, upgrade the proxy servers. The proxy servers are stateless and can be upgraded in any sequence or at the same time.
- Finally, upgrade the SSH nodes in any sequence or at the same time.
!!! warning "Warning": If several auth servers are running in HA configuration (for example, in AWS auto-scaling group) you have to shrink the group to just one auth server prior to performing an upgrade. While Teleport will attempt to perform any necessary migrations, we recommend users create a backup of their backend before upgrading the Auth Server, as a precaution. This allows for a safe rollback in case the migration itself fails.
When upgrading multiple clusters:
- First, upgrade the main cluster, i.e. the one which other clusters trust.
- Upgrade the trusted clusters.
Daemon Restarts
As covered in the Graceful Restarts section, Teleport supports graceful restarts. To upgrade a host to a newer Teleport version, an administrator must:
- Replace the Teleport binaries, usually
teleportandtctl - Execute
systemctl restart teleport
This will perform a graceful restart, i.e. the Teleport daemon will fork a new process to handle new incoming requests, leaving the old daemon process running until existing clients disconnect.
License File
Commercial Teleport subscriptions require a valid license. The license file can be downloaded from the Teleport Customer Portal.
The Teleport license file contains a X.509 certificate and the corresponding
private key in PEM format. Place the downloaded file on Auth servers and set
the license_file configuration parameter of your teleport.yaml to point to
the file location:
auth_service:
    license_file: /var/lib/teleport/license.pem
The license_file path can be either absolute or relative to the configured
data_dir. If license file path is not set, Teleport will look for the
license.pem file in the configured data_dir.
!!! tip "NOTE": Only Auth servers require the license. Proxies and Nodes that do not also have Auth role enabled do not need the license.
Troubleshooting
To diagnose problems you can configure teleport to run with verbose logging enabled
by passing it -d flag.
!!! tip "NOTE": It is not recommended to run Teleport in production with verbose logging as it generates a substantial amount of data.
Sometimes you may want to reset teleport to a clean state. This can be accomplished
by erasing everything under "data_dir" directory. Assuming the default location,
rm -rf /var/lib/teleport/* will do.
Teleport also supports HTTP endpoints for monitoring purposes. They are disabled by default, but you can enable them:
$ teleport start --diag-addr=127.0.0.1:3000
Now you can see the monitoring information by visiting several endpoints:
http://127.0.0.1:3000/metricsis the list of internal metrics Teleport is tracking. It is compatible with Prometheus collectors.http://127.0.0.1:3000/healthzreturns "OK" if the process is healthy or503otherwise.http://127.0.0.1:3000/readyzis similar to/healthz, but it returns "OK" only after the node successfully joined the cluster, i.e. it draws the difference between "healthy" and "ready".http://127.0.0.1:3000/debug/pprof/is Golang's standard profiler. It's only available when-dflag is given in addition to--diag-addr
Getting Help
Please open an issue on Github. Alternatively, you can reach through the contact form on our website.
For commercial support, custom features or to try our commercial edition, Teleport Enterprise,
please reach out to us: sales@gravitational.com.